User Authentication: Administration Console -- Custom Text
- Product: 360 Core Client Center
How do I configure custom text in the User Authentication Administration Console?
This page is part of a larger set of documentation about using the Administration Console to configure your User Authentication service.
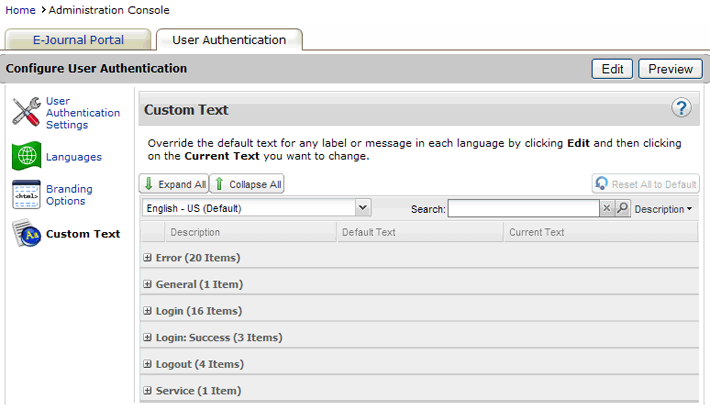
The Custom Text page in the Administration Console allows you to override the default text for any label or message element on the User Authentication pages in each language you choose to include. Please consider these default entries carefully and wherever necessary override them with custom text that will best serve your library's patrons.
This option is primarily for libraries using ILS-based or username/password authentication; because these are the only two cases in which Serials Solutions offers a login page. (The other credential-based options are offered pages by the authentication service.) However, error messages could appear when the service is used with a different method of user authentication (such as IP address); therefore, you may want to localize, brand, and customize the interface. At this time, the only error page that can be checked in Preview mode (when not using ILS-based or username/password authentication) is the Single Sign-On Error page; later in 2011, the Access Denied error page will also be available for preview.
Here is the initial view of the Administration Console's Custom Text page:

There are four major elements on this page:
- The dropdown menu allows you to change languages, as selected on the Languages page, because you can customize the text in each language available to patrons;
- The Description of each label or message indicates where it is found in the patron interface, or what is its purpose;
- The Default Text is the text Serials Solutions has chosen for each label or message; and
- The Current Text is your custom text for each label or message.
When you are ready to start editing your Custom Text, first choose the language you wish to edit from the dropdown menu, then click Edit in the upper-right corner of the page. Double-click on any current value you want to change, type in the new label or message, then either double-click another current value (to change that) or click Save. See below for an example of how this works.
If you want to replace any current value with the original default value, then highlight the current value and click Use Default. If you want to change every current value with its respective default value, click Reset All to Default.
You may make changes to any or all of the current values in a single editing session. After you make your changes, click Save, or click Cancel to discard your changes. If you have more than one language selected for the User Authentication interface, it is best to make all the changes in a particular language and save the changes before moving to the next language.
Changes to the Custom Text of your User Authentication interface will not be visible to patrons until the next day; to see how your changes will look without having to wait, click Preview.
Example: Change Text for "Login" Button
The Login button appears on the User Authentication screen. For this example, we're going to change the text on the button from "Login" to "Enter":
- Click Edit in the upper-right corner of the page.
- Expand the Login section by clicking the plus symbol + on the left side.You can click Expand All if you are unsure where the text string you want to change is located.
- Select the "Login" entry by double-clicking on the words in the Current Text column:

- The box will open for you to edit. Type in "Enter" and then click Save.
- Note that a small red triangle appears in the cell you edited to indicate that this current value has been changed:

- If you need to reset the text back to the default "Login," click Use Default at the top of the section.
- Date Created: 9-Feb-2014
- Last Edited Date: 21-Feb-2014
- Old Article Number: 8947

