
360 Resource Manager: Migrating Costs Between Databases
- Product: 360 Resource Manager
How do we migrate cost data when a database moves to a new provider, or titles move to a new database?
When we make changes to existing databases and titles in the 360 KB knowledgebase (as announced in our monthly Summary of Provider and Database Changes), there are sometimes actions you'll need to take to migrate resource information stored with 360 Resource Manager.
If you have costs attached to the old databases or titles, you have two options for actions to take:
- Most libraries choose to leave the costs associated with the old databases and titles and change the status of those databases and titles to Under Review, Archived, or another appropriate custom status of your choice. Do not change the status to Not Tracked, or you will lose all cost information. If you choose this option instead of the next option, remember to uncheck the Display In boxes for each of your public-facing services.
- Or you can migrate the costs from the old to new databases and titles, using the procedures below:
Migrating Database-Level Cost Data from One Database to Another
- In the Client Center's Management Reports, run the Cost Report - Details.
- Open the Cost Report - Details spreadsheet in Excel or a similar spreadsheet program.
- The Report contains all cost entries you have added to resources; remove the rows for resources not associated with this change.
- In the rows that remain, change the contents of the Database Code field to the Database Code for the new database (as shown in the announcement about the 360 KB change).
- Remove the entries in the Payment ID field (so the system will add them as new payments).
- Use the Cost Data Upload tool to upload the changed Cost Report - Details.
You now have the same payments associated with two different databases (and, possibly, two different providers). You may wish to delete the costs associated with the old database:
- In the Client Center Data Management system, click the Database name to see the Database Details page.
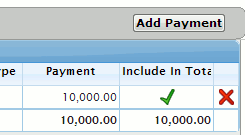
- On the left side, click open the Cost link. You'll see all the years with costs added, and the Database Payments.
- Click the appropriate Database Payments link, to see all the payments for the database for that year.
- Click the red X on the right side of the payments you want to delete:
Migrating Title-Level Cost Data from One Database to Another
The below process is effective when you have many title-level costs you want to move. If you have a small number of costs to move, you may find it easier to manually add the costs to the titles in the new database.
- In the Client Center's Management Reports, run the Cost Report - Details report.
- Once the report has been generated and made available for download, open the report in Microsoft Excel or a similar spreadsheet program.
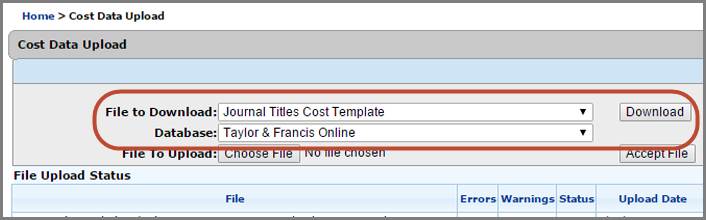
- Since the Cost Report - Details report only includes the old database, you also need to work with the Journal Titles Cost Template since it contains the holdings in the new database. To access the Journal Titles Cost Template report:
- Click Cost Data Upload on the Client Center home page and then select Journal Titles Cost Template from the File To Download drop-down menu.
- For the Database drop-down menu, select the resource to which you are transferring costs (in the example below we use Taylor & Francis Online), and click Download.
- The system will generate a CSV file which you can open in Excel or another spreadsheet editor.
- Prepare the Journal Titles Cost Template so that cost information can be transferred to it. Do this by adding rows to the spreadsheet so that a title with costs in the Cost Report - Details spreadsheet has the same number of rows in the Journal Titles Cost Template. For example:
- This sample Cost Report - Details report shows four lines of cost details for the title Fetal & Pediatric Pathology:

- In the Journal Titles Cost Template, Fetal & Pediatric Pathology has only 1 row, so 3 additional rows are needed:
- Insert 3 blank rows:

- Copy the title information from Cost Details - Report into the blank rows in the Journal Titles Cost Template:

- Now copy and paste the cost information for the title. Cost information in the Cost Report - Details spreadsheet should be in column M (Fiscal Year) through column AS (Fund Amount).
- Using the Fetal & Pediatric Pathology example, you would select the data in columns M through AS for the 4 rows of Fetal & Pediatric Pathology, and paste the data into columns L (Fiscal Year) through AR (Fund Amount) in the Journal Titles Cost Template.
- Delete the data in the Payment ID column in the Journal Titles Cost Template. Payment IDs are specific to the title in a particular database, so this step is needed to remove the Payment IDs associated with the old database.
- Once you have completed Steps 4 - 6 for all titles that have cost data you want transferred to the new database, delete all rows that do not contain cost data (except for the header in Row 1). This step is needed because the file upload process requires that every row have cost data.
- Save the Journal Titles Cost Template as a .csv file (the same comma-separated file type as when you initially opened the template), or you can also save the template as a .txt file (text file).
- To upload the Journal Titles Cost Template, return to the Cost Data Upload page (Client Center homepage provides a link to it).
- Click Choose File and locate the file you saved in Step 7.
- Click the Accept File button.

- You will be prompted to enter Yes or No for using itemized totals as effective costs.
- In this situation you typically want to select Yes so that 360 Counter will calculate the cost of the database based on the sum of payments entered at the title level for a given fiscal year. If you select No, 360 Counter will calculate the database cost based on the sum of payments entered at the database level for a given fiscal year.
- If the upload status says Failure, see the Check the Upload Status section of Cost Data Upload.
Now you can check the resource you were transferring cost data to, and verify that the cost data is present.
If you wish to delete the costs associated with the titles in the old database:
You can delete the payments one by one from each title or you can use the same Cost Data Upload system you used above. To accomplish this task you will only use the Cost Report - Details report (you will not need to use the Journal Titles Cost Template):
- Download the Cost Report - Details report, as you did in Step 1 above.
- Change the costs in the report to zeros and save the file as a .csv or .txt.
- Upload the Cost Report - Details file:
- On the Cost Data Upload page, click Choose File and locate the file you saved.
- Click the Accept File button.
- You will be prompted to enter Yes or No for using itemized totals as effective costs.
- In this situation Yes or No does not matter since it is the old database that you will no longer be using to track costs.
- Click Upload and a popup window will confirm that the upload process has begun.
- When the upload has finished, the file will display in the File Upload Status section of the page. Typically the process is quick (a few minutes maximum). Note that while you are on the Cost Data Upload page, the page will not refresh without clicking the Refresh Status button on the right side.
- Date Created: 9-Feb-2014
- Last Edited Date: 7-Oct-2015
- Old Article Number: 7383