
Configuring Persistent Handle Identifiers for Digital Resources
Handle identifiers are used to create unique persistent identifiers for digital resources. These identifiers can be used to create URLs to access the resource without concern that the location of the resource may change. Handle identifiers are structured by a prefix issued by the Handle.net registry for the owning institution for all of their handles and a suffix that uniquely identify the handle under the relevant prefix separated by a slash (/), so that the format is prefix / suffix. The handles and their persistent URLs are registered on a dedicated handle server on the Ex Libris cloud. The Handle.Net global registry maintains the links between the owning institution's prefix and the Ex Libirs hosted handle server to resolve any incoming requests for the location of the resource.
This page describes the procedure for creating handle identifiers for digital objects.
Creating handle identifiers consists of the following steps:
- Fulfill the prerequisites
- Configure control numbers
- Configure a handle integration profile
- Run the profile
Prerequisites
You must fulfill the following prerequisites before following the procedure on this page:
- Contact Handle.Net and register your institution. You receive a prefix to be used for your handle IDs that is unique to your institution.
- Open a support case with Ex Libris and request that your institution's prefix be added to the Ex Libris hosted handle server. You receive a file to be sent to Handle.Net with information about the server.
Configuring Control Numbers
To create Handle identifiers you must configure control numbers. The Handle identifier consists of the control number generated sequence together with the prefix number you receive from Handle.Net. You configure control numbers from Configuration > Resources > Control Number.
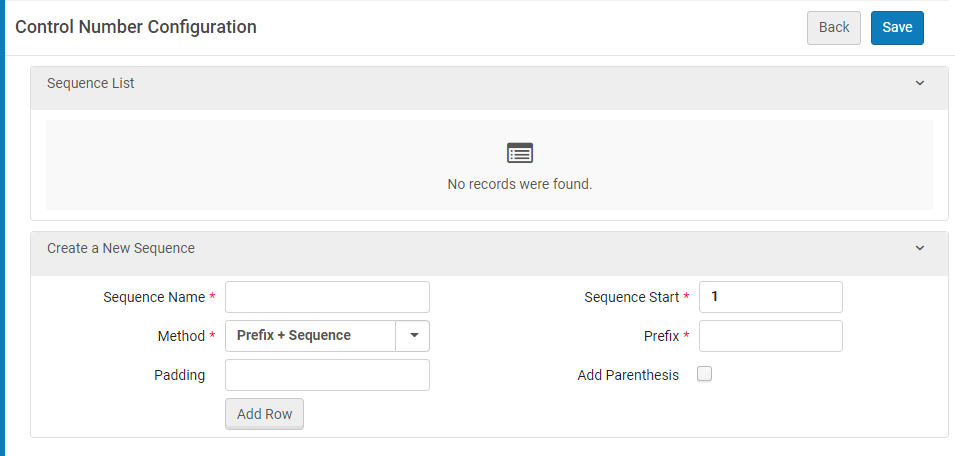
Fill in the fields as described in Configuring Automatic Sequencing Numbers for Bibliographic and Authority Records. Keep in mind the following requirements:
- In the Prefix field, enter the prefix supplied by Handle.Net.
- Following the prefix you must enter a slash (/). Additional characters can be added after the slash.
- Do not select Add Parenthesis.
Configuring a Handle Integration Profile
To create Handle identifiers you must configure a Handle integration profile.
- Select Configuration > General > External Systems > Integration Profiles.
The following appears:
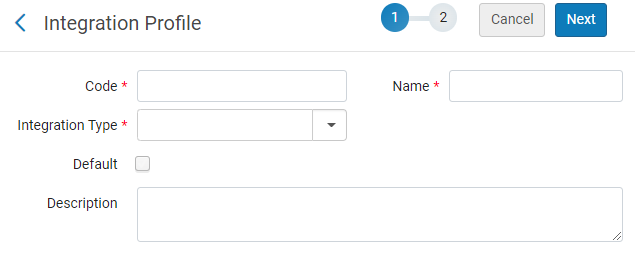 Add Integration Profile
 - Enter a code and name for the integration profile.
- From the Integration Type drop-down list, select Handle. Select Next. The following page appears:
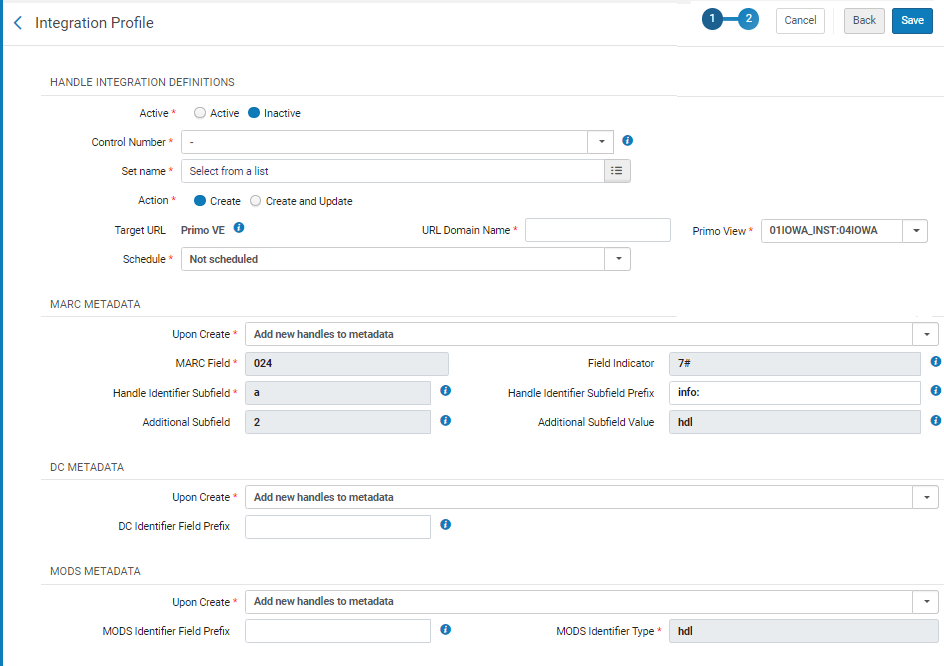 Integration Profile
 - Fill in the fields of this page according to the following table and select Save:
Handle Integration Profile Field Description Handle Integration Definitions Active Select Active to mark the profile as available to be run. Control Number Select the control number configured in the previous step. Set name Select a set of digital titles on which to run the profile and insert a Handle ID. Action Select: - Create – create new handles when none exist and skip records that already have a handle
- Create and Update – create new handles when none exist and also update the handle server with existing handles (for example when migrating existing handles)
Target URL The target URL of each handle points to the Primo VE record page of the relevant title. The URL format is: https:// /discovery/fulldisplay/alma / using the values of the URL Domain Name and Primo View fields. URL Domain Name The institutions Primo VE domain name to be used to create the Handle URL Primo View Select a Primo View to use in the URL. Schedule Select a scheduling option for when you would like the profile to run. MARC METADATA Upon Create For MARC records, select one of the following options: - Add new Handles to Metadata – add the new Handles to the record's metadata
- Add new and updated Handles to Metadata – add the new Handles to the record's metadata and also add any existing Handles to the record's metadata
- Do not add to metadata – do not add any Handles to the record's metadata
MARC Field The MARC field in which to put the handle ID. This is fixed to 024. Field Indicator The field indicator in which to put the handle ID. This is fixed to 7#. Handle Identifier Subfield The subfield in which to put the handle ID. This is fixed to a. Handle Identifier Subfield Prefix The prefix of the Handle ID in the record (optional). Additional Subfield The additional subfield in which to put the Additional Subfield Value. This is fixed to 2. Additional Subfield Value The value to put in the additional subfield. This is fixed to hdl. DC METADATA Upon Create For DC records, select one of the following options: - Add new Handles to Metadata – add the new Handles to the record's metadata
- Add new and updated Handles to Metadata – add the new Handles to the record's metadata and also add any existing Handles to the record's metadata
- Do not add to metadata – do not add any Handles to the record's metadata
DC Identifier Field Prefix The prefix of the Handle ID in the record to be added to the DC Identifier field. (Optional). MODS METADATA Upon Create For MODS records, select one of the following options: - Add new Handles to Metadata – add the new Handles to the record's metadata
- Add new and updated Handles to Metadata – add the new Handles to the record's metadata and also add any existing Handles to the record's metadata
- Do not add to metadata – do not add any Handles to the record's metadata
MODS Identifier Field Prefix The prefix of the Handle ID in the record to be added to the MODS Identifier field. (Optional). MODS Identifier Type The type attribute of the MODS identifier. This is fixed to hdl.
Running the Integration Profile
After you have configured an integration profile, it appears in the list of integration profiles. From the row actions of the profile, select Edit and select the Actions tab:
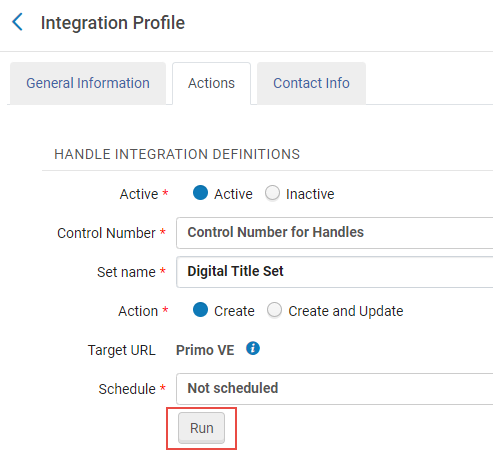
Select Run to manually run the profile and add Handle identifiers to the set of digital titles that you indicated. After the profile runs, it is possible to access the handle identifier's target URL by building a URL in the following format: https://hdl.handle.net/{handle_identifier}.