
Working with Support Center Case List Views
In this article, we will cover some best practices regarding using case list views in the ProQuest and Ex Libris support center (https://support.proquest.com).
Getting Started
After logging into the support center, go to the Manage Cases tab.
Tip! Watch a 4 minute overview here: https://www.youtube.com/watch?v=BYhpPa6yiK8
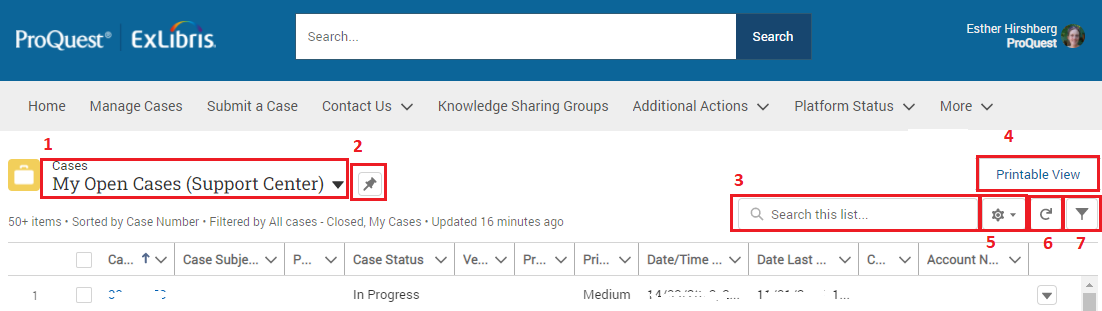
- The name of the list you are viewing is displayed above the case list.
- Click the name to open the list of available options.
- Start typing to search for a specific list
- The default list is 'Recently Viewed'. Use the pin to select a different default.
If this is the first time you are visiting the support center, 'Recently Viewed' will show no cases.
The default view is stored in your browser cache, it will reset to 'Recently Viewed' when you clear your cache.
- Use the 'Search this list' option to search for relevant results within the list you are viewing
- Clicking 'Printable View' will open a new tab with the cases you are viewing. This table can be copied and pasted into Excel or printed using your browser print options.
There is a Salesforce limit of 1,000 records when using 'Printable View'. If you need to print more than 1,000, split it into several lists (by date created, for example)
- Click the gear icon to see your list view control options
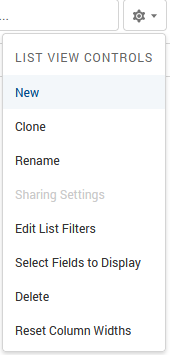
- New - create a new list
- Clone - clone the current list for further customization
- Rename - rename the list
- Edit List Filters - open the filters tab and modify them
- Select Fields to Display - opens a window where you can select the fields that will show in the list columns
- Delete - if you would like to delete this list
- Reset Colum Width - if you customized the width of the columns, this will reset them to the default width
The Rename, Edit List Filters, Select Fields to Display and Delete options are only displayed for lists you created.
These settings cannot be customized for lists provided by ProQuest and Ex Libris.
- Refresh the list you are viewing by clicking the refresh icon
- Click the filter icon to view the filters applied on the list you are viewing. For your personal lists, you can also use this panel to modify the filters.
Tip! The filters will only apply after saving your changes. You can also 'Save As' if you do not want to override the current list.
This option is not available for the 'Recently Viewed' list.
For the lists provided by ProQuest and Ex Libris, the filters will be locked. Clone the view to customize the filters.
Working with Filters
The easiest way to customize a list is to start by cloning a list provided by ProQuest and Ex Libris.
You can add filters to drill down into specific products or case statuses.
Key filters:
- Filter by Owner should always be set to 'All Cases'.
- My Cases - cases that you opened. Set it to 'True' to see your cases.
- My Institution Cases - cases opened by you or by other colleagues in your institution. Set it to 'True' to see your institution's cases.
- Product/Service Name - use this field to filter by the case product.
- Platform / Service - will allow you to differentiate between Ex Libris and ProQuest cases.
- Case Status - reflects the case handling status. See a full list of available case statuses What is Case Status, and What Does It Mean?
- Open - indicates that the case is not open, i.e. not in statuses 'Awaiting Customer Confirmation' or 'Closed'.
- Article last edited: 12-Apr-2022