
Intota: Vendor Statistics Management
- Product: Intota
How do we provide our login details for harvesting statistics from providers, and also tell ProQuest which COUNTER-compliant reports we want collected?
The Vendor Statistics Management page is where you provide your login details for harvesting statistics from providers, and it also where you tell ProQuest which COUNTER-compliant reports you want harvested via the SUSHI protocol and via our DRS (Data Retrieval Service) administration-based harvesting. The page also provides an area to manage your login details for those providers who are not COUNTER-compliant.
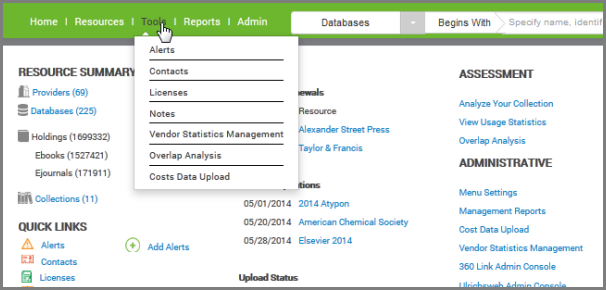
AccessVendor Statistics Management by clicking Tools on the menu bar and then selecting Vendor Statistics Management in the submenu:
You can also use the Administrative section of your Intota home page to access Vendor Statistics Management.
The top section of the Vendor Statistics Management page (Manage Data Retrieval) is where you manage your information regarding COUNTER-compliant providers and the bottom section of the page (Additional Statistics Metadata) is where you manage your information regarding non-compliant providers.
Click on a link to go to the appropriate section of the document:
-
Manage Data Retrieval (COUNTER-compliant providers)
-
Additional Statistics Metadata (non-compliant providers)
Manage Data Retrieval
To inform ProQuest which usage reports you'd like us to collect from each provider with the Data Retrieval Service (DRS), you will need to fill out the Automatic (SUSHI) Data Retrieval Configuration form or the Manual Data Retrieval Configuration form with information about the providers, including access information (URL, credentials) and the reports you would like us to retrieve. This is typically done through the pop-up screens in the Manage Data Retrieval section of Vendor Statistics Metadata seen below (commonly referred to as the DRS Request Form). You can alternately use the DRS export/upload tool and enter information about the providers on a spreadsheet, although most libraries will probably prefer to use the method described here because it is more intuitive.
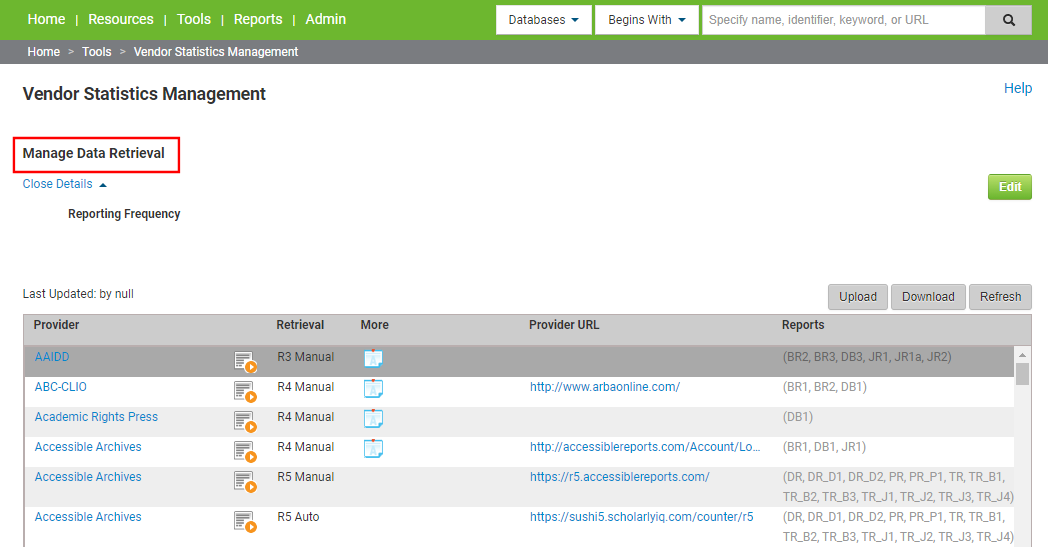
To begin using the Manage Data Retrieval area, click the name of the provider you want to work on. You will see a pop-up screen with the provider information. The pop-up screen will be different depending on whether this is where you enter SUSHI-Protocol retrieval information for that provider or DRS Administration-based retrieval information:
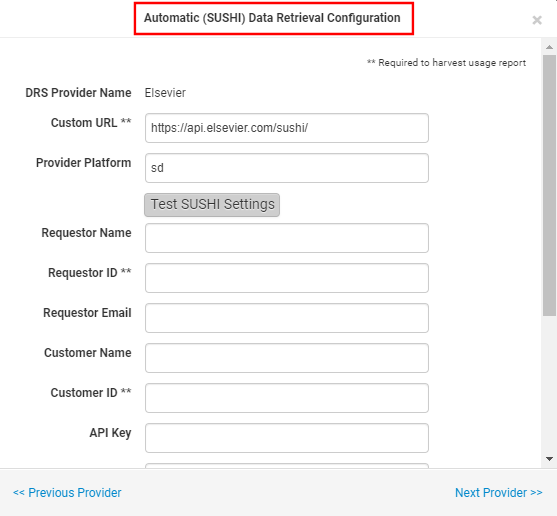
A typical SUSHI-protocol pop-up screen looks like this:
A typical Manual pop-up screen looks like this:
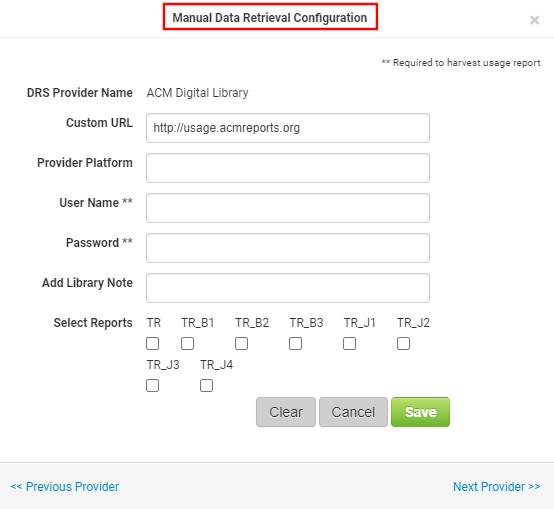
The fields that are available for information depend on the provider, but will include some of the following:
| Field Name | Definition |
|---|---|
|
DRS Provider Name |
The provider name from the Knowledgebase. |
|
Provider Platform |
Several publishers (such as Elsevier, de Gruyter, Edward Elgar, and JISC) require the platform parameter for SUSHI r5 harvesting requests. |
|
Custom URL |
If we haven't already entered a default URL here, you'll need to get a custom URL from the provider that is specific to your library. |
|
Test SUSHI Settings |
You will use this button to test the SUSHI credentials when you are done entering them here. |
|
Requestor ID |
Get this from the provider. |
|
Requestor Name and Requestor Email |
You can enter the name and email of the person in your library making the request. |
|
Customer ID and Customer Name |
Specific to your library; get these from the provider. |
|
User Name and Password |
specific to your library; get these from the provider (except see Proxy URL below). |
|
Proxy URL |
For very few providers, we will need to proxy into your library's system to retrieve files from the provider. (The Admin Note on the Data Retrieval Configuration form will indicate if this is one of those providers.) Provide your proxy URL here, and enter a proxy access UserName and Password instead of a provider UserName and Password in the preceding fields. |
|
Added Vendor's Statistics URL to Proxy Configuration File [checkbox] |
If this checkbox appears, you must add the provider's (vendor's) URL to your library's proxy configuration file so that we can access that URL when we proxy in through your system. When you have done that, check this box. |
|
Yes, I was able to [add] ProQuest's IP address to my vendor account. [checkbox] |
If this checkbox appears, then you must inform your provider of the ProQuest IP addresses so that our DRS system can access your usage reports. Contact us with the Support Portal option and we will let you know our IP addresses. Once you have entered the ProQuest IP addresses into your provider's administration account, check this box. |
|
Add Library Note |
This is the Library Note that displays on the Vendor Statistics Metadata page as an L icon in the More column. It is a message that you and others in your library can create to give us any special instructions. You can enter a maximum of 2000 characters. |
|
Select Reports |
Check boxes will appear under each report-type available from this provider. Select the ones you want us to retrieve. |
|
Admin Notes |
These are ProQuest-provided notes about a specific situation with the provider. These also display on the Vendor Statistics Metadata page as an A icon in the More column. |
Some fields are required ... they must be filled out before we can retrieve usage reports from the provider for you. Those fields are marked in with an asterisk on the pop-up screen. The other fields -- not in bold text -- are not required, but can be used by you to track information about the provider. The system will allow you continue working even if you have not filled out all the required fields, but the DRS will not be able to retrieve usage reports until you go back and finish entering all the required fields.
If this is a SUSHI provider, once you have entered the required fields, you should Test SUSHI Settings.
When you are done, select Save at the bottom of the pop-up window. A few notes about other buttons and links at the bottom of the screen:
-
Previous Provider: Opens the pop-up screen for the provider above the current one (on the list of providers) without saving the current information.
-
Next Provider: Saves the information you have entered for the current provider and then opens the information for the provider below the current one (on the list of providers).
-
Cancel: Does not save the information you have entered for the current provider, but just returns you to the Vendor Statistics Management page.
-
Clear: Removes any data you have entered on the form.
Additional Statistics Metadata
You can use this area of Vendor Statistics Management to manage your login details for providers who are not COUNTER-compliant and therefore not available in the above Manage Data Retrieval section.
When you click on the View Details link, you will see any vendor information that your library has added. Note that if your library was previously using Vendor Statistics Metadata in the Client Center to manage login details for providers who are not COUNTER-compliant, that information will display here in Intota.
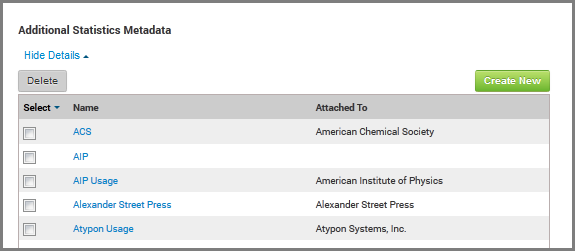
Select the Name to display details. The Attached To column displays which resources you have associated with the vendor. Use the Create New button on the right side to add a new record.
When you click on a Name to display details, only those fields of information that are populated will display; click Edit to view all available fields. For descriptions of any of the fields, view the Additional Statistics Metadata section of Intota's resource management glossary. Use the Related Resources section to attach provider(s) to your record. This is done by clicking the Add Resources link which will provide a search box to query our knowledgebase for the provider.
- Date Created: 1-Jun-2014
- Last Edited Date: 30-Nov-2020
- Old Article Number: 10826