
Setting Up Syndetics Unbound in Primo
Introduction
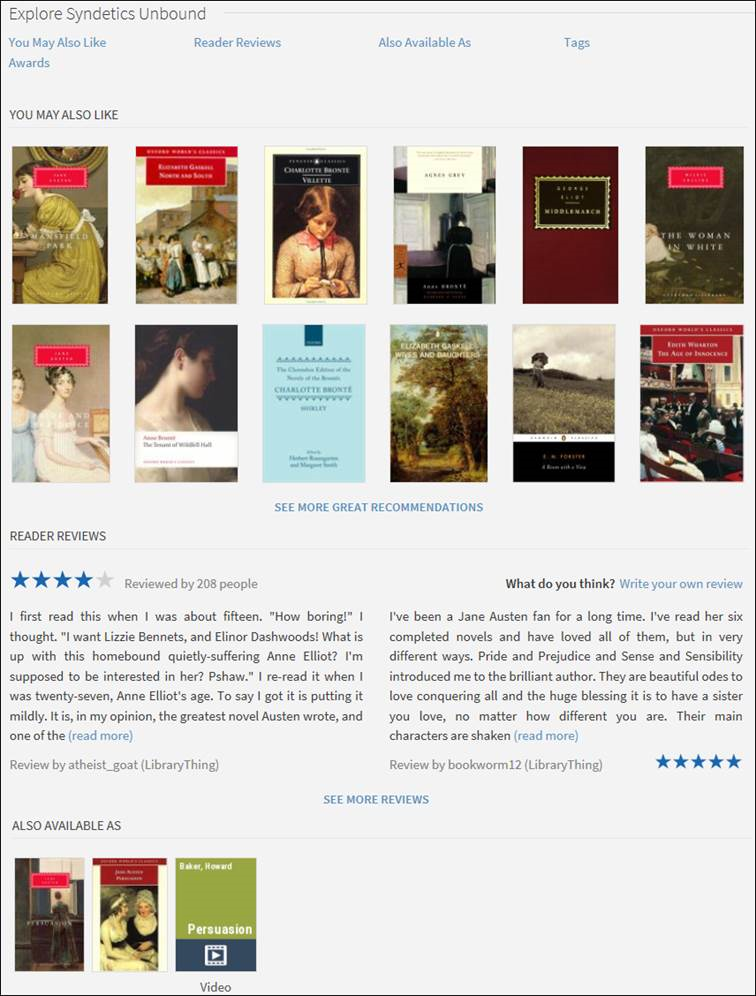
Syndetics Unbound can seamlessly add enriched item information and interactive exploration to your Primo experience. Backed by comprehensive data from ProQuest and LibraryThing, the Syndetics Unbound integration in Primo enables users to better evaluate available resources and creates new pathways for content discovery.
Syndetics Unbound includes over a dozen enrichment elements, a full featured administration system, and Book Display Widgets that you can use to promote titles from collections on any website.
For more details about the full capabilities of Syndetics Unbound, we encourage you to visit the following:
-
Knowledge Article - Syndetics resources can be included into Primo in three different use cases
-
A subscription to Syndetics Unbound is required for integration with Primo/Primo VE. For information about subscription pricing, contact Doug McMillan, VP Global Sales.
-
Primo VE does not support Syndetics Classic.
Initial Setup of Syndetics Unbound
After you subscribe to the service, you will receive a welcome email that contains a username for the lead administrator's account and an activation link.
-
Select the activation link in the welcome email and create a password for your account.
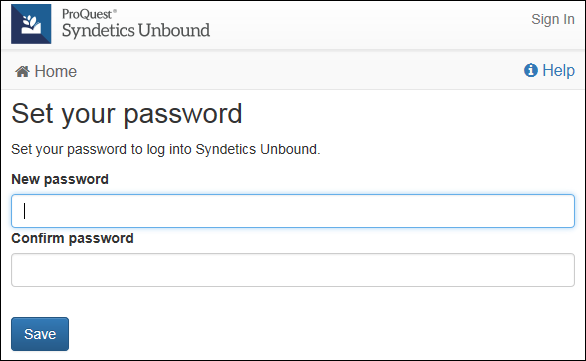 Set New Password
 -
Sign in to Syndetics Unbound.
You can also sign in to your account by entering the following URL in a browser and then selecting the Admin button at the top of the page: https://proquest.syndetics.com/
-
Perform each of the following tasks by selecting the associated link in the Install Checklist.
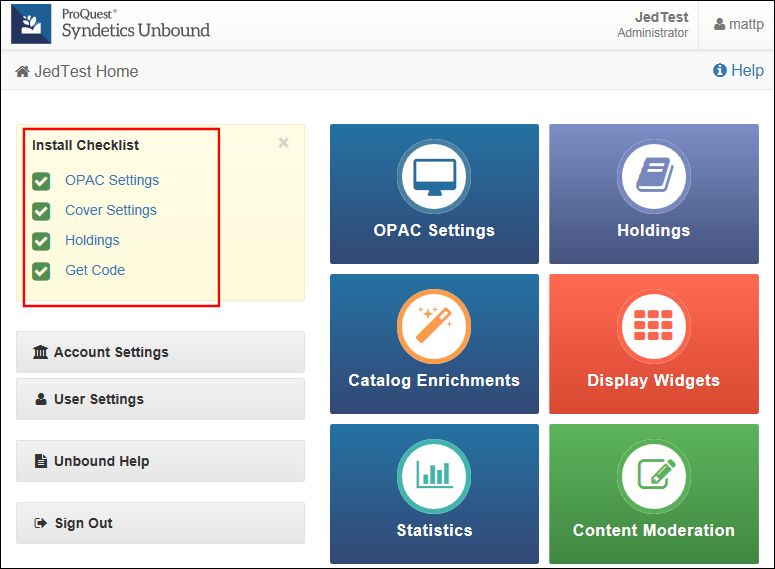 Install Checklist
-
OPAC Settings – To link content from Syndetics Unbound with items in your catalog, Syndetics Unbound requires URLs that query items in your Primo view. Syndetics Unbound tries an ISBN search first. If no results are returned, it attempts a keyword search, followed by a title search if needed. Use the following formats for the ISBN URL, Keyword URL, and Title URL fields, where UNBOUNDREPLACE is a placeholder for the search query text (such as the ISBN, keyword, or title):
-
For Primo:
https://<my_primo_domain>/primo-explore/search?query=any,contains,UNBOUNDREPLACE&tab=<tab>&search_scope=<scope>&vid=<view_id>&lang=<lang>&offset=0
-
For Primo VE:
https://<my_primo_ve_domain>/discovery/search?query=any,contains,UNBOUNDREPLACE&tab=<tab>&search_scope=<scope>&vid=<inst_id>:<view_id>&lang=<lang>&offset=0
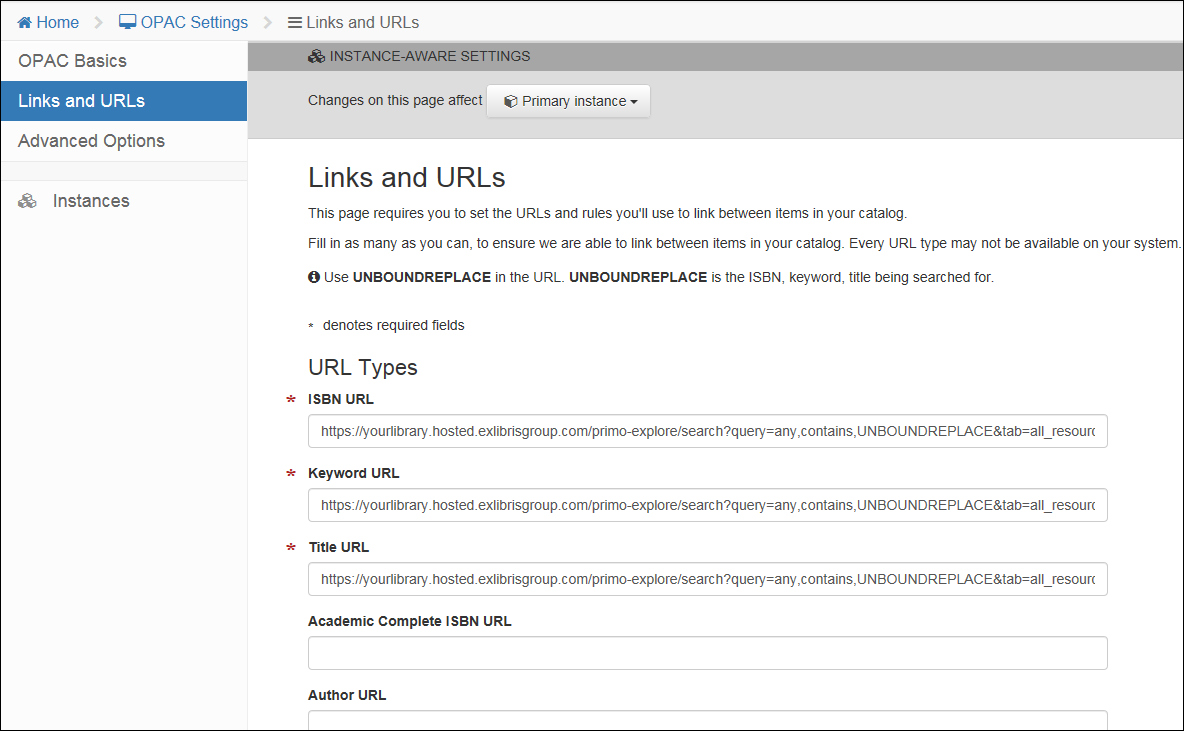 Configure Links and URLs
 -
-
Cover Settings – You can skip this task since it is handled automatically in Primo.
-
Holdings – Syndetics Unbound needs to know your holdings so that it can link to your library and recommend items that are in your catalog. You can send your holdings either as full MARC or as a tab-delimited file (TSV) using either the Web (select Upload Holdings via Web) or FTP (select Upload Holdings via FTP) method. For more details on uploading holdings, see Syndetics Unbound Get Started Guide.
After you have selected your upload method, specify the following fields:
-
File format – Specify the format of the records (such as MARC 21 for the Web method). For the FTP method, ensure that file formats are compatible in both Syndetics (such as MARCXML (ZIP compressed)) and Alma (such as XML compressed).
-
Action – Specify whether you want to replace all records or just add additional records. If you are updating your records incrementally, select Add additional records.
-
Character encoding – Specify the type of character encoding used.
-
Call Number Type (Web upload only) – Specify your call number type.
-
Completion alert email – Specify your email address so that you can receive notifications regarding your uploads.
For the Web upload method, click Add files and then include all files that you want to upload. If a file exceeds 100 MB, you must use the FTP method to upload it.
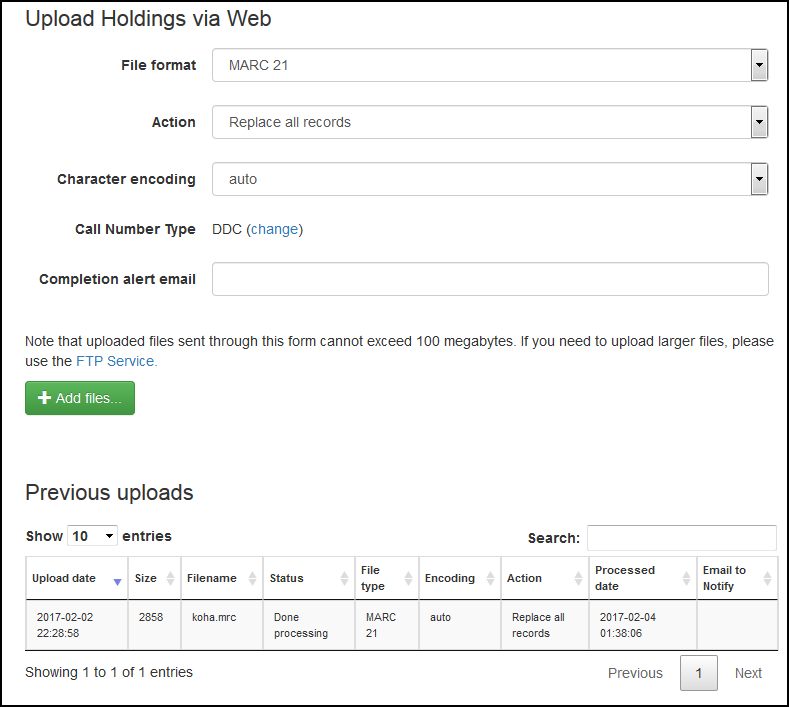 Upload Holdings via Web
For the FTP upload method, configure the FTP connection in Alma. For more information, see Configuring the FTP Connection in Alma.
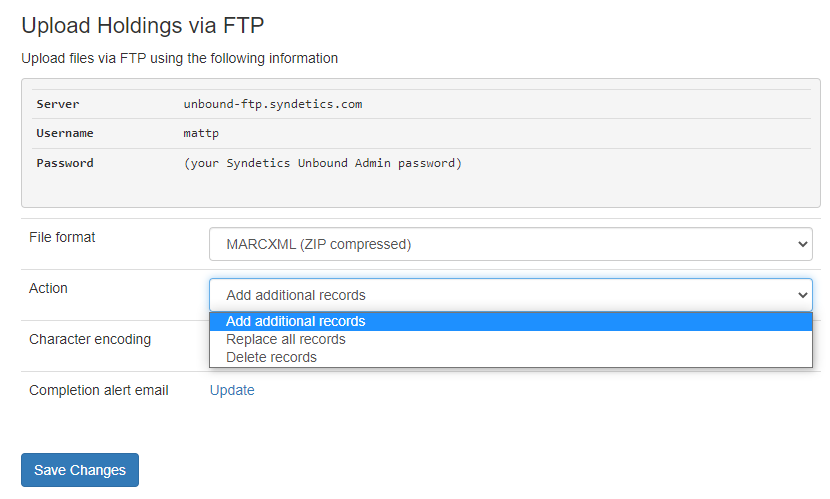 Upload Holdings via FTP
 -
-
Get Code – Retrieves the necessary information to enable Syndetics Unbound in Primo.
-
Write down the account number. You need this number later to enable Syndetics Unbound in Primo (see Enable Syndetics Unbound in Primo) or Primo VE (see Enabling Syndetics Unbound in Primo VE).
 Get Account Code for Later
 -
Copy the text that appears in the HTML to Paste Into Your OPAC field, paste it into a basic html file called unbound.html, and then save your changes to the file. This file is now ready to be uploaded and used in Primo (see Enabling Syndetics Unbound in the Classic UI).
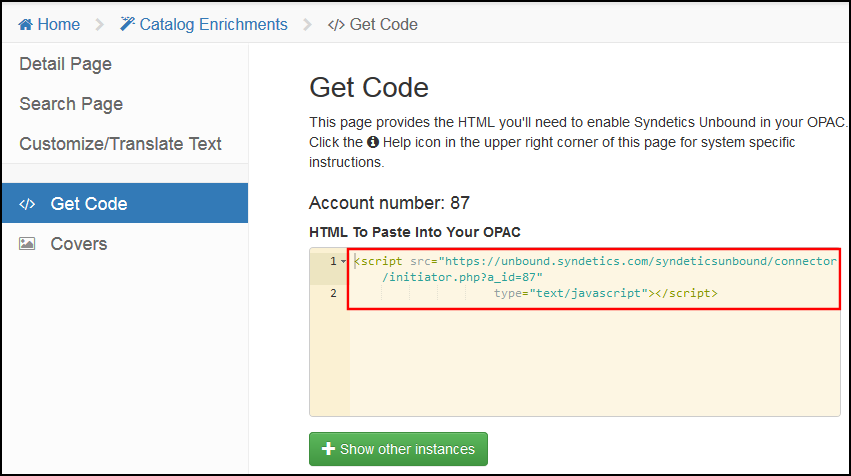 Get HTML Text and Create HTML File
-
-
To perform additional configurations for Syndetics Unbound, see Additional Configurations in Syndetics Unbound.
Integrating Alma Holdings with Syndetics Unbound
Syndetics Unbound needs to know your holdings so that it can recommend items that are in your catalog.
After completing the above procedures, you must enable Syndetics Unbound in Primo. For more information on how to enable Syndetics Unbound in your discovery system, refer to the relevant section for your environment:
Configuring the FTP Connection to Syndetics Unbound in Alma
The FTP upload method is required when uploading holdings files that exceed 100 MB. In Alma you must create an FTP connection and a publishing profile to support uploads for Syndetics Unbound.
-
Log on to the Alma server.
-
Configure the FTP connection used to upload files from Alma (Configuration Menu > General > External Systems > S/FTP Definitions). For more information, see Configuring S/FTP Connections. On the Update S/FTP Connection page, make sure that you include the following information:
-
Name – Syndetics Unbound FTP
-
Server – unbound-ftp.syndetics.com
-
Port – 21
-
FTP Passive Mode – Make sure that this option is selected.
-
UserName and Password – Specify your Syndetics Unbound login information.
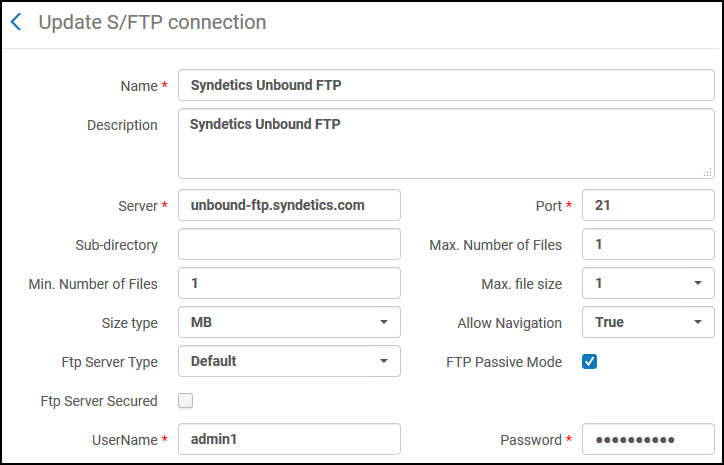 Update S/FTP Connection Page
 -
-
Select Save.
Creating the Set of All Records Published in Alma
The advanced search enables you to create a set of all records that have been published without suppression from discovery.
-
Select Advanced to open the Advanced Search box.
-
Specify the following search criteria and then select Search.
 Advanced Search for All Published Titles
 -
Select Save Query and name the set Syndetics Unbound.
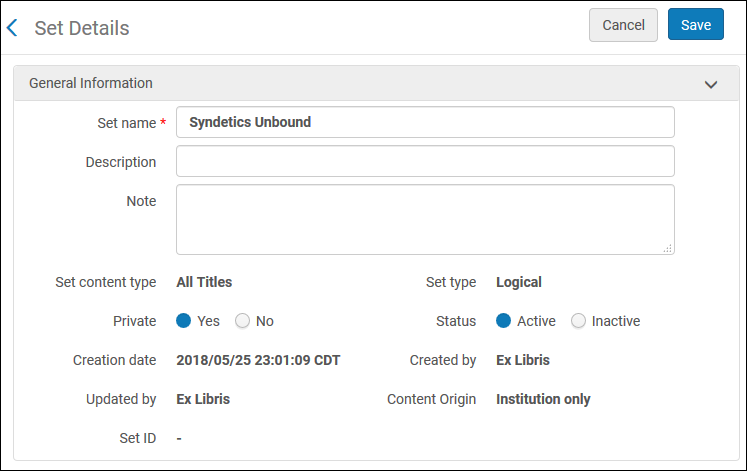 Set Details for Syndetics Unbound
 -
Select Save to save your set which is used by the publishing profile.
Defining the Publishing Profile for Syndetics Unbound in Alma
Alma provides a predefined publishing profile that you can copy to create a publishing profile that is used to publish holdings information regularly to Syndetics Unbound.
-
On the Publishing Profiles page (Resources > Publishing > Publishing Profiles), select Community.
-
Search for Syndetics Unbound in the Name field.
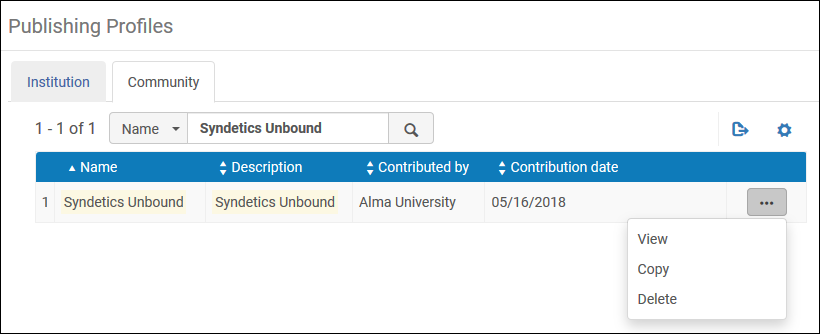 Publishing Profile Template for Syndetics Unbound
 -
Select Copy to open the publishing profile template.
-
In the Content section, select the Syndetics Unbound set from the Set name field.
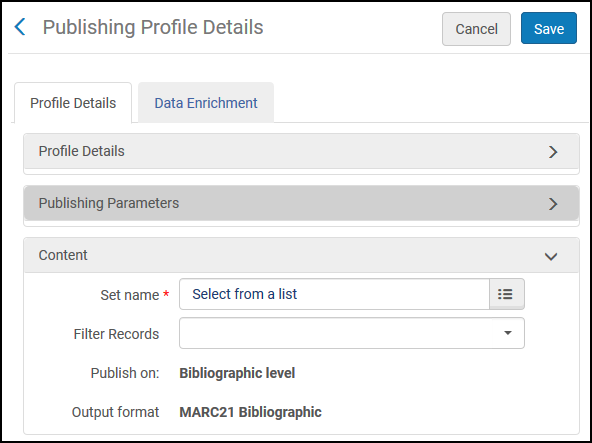 Content Section on Publishing Profile Details Page
 -
In the Publishing Protocol section, select the Syndetics Unbound FTP connection from the FTP configuration field.
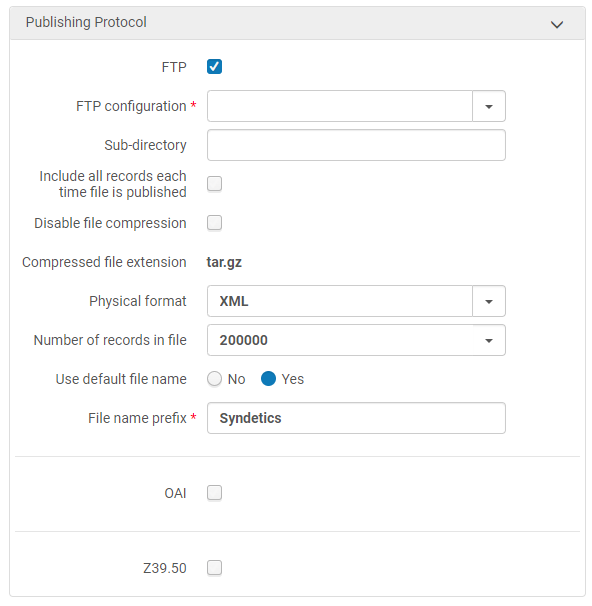 Publishing Protocol Section on Publishing Profile Details Page
-
It is recommended that you set Number of records in file to 200000 to reduce the number of files, notifications, and processing time.
-
Ensure that file formats are compatible in both Syndetics (such as MARCXML (ZIP compressed)) and Alma (such as XML compressed).
-
-
Select Save to save your new publishing profile.
-
On the Publishing Profiles page, select Institution, search for your new publishing profile, and then activate it.
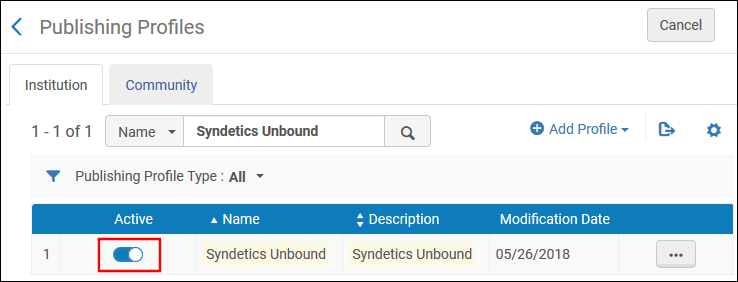 Activating the Publishing Profile
Enabling Syndetics Unbound in Primo (New UI)
This section describes the steps needed to enrich the full display results for Primo customers that are using the new Primo UI.
-
Log on to the Primo Back Office.
-
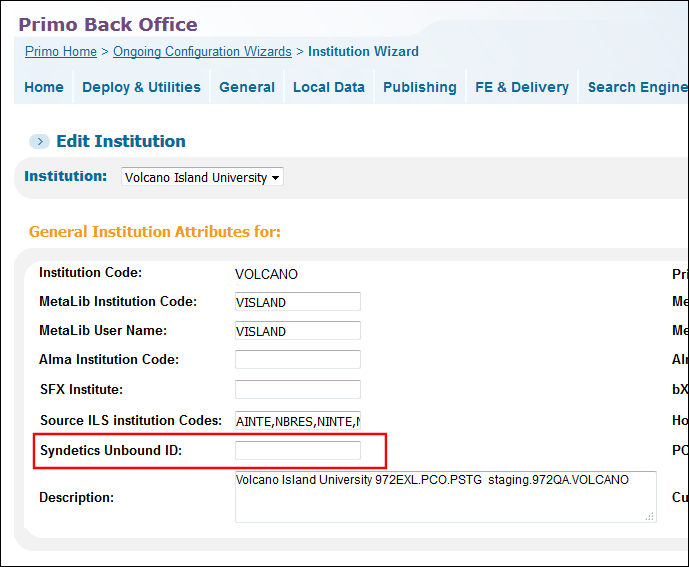
Edit your institution in the Institution Wizard (Primo Home > Ongoing Configuration Wizards > Institution Wizard).
 Institution Wizard
 -
In the Syndetics Unbound ID field, enter the Syndetics Unbound account code (see Get Code for New UI).
-
Select Save.
-
Continue through the wizard and deploy the change to the institution.
-
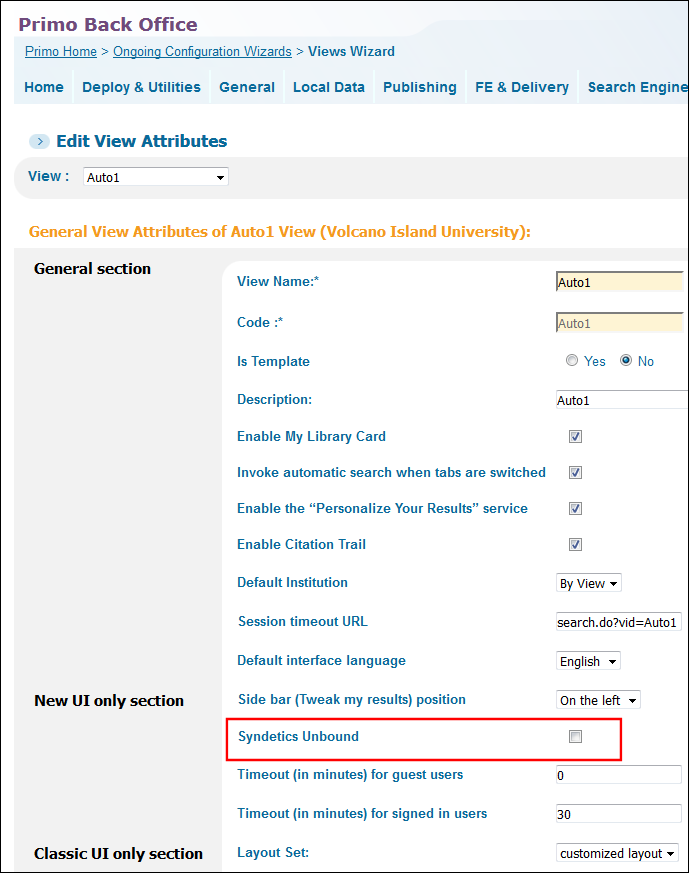
Edit your view in the Views Wizard (Primo Home > Ongoing Configuration Wizards).
 Views Wizard - General Attribute Configuration
 -
Under new UI only section, select the Syndetics Unbound checkbox.
-
Select Save & Continue.
-
Continue through the wizard and deploy the change to the view.
Enabling Syndetics Unbound in Primo VE
This section describes the steps needed to enrich the full display results for Primo VE customers that are using the new Primo UI.
-
Log on to Alma.
-
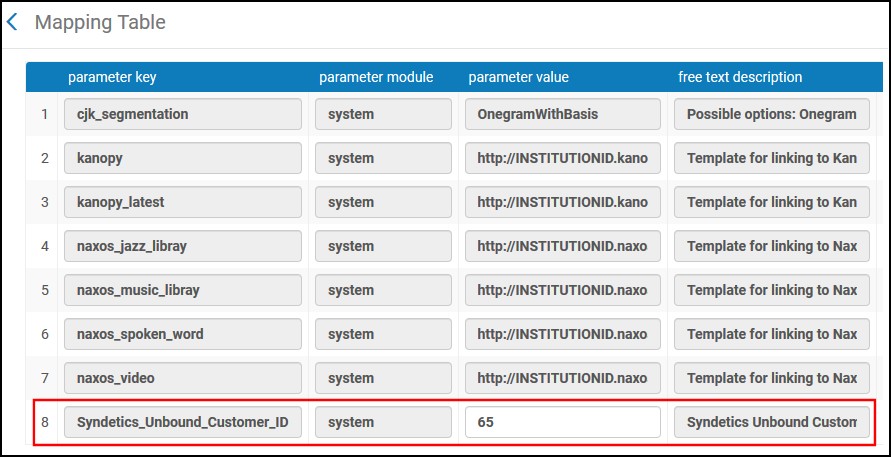
On the Discovery Customer Settings page (Configuration Menu > Discovery > Other > Customer Settings), edit the Syndetics_Unbound_Customer_ID parameter and enter the Syndetics Unbound account code into the parameter value field (see Get Code for New UI).
 Discovery Customer Settings Page
 -
Select Save.
-
Edit your view on the View Configuration page (Configuration Menu > Discovery > Display Configuration > Configure Views).
 View Configuration Page - General Tab
 -
Select the General Tab.
-
Under General Attributes, select the Enable Syndetics Unbound check box.
-
Select Save.
Enabling Syndetics Unbound in Primo (Classic UI)
This section describes the steps needed to enrich the full display results for the classic Primo UI.
-
Log on to the Primo Back Office.
-
Use the File Uploader utility (Primo Home > Primo Utilities > File Uploader) to upload the unbound.html file (see Get Code for Classic UI) to the server. For more details on uploading files, see The File Uploader Tool.
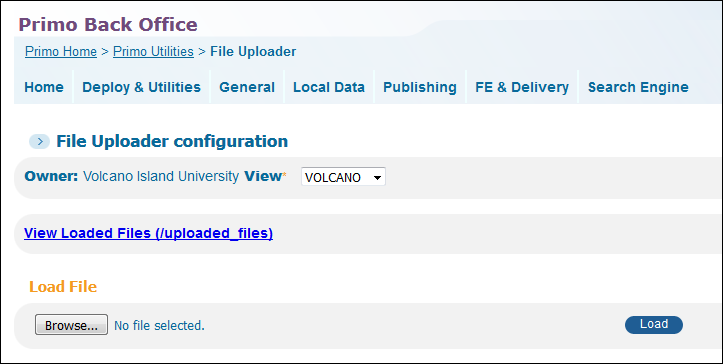 File Uploader Utility
 -
Edit your view with the Views Wizard (Primo Home > Ongoing Configuration Wizards > Views Wizard).
-
In the Classic UI only section, select customized layout from the Layout Set drop-down list and then select Edit to modify the view's custom layout.
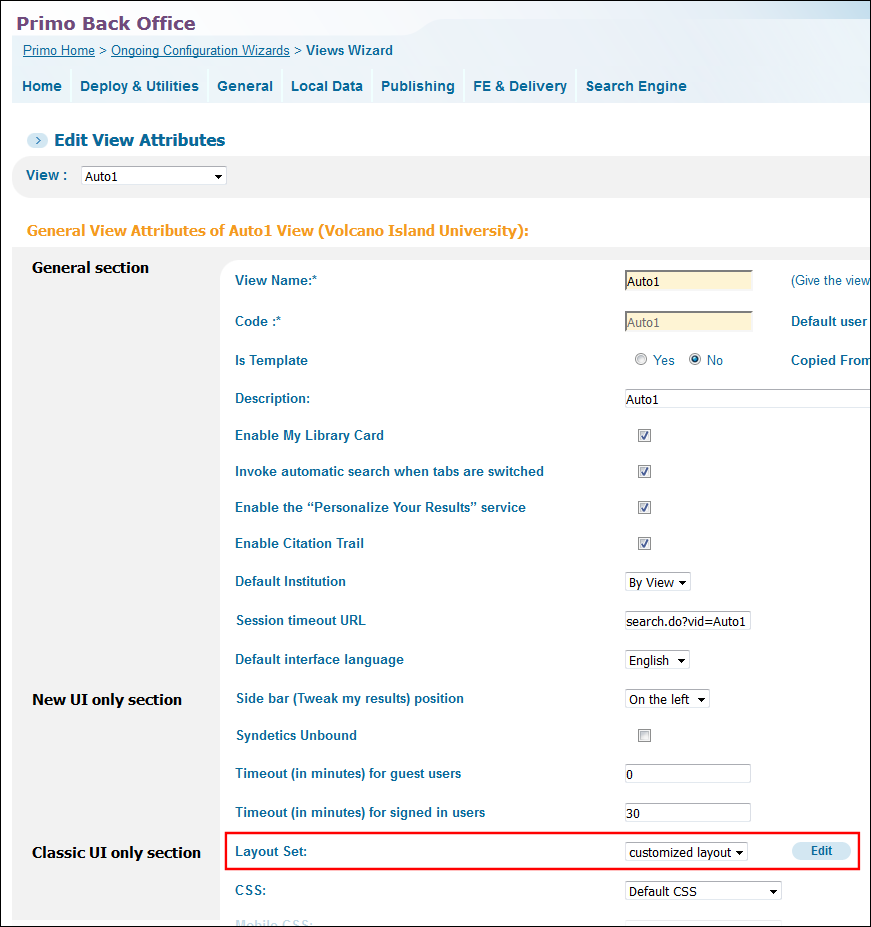 Views Wizard - Edit Customized Layout
 -
Create a custom tile for the Full Display page and then link the custom tile to the unbound.html file that you previously uploaded. For more information on customizing layouts, see Custom Layout Editor.
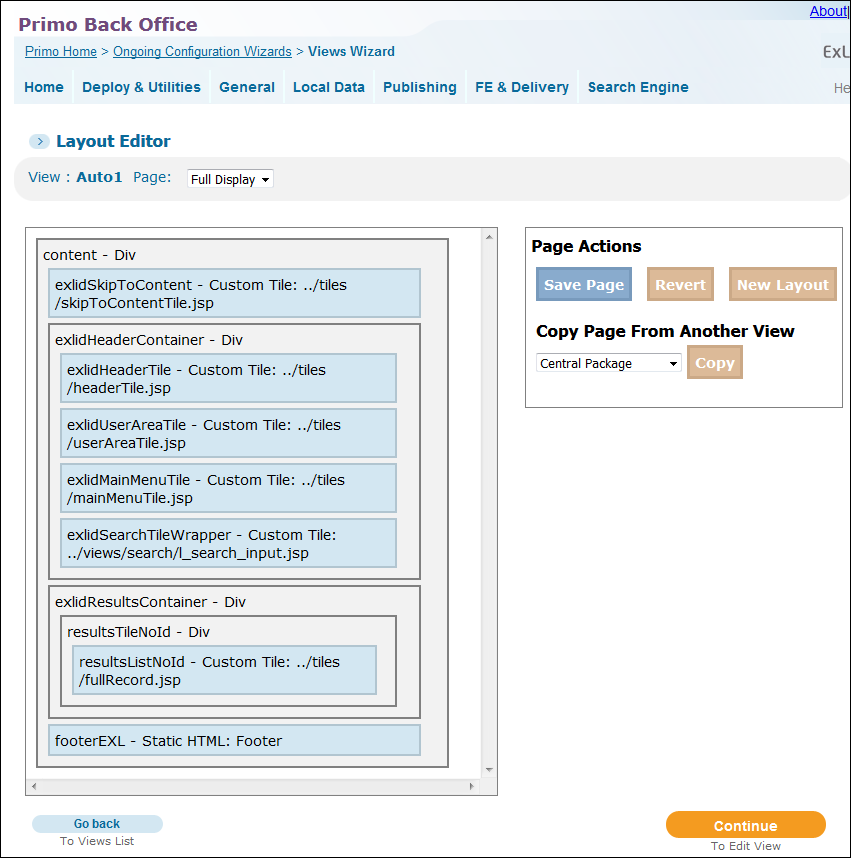 Custom Layout Editor - Full Display Page
Additional Configurations in Syndetics Unbound
This section describes additional configurations that you can perform to customize the content that appears in Syndetics Unbound.
Element Selection
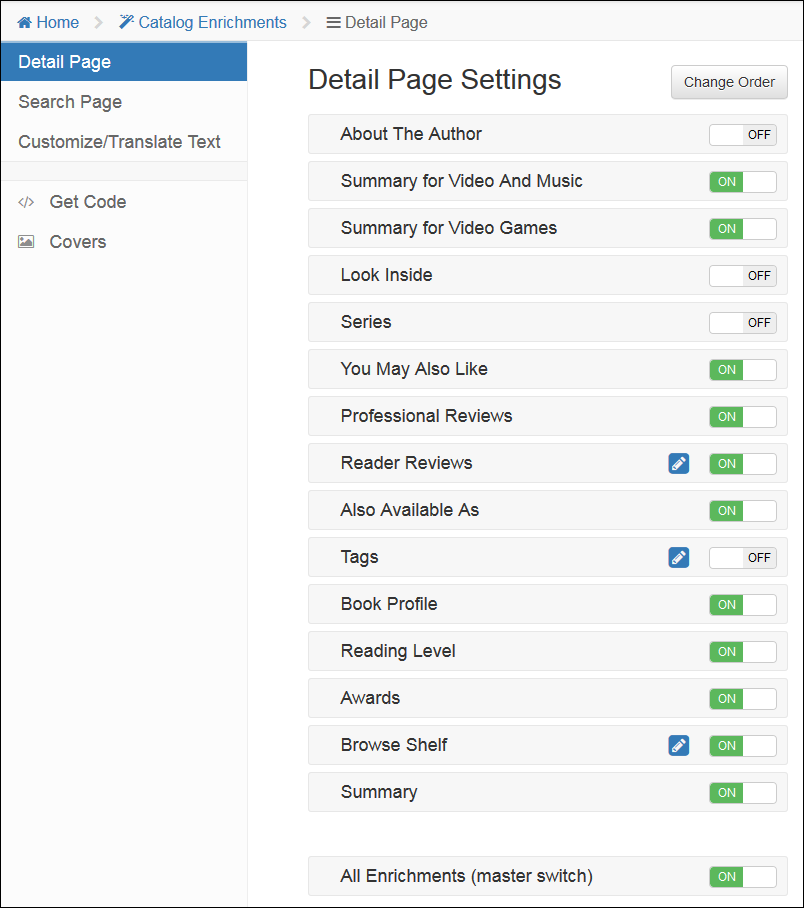
The Detail Page Settings tab (Home > Catalog Enrichments > Detail Page) allows you to specify which elements you want to appear on the Full Display page in Primo by toggling their ON/OFF buttons. Because Primo already has a virtual shelf browse option, you may want to turn off the Browse Shelf option on this tab.
In addition, you can select Change Order to customize the order in which the elements appear in Primo.
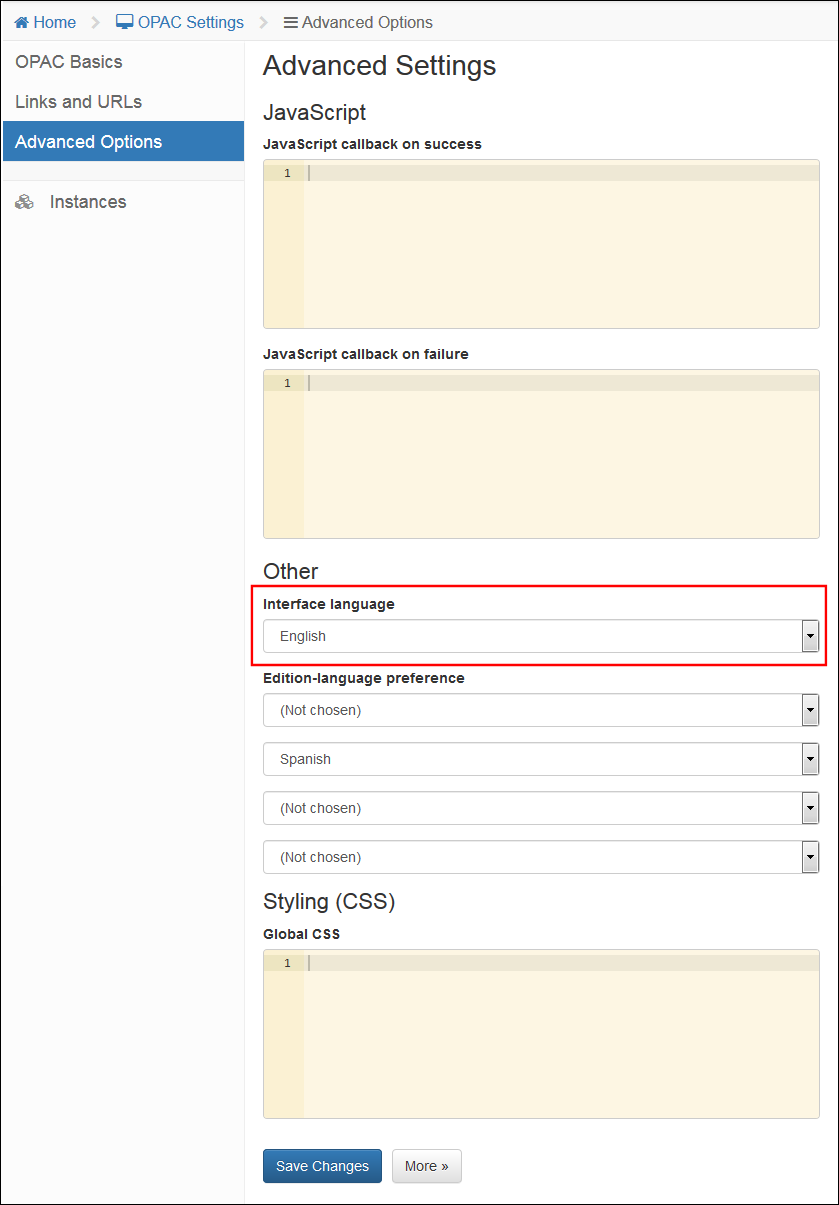
Interface Language
The Advanced Options tab (Home > OPAC Settings > Advanced Options) enables you to set the interface language. This setting translates the interface text of Syndetics Unbound into the selected language. It does not translate the content (for example, the text of Summary, Professional Reviews, and so forth).
If patrons select a language in Primo, their selection overrides this setting.
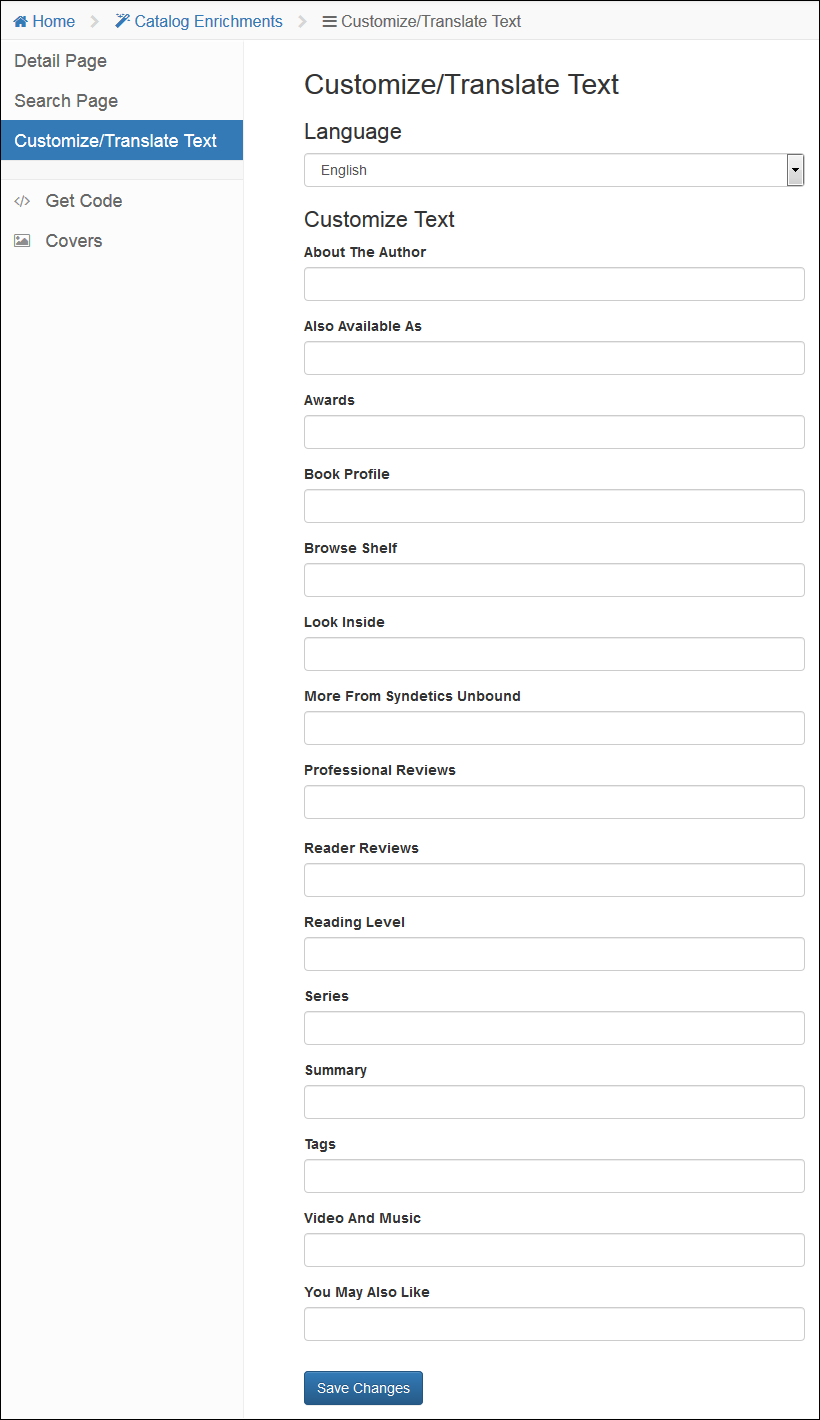
Customize/Translate Text
The Customize/Translate Text tab (Home > Catalog Enrichments > Customize/Translate Text) enables you to customize any of the translation strings or to change the text (for example, to rename the header Tags to Browse by Tag).
Tags Translation
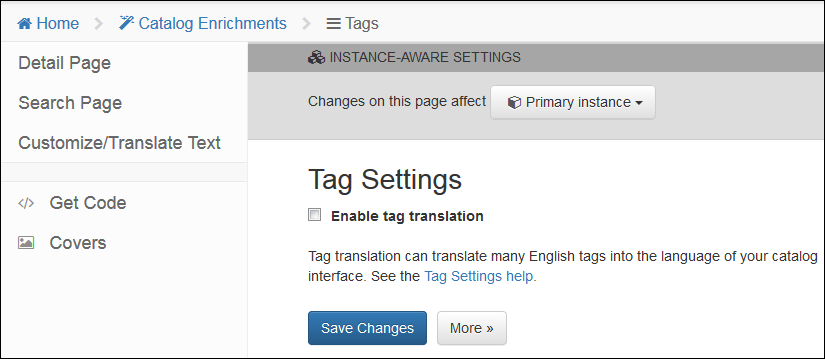
The Tags tab (Home > Catalog Enrichments > Detail Page > Edit Tags) enables you to translate many tags into the language of your catalog interface if you enable tag translation.
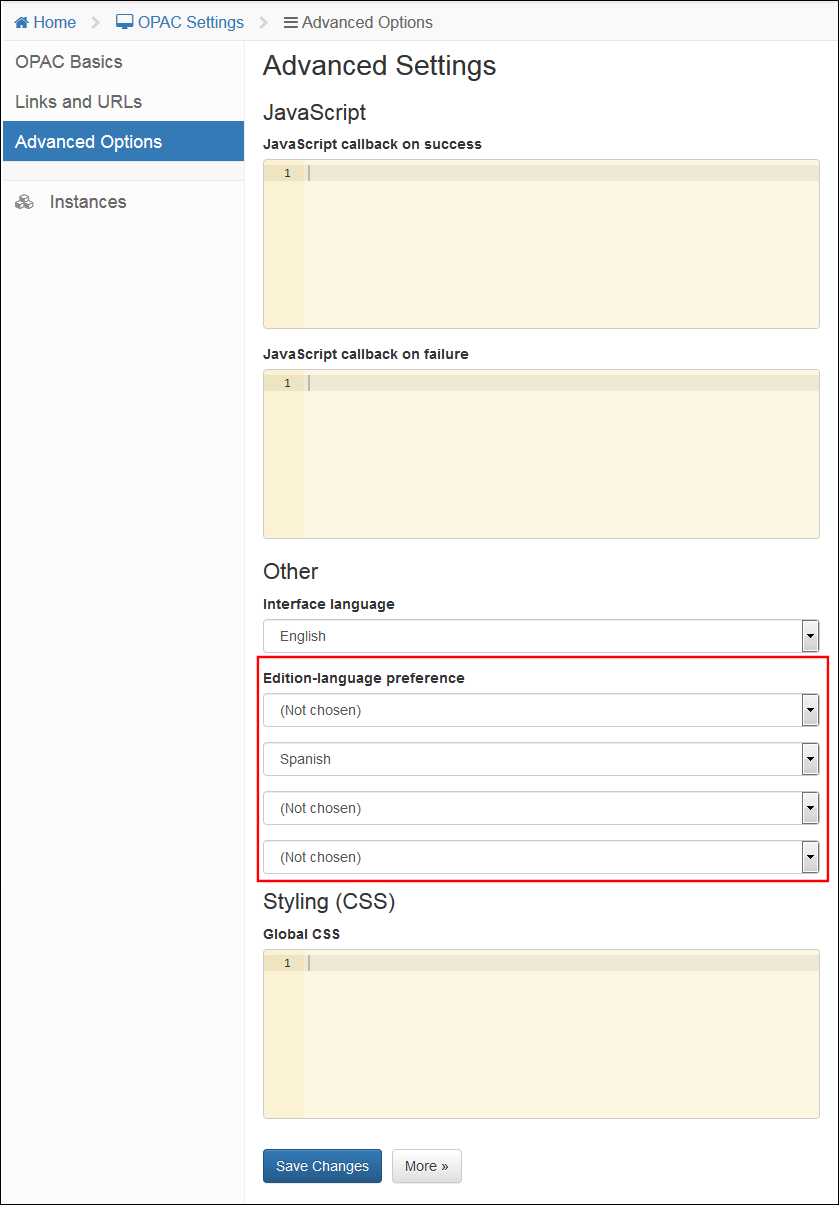
Edition-Language Preference
The Advanced Options tab (Home > OPAC Settings > Advanced Options) enables you to configure edition-language preferences. When multiple editions of a work are available at your library, we will display the most popular edition. To give preference to certain languages—for example, to pick a less popular German edition over a more popular English edition—select them from the drop-down lists in the order that you prefer.
Need Help?
If you have issues with Syndetics Unbound implementation, please contact Tech Support at Bowker.TechnicalSupport@proquest.com.