
Custom Layout Editor
This article is relevant only to the classic Primo UI.
-
If you are working with the new Primo UI, see New UI Customization - Best Practices.
-
If you are working with Primo VE, see Primo VE Customization - Best Practices.
The Custom Layout Editor allows users to create customized views for the following pages in the classic Primo UI only: Full Display, Brief Display, and Home Page. To customize the page layout, the Layout Editor page (see Custom Layout Editor) allows users to add their own elements (such as JSP, JS, and HTML) as well as standard Primo elements (tiles and static HTML). Note that the editor only adds the elements in a linear fashion to the customized page. The actual format and styles are controlled by the CSS styles and files that are included for each element.
For more information on customizing the CSS styles, refer to the Primo Technical Guide.
Custom Layout Editor
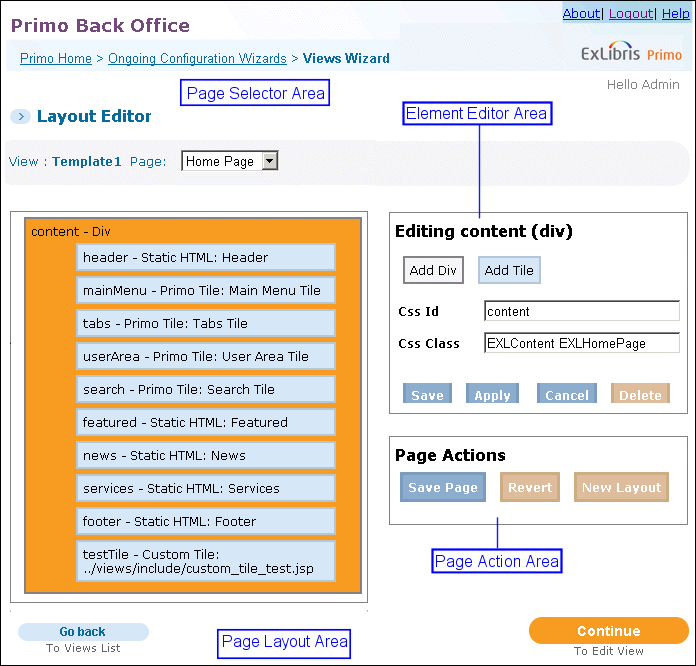
The Layout Editor contains the following areas:
-
Page Selector – opens the current view and allows users to select a page to edit.
-
Page Layout – shows the elements that appear on the page.
-
Element Editor – allows users to add and configure elements.
-
Page Action – contains the actions (such as saving and resetting) that apply to the page.
To access the Layout Editor page:
-
Select a view to edit on the Primo Home > Ongoing Configuration Wizards > Views Wizard > Views List page.The Edit View Attributes page opens (see Edit View Attributes (Parent View)).
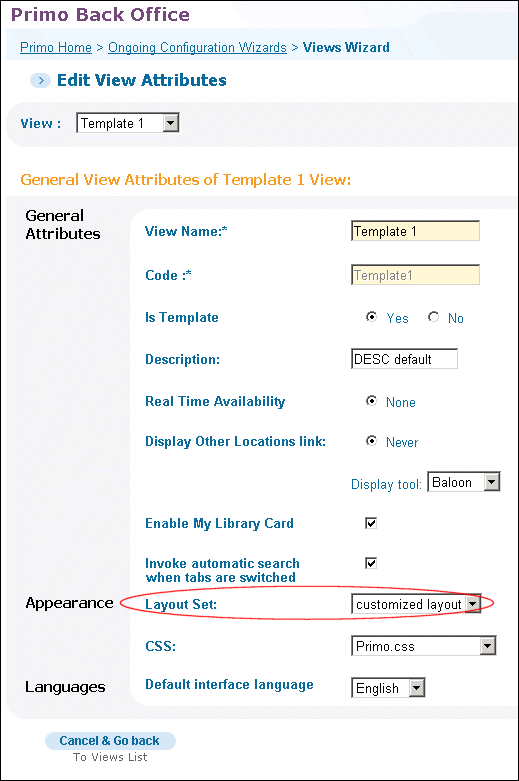 Edit View Attributes - Custom Layout
 -
On the Edit View Attributes page, make sure that the Layout Set field is set to customized layout.The Edit button opens next to the field.
-
Click Edit to display the Layout Editor page.
Page Selector Area
The Page Selector area opens the current view and allows you to select the following pages to edit from the drop-down list:
-
Home Page
-
Full Display
-
Brief Display

Page Selector Area
After the page type is selected, the Page Layout area displays the elements included on the page.
Page Layout Area
The Page Layout area opens the elements that will appear in the selected view and page. From this area, users can add Div or Tile elements and reorganize the order of the elements linearly by dragging the elements to the new location.
The format of each element is determined by the CSS class and styles.

Page Layout Area
The structure of a page layout can consist of nested Div elements, which can have many Tile elements each. Note that the top-level element must be a Div element, and all other elements must be contained within the uppermost Div element, which is indicated by the content element (see Page Layout Area).
Adding Elements on the Page
To add tiles in the Page Layout area, select a Div element to highlight it. When the section is highlighted, the Element Editor area opens, which allows you to add either Tiles or Div elements. For more information on configuring Div and Tile elements, see Element Editor Area.
Modifying Elements on the Page
To modify tiles in the Page Layout area, select a Div element to highlight it. When the section is highlighted, the Element Editor area opens, which allows you to modify the element in the Element Editor area. For more information on configuring Div and Tile elements, see Element Editor Area.
Moving Elements on the Page
To move an element in the Page Layout area, select the element and drag it to the desired location on the page.
Removing Elements on the Page
To delete an element in the Page Layout area, select the element and then click Delete in the Element Editor area.
Copying Tile Elements on the Page
To copy a Tile element on the Page Layout area, select the Tile element and then click Copy in the Element Editor area to place a duplicate copy in page layout.
Element Editor Area
The Element Editor area allows users to configure the settings of the Div and Tile elements.
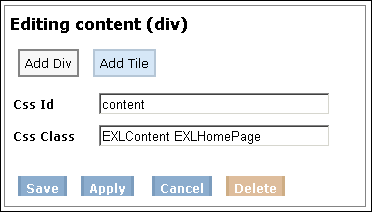
Element Editor Area - Div Elements
The content of the editor is determined by the type of element (Div or Tile) that is selected in the Page Layout area.
Div Elements
Div elements are used structurally to define divisions or sections within the HTML page layout, while Tile sections add functionality (such as the Facets and Tagging tiles). When a Div element is selected in the Page Layout area, the configuration parameters for Div elements appear in the Element Editor area (see Element Editor Area - Div Elements).
To add a Div element, click Add Div in the Element Editor area and fill in the fields shown in Div Element Parameters.
If you don not specify valid CSS IDs and CSS Classes, the system will not be able to deploy the layout to the Front End.
| Parameter | Description |
|---|---|
|
Css ID
|
Indicates the CSS ID used in the CSS file.
|
|
Css Class
|
Indicates the CSS Class used in the CSS file.
|
To save the element settings for this session, click Save on the Element Editor area. Otherwise, select Cancel to abort the changes. Note that you must click Save in the Page Action area to save element changes to the page layout.
Tile Elements
Tile elements are used to add functionality (such as pre-defined tiles, static HTMLs, and customized tiles) to the page. When a Tile element is selected in the Page Layout area, the configuration parameters for Tile elements appear in the Element Editor area.

Element Editor Area - Tile Elements
To add a Tile element, click Add Tile in the Element Editor area and fill in fields shown in Div Element Parameters.
If you don not specify valid CSS IDs, CSS Classes, and URLs, the system will not be able to deploy the layout to the Front End.
| Parameter | Description |
|---|---|
|
Css ID
|
Indicates the CSS ID used in the CSS file.
|
|
Css Class
|
Indicates the CSS Class used in the CSS file.
|
|
Content
|
Indicates the type of content this tile opens. The following values are valid:
|
|
Tiles
|
Allows users to include tiles created by Ex Libris. These tiles perform core functions defined for Primo. Select a tile from the drop-down list.
|
|
Static HTML
|
Allows user to include static HTMLs created for Primo. Select a static HTML file from the drop-down list.
|
|
Url
|
Enter the URL of the custom tile. The custom tiles may utilize any modern web technology as long as it outputs HTML fragments.
If the tile is meant to be interactive, the links or Javascript must relate back to the proper server through full paths. AJAX and Javascript interactions are preferred since they can be integrated into the existing page.
|
To save the element settings for this session, click Save in the Element Editor area. Otherwise, click Cancel to abort the changes. Note that you must click Save in the Page Action area to save element changes to the page layout.
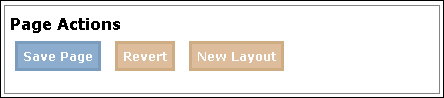
Page Action Area
The Page Action Area performs the following action:
-
Save Page – Saves changes to the page layout.
-
Revert – Aborts changes and reverts the page layout to the last saved configuration.
-
New Layout – Clears the entire layout and removes default elements from the page layout.
Page Action Area
Loading Multiple CSS Files
With customized layouts, the previously mandatory Primo_default.3.0.css file is initially disabled to allow more control of customization. This file defines many of the styles that are used by Primo tiles and static HTML files. You may continue to use this file and include additional CSS files by separating them with semicolons in the Css Url field of the CSS mapping table, as shown in the following figure:
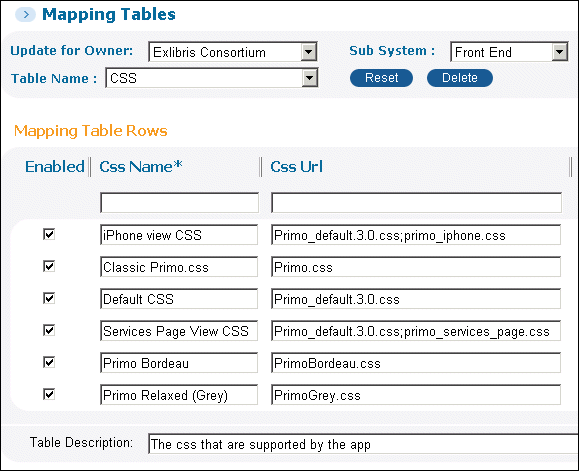
CSS Mapping Table - Css URL Field