
Step 4: Go Live
This guide provides the necessary information to go live with Primo VE.
Preparing to Go Live in Primo VE
Readiness Evaluation
When you have completed the first three step of the Go VE process, refer to the following tools to make sure that you have not missed anything:
-
Process tracking page – Make sure that all tasks leading up to going live have been completed and that there are no errors.
-
Go live readiness checklist – Run the tasks on this checklist in your Primo VE environment.
-
Customer checklist – We recommend that you prepare a list of tests for your unique features and needs.
When you are ready to Go Live, perform the following tasks:
-
Initiate the Go Live process at least three weeks prior to the requested Go Live date.
Initiating the Go Live Process
The Go Live phase of the process is initiated when you open a Support case to schedule the Go Live date. The case must be submitted at least three weeks prior to the requested Go Live date.
Prior to the Go Live date, you will receive a notification via your Support case letting you know that the Primo VE environment is ready for DNS simulation.
-
Open a Support case. The case should include the following information:
-
Subject: Go VE - Go Live {Alma institution code + institution name}
-
Description:
-
requested date for Go Live - this date must fall on a weekday (Monday – Thursday) or Sunday.
-
Primo institution code
-
Primo Front End domains in use
-
Primo VE domain that you intend to use after going live (such as Ex Libris CNAME or a local custom domain).
-
-
-
Once you have received notification that the DNS settings are in place, you will be able to simulate the redirection prior to the Go Live date. Note that this step is not mandatory, and will have no effect on the DNS switch itself. For full instructions, see DNS Switch Simulation.
Redirect Permalinks in Primo to Primo VE
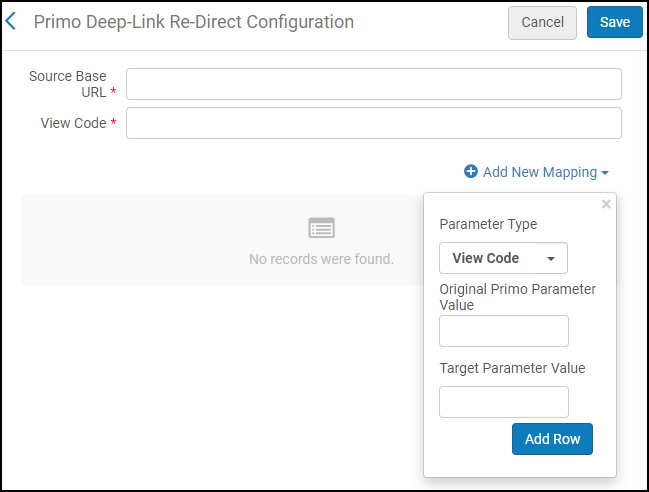
Use the Primo Deep-Link Re-Direct Configuration page (Configuration Menu > Discovery > Other > Primo Deep-Link Re-Direct Configuration) to map the parameters used in Primo permalinks to the corresponding parameters used in Primo VE permalinks so that the system can redirect Primo permalinks to the correct page in Primo VE. For more information, see Configuring Redirection for Primo VE Deep Links.
On the Go Live day, a DNS switch will be executed to redirect traffic from your Primo base URL:
to your Primo VE base URL:
The following URL parameters will be translated as configured in the Primo Deep-Link Re-Direct Configuration table: vid, tab, search_scope, and docid (which will be transformed for records belonging to data sources defined in the configuration table). The DNS switch itself is seamless, and does not affect the performance of Primo.
If you are using a custom domain (a non-Ex Libris domain) to access the Primo Front End, the switch must be performed on your end by redirecting your domain to point to Primo VE instead of Primo.
If you are using an A record (which is a domain that is used by other institutions in your Primo installation—for example, https://primo-pmtna01.hosted.exlibrisgroup.com) instead of a CNAME (which is a domain that is uniquely used by your Primo institution), there will be no DNS switch. Your Primo VE environment will be prepared according to schedule, but the actual Go Live depends on you changing the library links to the Primo VE URL. In order to prevent patrons from accessing the old Primo after Go Live, perform the following actions in Primo once you switch to Primo VE:
-
Disable the silent login to Primo
-
Hide the "sign in" buttons
-
Change the "Sign in" banner message to something like the following:
Library Search is moving to a new location. In order to get complete results and to request items, please go to XXXXX.
Going Live with Primo VE
On the scheduled day of the switch, Ex Libris will perform the following tasks for you:
-
DNS switch is deployed.
-
The Alma and CDI E-Shelf saved records are copied from Primo to Primo VE. Saved
searches are not copied to Primo VE. -
Primo APIs are routed to point at Primo VE instead of Primo (Production and SB).
-
Primo Analytics data is copied to Primo VE Analytics in Alma. Primo Analytics is accessible from within the Alma menus, including all of the existing folders: reports and data. Saved reports are copied automatically unless there is an issue with the file name (such as a late renaming). Please contact Support if any reports are left behind.
-
Primo VE is activated on Alma Sandbox. Alma Premium sandboxes receive a copy of the Primo VE configuration during the coming Sandbox Refresh (February and August).
When the above tasks are complete, you will receive a final notification via your Support case to let you know that traffic is being redirected from your old Primo environment to your new Primo VE environment.
-
Test the redirection.
-
Test authentication and verify that E-shelf saved records are available.
-
Test Primo VE Analytics and verify that Primo Analytics data is available.
-
For Leganto institutions – Link Leganto to Primo VE. You can configure the repository in which Leganto users search for citations to be Primo VE. You will need the View Code for your Primo VE view. You can restrict the searches to a specific scope or allow users to search in any scope. The relevant Leganto configuration guide can be found at: Configuring Repository Search in Leganto.
-
For CampusM institutions – Link CampusM to Primo VE. The integration of Primo VE with CampusM is implemented with same the REST DLF APIs with the new Primo UI. For CampusM configuration details, see here. If you need further assistance, submit a Salesforce case to CampusM Support for further assistance.
Post Go Live Actions
Although Primo links are automatically redirected to Primo VE after going live, we recommend that you also perform the following tasks in the days after the Go Live date:
-
Update your third-party vendors to point to your Primo VE OpenURL base. For information on configuring the base URL for the Services Page, see Configuring the Services Page for Primo VE.
-
Update the code for embedded Primo search boxes on your library page according to Primo VE terminology and parameters. For more information, see Creating a Search Box With Deep Links to Primo VE.
-
Change the Primo links on your library website to point to your Primo VE URL.
-
Subscribe to Email Alerts for your Primo VE instance on the System Status page.