
Google Developer Console Account Access
Ex Libris requires access to your Google Developer Console account in order for us to release the campusM apps on your behalf to the Google Play store.
Create a New Account
Follow the steps on the Google Developer pages to set up a new account: https://support.google.com/googleplay/android-developer/answer/6112435?hl=en&ref_topic=3450769. Once the account has been created, provide Ex Libris with access as described below.
You may not need to create a new developer account if your institutions already have an existing official developer account. If this is the case, you can skip this step.
Create a New Placeholder App
In the Google Play Console, create a new Placeholder App for campusM.
- Visit https://play.google.com/apps/publish and log in to your institution’s account.
- Select Create app.

- Complete the following parameters:
- App name: campusM-placeholder
- App or game: App
- Free or paid: Free
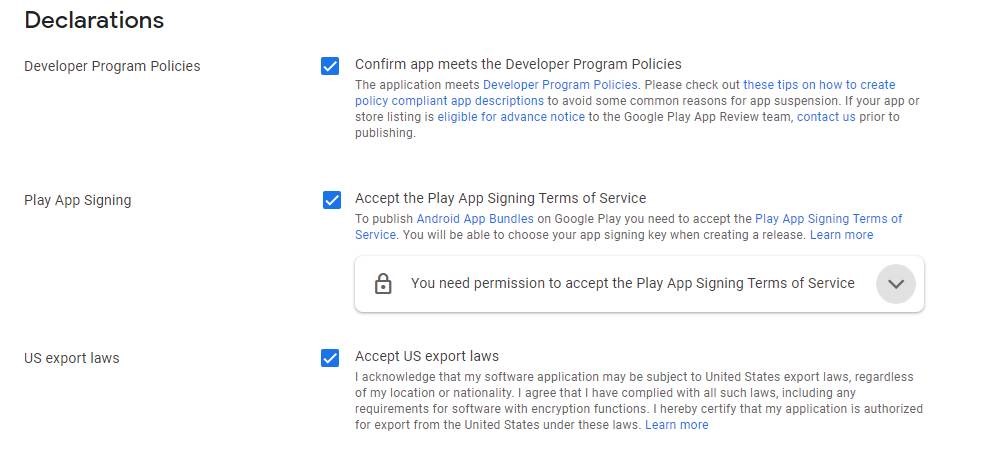
- Select all options in the Declarations section.
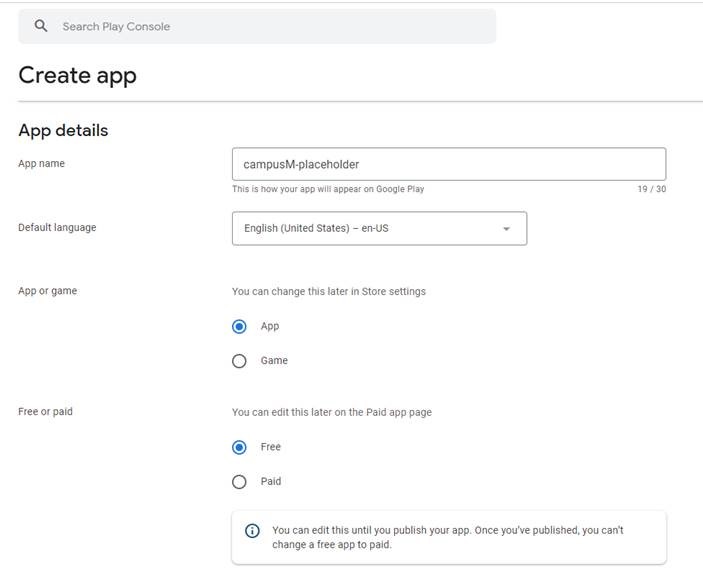
- Select Save.
Grant Ex Libris Access to Your Google Play Developer Console
The campusM team requires sufficient access to your Google Play Developer Console, via which your app can be managed. Below are the steps required to achieve this:
- Visit https://play.google.com/apps/publish and log in to your institution’s account.
- Click Users and permissions and click Invite new users:

The following appears:
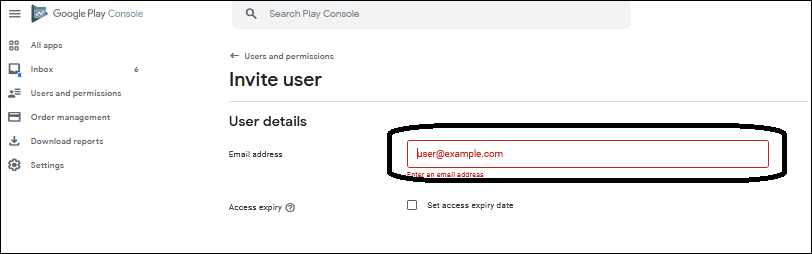
- Enter the relevant email address based on your region according to the table below.
Prior to April 2018, the campusM store user email was the same for all regions: ExlibrisMobileApps@exlibrisgroup.com. Customers who previously added that non-regional specific campusM user email do not need to change to a regional one; however, Ex Libris' recommendation is to utilize the regional campusM mail moving forward.
Region campusM Store Authorized User (Email) APAC ExlibrisMobileAppsAPAC1@exlibrisgroup.com EMEA ExlibrisMobileAppsEMEA1@exlibrisgroup.com NA ExlibrisMobileAppsNA1@exlibrisgroup.com - Leave the Set access expiry date checkbox clear.
- Click Done. The permissions page displays:

- Set the permissions according to the image above.
- Click Send Invitation.
Access is granted to the Google Play developer console.
For questions about the required permissions, see our related FAQ.
To find out more about the Google Play Console, see the Google Play Console Help.
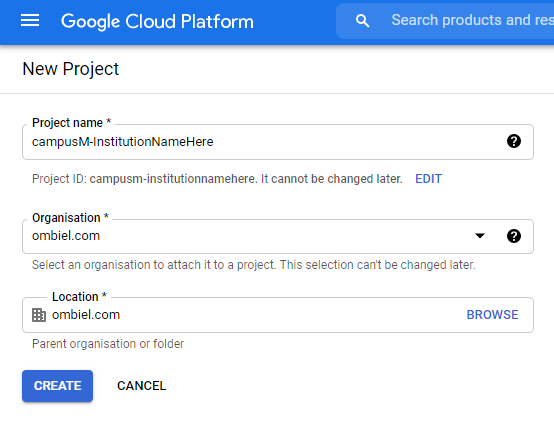
Google API Project
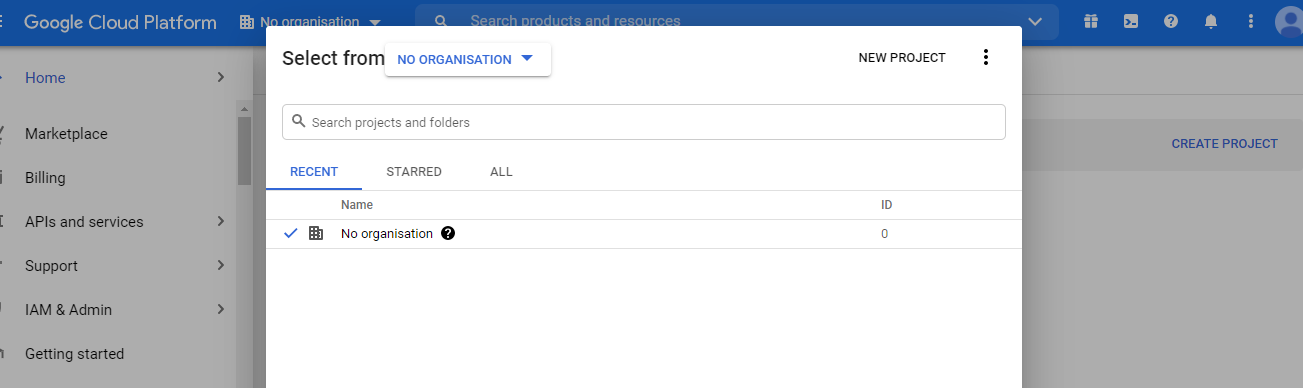
If you do not already have a Google API Project, you must create a new project before you can grant Ex Libris access.
-
Navigate to Select a project in the header of the page, and in the resulting modal, select NEW PROJECT.
-
Enter a Project name e.g. campusM-InstitutionName and CREATE. Include the institution name or name abbreviation within the project name.
Grant Ex Libris Access to Your Google API Project
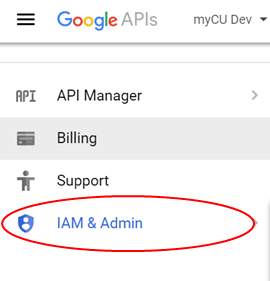
The campusM team requires access to your Google API project. To do this, perform the following steps:
-
Visit https://console.developers.google.com/apis/dashboard and log in to your institution’s account.
-
Click to expand the menu, select IAM & Admin.
-
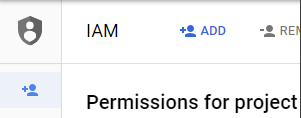
Navigate to ‘IAM’

-
Click Add.
-
In the Member field enter: Please use the campusM email address based on your region. Note: prior to April 2018, the campusM store user email was the same for all regions: ExlibrisMobileApps@exlibrisgroup.com. Customers who previously added that non-regional specific campusM user email do not need to change to a regional one, however, Ex Libris' recommendation is to utilize the regional campusM mail moving forward.
Region campusM Store Authorized User (Email) APAC ExlibrisMobileAppsAPAC1@exlibrisgroup.com EMEA ExlibrisMobileAppsEMEA1@exlibrisgroup.com NA ExlibrisMobileAppsNA1@exlibrisgroup.com -
Configure the role to be Project > Owner.

-
Click Add.
Find out more about the Google Play Console by following this link: https://support.google.com/googleplay/android-developer.
Why does Ex Libris require Access to your Google API Project?
- Google Maps - Our native Android app integrates with the Google Maps API which requires access to Google APIs.
- Push notifications - Our native Android app requires access to Google APIs to enable GCM (Google Cloud messaging)
Providing Ex Libris with your Google Developer Service Account
The Service Account is different from your Google Developer Account - It is created via the Google API console, when logged in to your Google Developer Account.
- Log in to your Google Developer Account
- Open the Google Play Console.
- Select the Settings menu.
- Select API access.
- Select the Create Service Account button.
If you do not already have a Google Play Developer Project, you must create a new project before you can see the option to create a new service account.
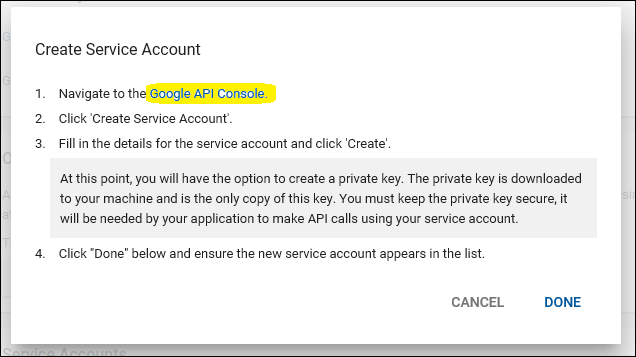 Create Service Account
 - Select the Google API Console link in the dialog, which opens a new tab/window:
- Select the Create Service Account button at the top of the Google Developers Console.
- Provide a service account name, for example: campusM, and then select Create.
- Select Select a role and select Service Accounts > Service Account User.
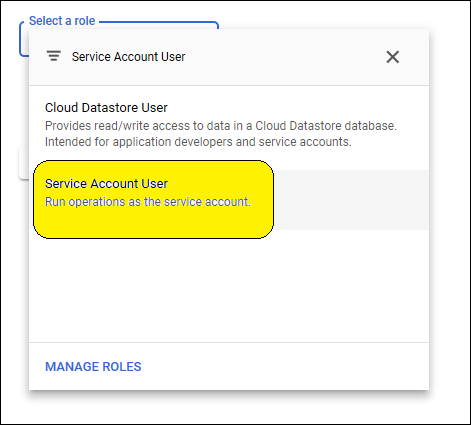 Service Account User
 - Select the Create Key button.
- Make sure JSON is selected as the Key type.
- Select Create to close the dialog.
The file is saved to the Downloads folder by default, if you are not asked for a save location.
- Make a note of the file name of the JSON file downloaded to your computer.
- On the Google Play Console, select Done to close the dialog.
- Select Grant Access for the newly added service account.
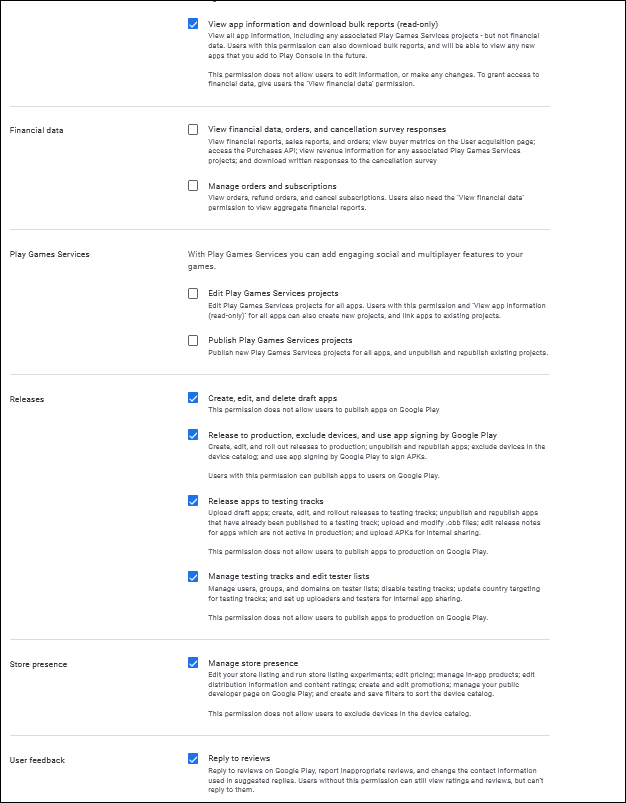
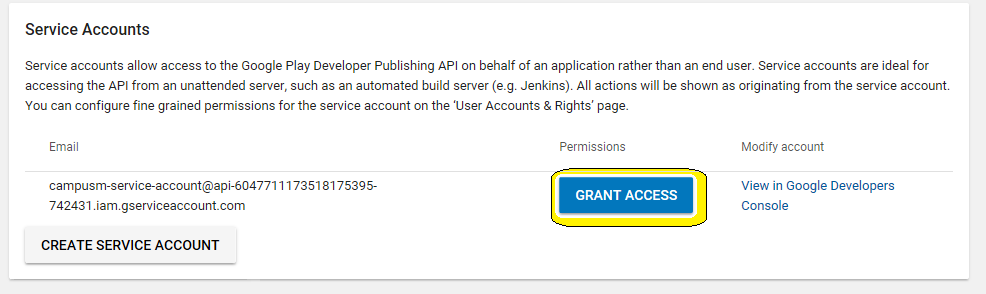 Grant Access
 - Select the permissions according to the screenshot below (Role: Custom). Click Add User to close the dialog.
 Add User
 - Provide campusM with the JSON file that you downloaded.
App Store Listing – Containing or Displaying Ads
On the Google Play Store, Android users will sometimes identify that customer"s apps will have the label "Contains Ads." campusM never show advertisements within the product, and have no intention of doing so. However, this is necessitated by Google"s policy towards third party content and what it defines as an advertisement.
In areas wherein Google lack formal documentation, conventions are formed around what Google will reject people for. We have had messages from Google with content that can be surmised by the following:
"By January 11, 2016, you must sign in to the Play Developer Console and declare whether your apps contain ads (such as ads delivered through third party ad networks, display ads, native ads, and/or banner ads). After this date, the ads declaration will be required to make any updates to your apps. Please note that misrepresenting ad presence violates Google Play Developer Program Policies and may lead to suspension."
"Here are a few examples from Google of when you should answer "yes" to having ads for purposes of the "Ads" label:
Native ads: My app includes ads natively, indistinguishable from other content (e.g. sponsored articles, ads within a feed, etc).
House ads: My app renders a small banner to promote my other apps.
Banner and interstitial*: My app integrates with an Ad SDK to show banners and/or interstitials."
House ads: My app renders a small banner to promote my other apps.
Banner and interstitial*: My app integrates with an Ad SDK to show banners and/or interstitials."
This will include things such as Sports events promotion, promoting other Institutional products or portals, links to third party content such as the Olympics, etc.
As such, by default, we include "contains ads."
Removing this label risks not only having an app pulled from the store, but all of the apps on your account pulled when the account is suspended on Google Play. As such, we strongly recommend customers do not remove this, nor do they request Ex Libris do this for them.
Billing Requirement for Maps API
Google are rebranding their mapping technologies and adjusting the pricing structure for their use. As a result, campusM customers will need enable billing with a credit card against their Google Developer account by the 11th June 2018.
Google’s pricing table (https://cloud.google.com/maps-platform/pricing/sheet/) makes it clear that campusM customers will not be charged for the mobile maps that are used as part of our native apps. So there is no expectation that you will be required to pay anything additional to Google for campusM as a result of their new pricing structure. However, they are explicit about the need for billing against the developer account to keep it in good standing and enable the app to be available and up-gradable through the Play Store.
Google have provided a transition tool that will guide you through adding the required billing details to your account: https://mapsplatformtransition.withgoogle.com/
You will need your developer account login details and a payment method.
Note that all of the campusM mobile apps have a Google Maps Platform API key.
To find out more about the changes Google are making to their mapping platform please visit: https://cloud.google.com/maps-platform/user-guide/.