
Contact Tracing
![]()
Overview
- Contact tracing PI requires an authenticated profile, so it cannot be used for guest profiles.
- Only one Product Integration instance can be deployed per app.
Vendors
User Experience
The following section describes information relating to the user experience for the Contact Tracing product integration.
User Activities
- Students can scan a QR code to capture a new visited location.
- Students can manually enter a location code to capture a newly visited location.
- Students can see their visited location history.
Authentication
Offline Support
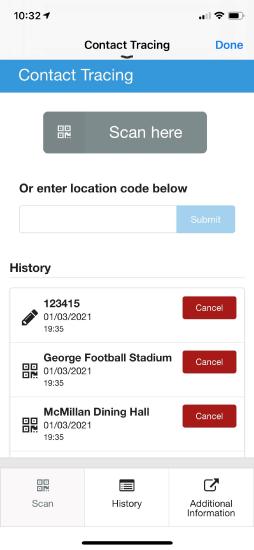
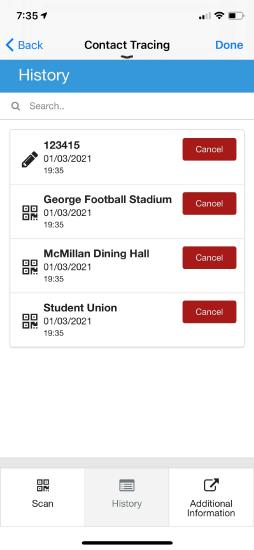
Main Workflows and Screenshots
- Scan a QR code, or manually enter a location code when visiting a new place to store the location
- Review location history and search for locations or places I visited on a specific date
| The Contact Tracing landing page displays the Scan button and last scanned locations | The Location History page displays data for the number of days as was configured by the university. The user can search by location, name, and date. |
 |
 |
Technical Overview
Prerequisites
The following prerequisites are required for the Contact Tracing product integration.
- For RESTful API (generic) vendor the APIs as described below should be available. See API Information. If campusM Cloud vendor is used no APIs prerequisites.
- QR code should include the following data in a JSON format - userID, locationName, description, locationId
For example:
{
"locationName": "Presentation Pod 100",
"description": "2 seats",
"locationId": "12345",
"campusID": "11"
}
- QR code should include the following data in a JSON format - userID, locationName, description, locationId
All four attributes are not mandatory.
- For manual code entries, only letters, numbers, spaces, and the following characters: -./_ are valid entries.
API Information
The Contact Tracing product integration uses the following APIs:
- Get User's History – mandatory
- Send User's Location's – mandatory
- Delete User Location – not mandatory
Get User’s History API
Request:
https://{Base URL}/UserApi/api/users/getUserLocations?userid={userID}&startDate={startDate}&endDate={endDate}
- The date range is a maximum of 7 days
- Base URL – the URL to retrieve as defined in the product integration configuration
- userID – the user identifier as defined in the Query Parameters.
- The format of startDate and endDate should be: {yyyy-MM-ddTHH:mm:ss+Z}, for example: 2020-09-02T09:55:15+03:00.
Expected response:
The response should be similar to the following:
"userLocationsList": {
"location": [
{
"campusID": "",
"locationName": "",
"time": "2019-12-30T09:30:15+0200",
"userID": "a@google.com",
"locationId": "12345",
"serialNumber": "1"
},
{
"campusID": "",
"locationName": "",
"time": "2019-12-30T09:30:15+0200",
"userID": "a@google.com"
"locationId": "14542",
"serialNumber": "2",
"source": 1
}
]
}
}
Response attributes Mapping:
| Attribute | Description | Mandatory Yes/No | Data Type | Default | Example |
|---|---|---|---|---|---|
| campusID | campus ID | No | String | ||
| locationName | Yes | String | |||
| time | scan time | Yes | String according to the following format: yyyy-MM-ddTHH:mm:ss'Z' |
2019-12-29T07:30:00+0200 | |
| userID | The user identifier that matches the equivalent attribute on IDP (see Prerequisites # 1). | Yes | String | ||
| locationId | Location ID | Yes | Number | ||
| serialNumber | Scan ID number | Yes | Number | ||
| source |
How the location was added:
|
Yes | Number |
Send User’s Location API (POST)
Request:
https://{BASE URL}/UserApi/api/users/updateUserLocation
Body:
"userID": "a@google.com",
"locationId": "54321",
"locationName": "Presentation Pod 5"
"time": "2019-12-30T11:00:00+0200"
"description": "2 seats"
"campusID": "",
"source": 0
}
| Attribute | Description | Mandatory Yes/No | Data Type | Default | Example |
|---|---|---|---|---|---|
| UserId | The user identifier that matches the equivalent attribute on IDP (see Prerequisites # 1). | Yes | String | ||
| locationName | Location Name | Yes | String | Conference Room 1 | |
| Description | Description | Yes | String | ||
| Time | Time of check-in | Yes | String according to the following format: yyyy-MM-ddTHH:mm:ss'Z' |
2019-12-29T07:30:00+0200 | |
| Source | How the location was added:
|
Yes | Number |
Expected response:
Response should include failure/success indication in the following format:
{
"userid" : "a@google.com",
"locationId" : "54321",
"response": "location successfully added!'" //if success, 'response' must contain the string "Successfully", otherwise it'll be considered as failure
}
Delete User Location API
Request:
campusM should send the following web service:
https://{BASE URL}/UserApi/api/users/deleteUserLocation
Body:
Expected response:
Response should include failure/success indication in the following format:
"userID" : "a@google.com",
"locationId" : "54321",
"response": "location successfully deleted!'" //if success, 'response' must contain the string "Successfully", otherwise it'll be considered as failure
}
Authentication of all APIs is included in the headers, as configured in Authentication Type.
Product Integration Configuration
| Configuration Option | Description | Mandatory | Data Type | Default | Example |
|---|---|---|---|---|---|
| Manage Integration | |||||
| Enable Product Integration | Select to enable the product integration on the user's campusM app. | No | Checkbox | Unchecked | |
| Product Integration Description | A description of the product integration for internal use | Yes | String | ||
| Screen Title | The title that appears in the top header of the service | No | String | Registration Status | |
| API Configuration This section contains the API details to define the API structure. You can test the API configuration. See Testing API Product Integration Configuration. |
|||||
| Base URL to retrieve the information | The URL for the API | Yes | URL | https://{HOST} | |
| Parameter Input Option | The parameter input option. Possible values: Username, Token Property, and Constant. It is sent as the path parameter | Yes | Drop-Down list | Token Property | |
| Token Property Name | Enter the property name to be retrieved from the token ({ USERNAME, MAIL, GIVEN_NAME, SURNAME, FULL_NAME } or as named in the integration profile) | No | String | USERNAME | |
| Constant Value | The value when the User Identifier is set to Constant | No | String | ||
| Authentication Type | Authentication type against the web service. The options are the following:
|
No | Object | No Auth | |
| General | |||||
| Enable Manual Location Code Entry | No | Checkbox | Unchecked | ||
| Total number of days available to view in Locations History | The total number of days for Locations History. The value should be between 1 and 28. | No | Number | 5 | |
| Data Retention Policy | How long Contact Tracing data is retained in the Ex Libris campusM cloud | No | Number | 30 | |
| Date Format | The format to display any dates in, throughout the integration | No | Drop-Down list | ||
| Number of records to show initially in Locations History | Number of records to show in Locations History at the beginning | No | Number | 10 | |
| Number of additional records to load on each click of the Load More Results Button | Number of records to load on each click of the 'Load More Results' button, should be between 2 and 5 | No | Number | 5 | |
| Display Cancel Button | 'Cancel' button allows users to delete logged location and triggers deleteUserLocation API | No | Checkbox | Unchecked | |
| Additional Information URL | URL for Additional Information/ Help tab (link out) | No | String | ||
| Look and Feel | |||||
| Primary Theme Color | Select a color for the main elements on the page | No | Color Picker | #444444 | |
| Secondary Theme Color | Select a color for the secondary elements on the page | No | Color Picker | #6f8ea4 | |
|
Text / Labels |
|||||
| Landing Page Title | No | String | Landing Page | ||
| Location History Page Title | No | String | Location History Page | ||
| Scan Button Text for Mobile | No | String | Scan Here | ||
| Scan Button Warning Message for Web | No | String | Can only be scanned using a mobile phone | ||
| Enter Location Code text for Mobile | No | String | Enter location code below | ||
| Enter Location Code text for Web | No | String | Enter location code below | ||
| Submit Button Text | No | String | Submit | ||
| Error Message Text for Manual Code Entry | No | String | Location code can only contain letters, numbers, spaces, and the following characters: _./- | ||
| Home Page History Title | No | String | History | ||
| Load More Results Button Text | No | String | Load More | ||
| Error Message | General error message if the page fails to load | No | String | Please try again later | |
| Empty Results Message | The Empty Results Message displays when no results are returned for the Location History | No | String | There is no location history for this user | |
| No Search Results Message | This message displays when a user's search term returns no results | No | String | No results | |
| QR Scan Success Message | This message displays when the QR code scans successfully | No | String | Your location was submitted successfully | |
| QR Scan failure Message | This message displays when the QR code fails to scan | No | String | Adding location failed – please try again later | |
| Cancel Button | No | String | Cancel | ||
| Main Menu Bar Additional Information Label | No | String | Additional Information | ||
| Main Menu Bar Scan Label | String | Scan | |||
| Main Menu Bar History Label | String | History | |||
| Import/ Export Configuration You can configure product integration and then export it to another campusM environment, for example, from sandbox to production or from preview to production. |
|||||
| Export | Create a JSON file with all product integration configuration | No | |||
| Import | Use this option in order to load configuration from JSON of an exported product integration | No | |||
Getting Contact Tracing Results
For information about extracting Contact Tracing response data, see Get Contact Tracing Results.