
Canvas
![]()
Overview
User Experience
User Activities
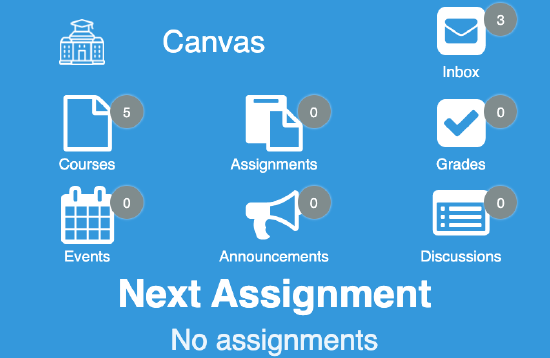
- Number of enrolled (active) courses
- Number of unread conversations (Inbox)
- Assignments count
- Grades count
- Calendar events count
- Announcements count
- Discussions count
- Next assignment due (if any)
The live tile provides deep links to the Canvas Courses app for both mobile and wed versions. Selecting Inbox links to the Canvas Inbox, and selecting all other components links to the Canvas Courses section.
Authentication
The Canvas authentication uses an OAuth Integration Profile (configured at App Settings > Integration Profile > Add Integration Profile.This must be configured before the product integration will work. See OAuth Integration Profile Configuration.
Offline Support
Canvas data is not cached on the user's device. A Live Tile is intended to present fresh data, to configure the time between updates, see Configuration.
Screenshots
The following is an overview of the Canvas product integration user interface for a reference when configuring it.
| Example of 3 x 2 dimensions |
 |
Live Tile Configuration Rules
The Canvas live tile is designed to work with the following tile sizes. The tile will attempt to display as many elements as possible regardless of the dimensions set, but we cannot guarantee the intended experience if you do not adhere to the following dimensions. The tile dimensions are set in the App Builder, while the widgets per row (and other details) are set in the Configuration page for this product integration.
- 1 wide x 1 high
- This is a special case. The tile will only display one widget (the highest prioritized, enabled widget).
- 2 wide x 1 high
- We recommend using 1 - 2 widget rows and using 1 - 3 widgets per row.
- The Next Assignment area only displays if it is the only item enabled.
- 2 wide x 2 high
- We recommend using 2 - 3 widget rows and using 1 - 3 widgets per row.
- 3 wide x 1 high
- We recommend using 1 - 2 widget rows and using 2 - 4 widgets per row.
- The Next Assignment area only displays if it is the only item enabled.
- 3 wide x 2 high
- We recommend using 2 - 3 widget rows and using 2 - 4 widgets are used per row.
- 3 wide x 3 high
- We recommend using 2 - 4 widget rows and using 2 - 4 widgets are used per row.
We recommend keeping the header text and widget labels for the live tile short.
Technical Overview
Supported Versions
There are no version requirements. The prerequisites provided below are valid for the last three years of Canvas releases (at least). The only requirement is that when your Canvas administrator adds a developer key, the Redirect URIs field is available as well as the legacy Redirect URI field. We require the former (see Prerequisites).
Prerequisites
The following prerequisites are required to configure the Canvas product integration:
- Contact Ex Libris to add your Canvas Base URL to the proxy list.
- The Canvas hostname for the product integration from which to fetch information.
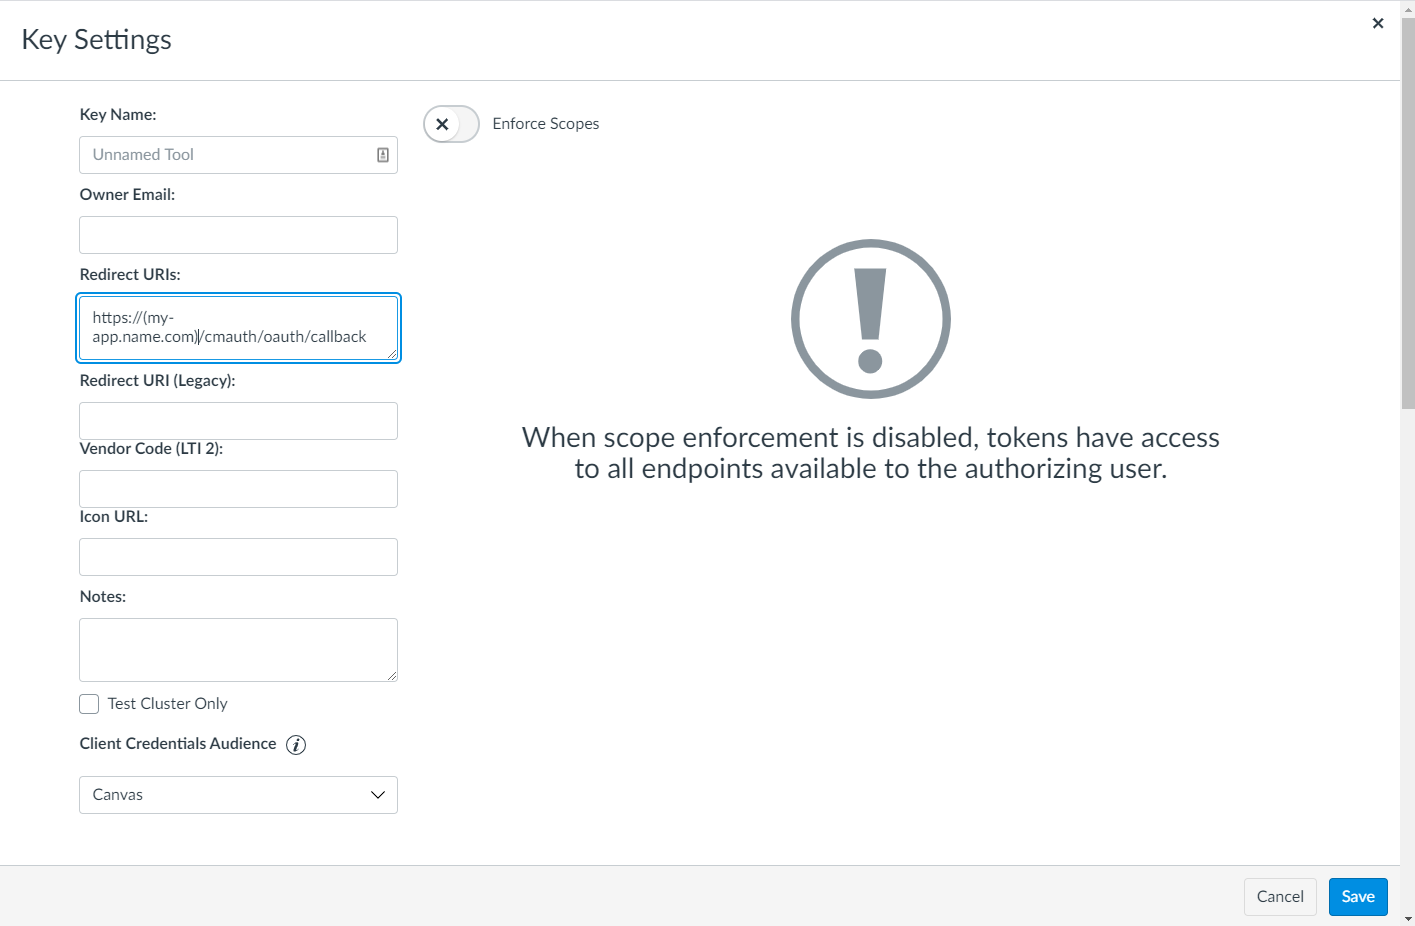
- A Canvas developer key with Redirect URLs set for your Sandbox, Preview, and Production app hostnames.
- Each hostname must end in /cmauth/oauth/callback, for example, https://my-app.name.com/cmauth/oauth/callback.
- This is not a URL that is meant to be accessible. It is used by our cloud platform to complete the OAuth authentication flow.
- Scopes are not enabled by default, but you can enable them. See OAuth Scopes.
- Once the developer key is set up, you can use the client ID and the secret to set up an integration profile for the Canvas instance you want to use with the product integration.
To configure the key, from the Canvas Admin page, select Admin > Developer Keys:
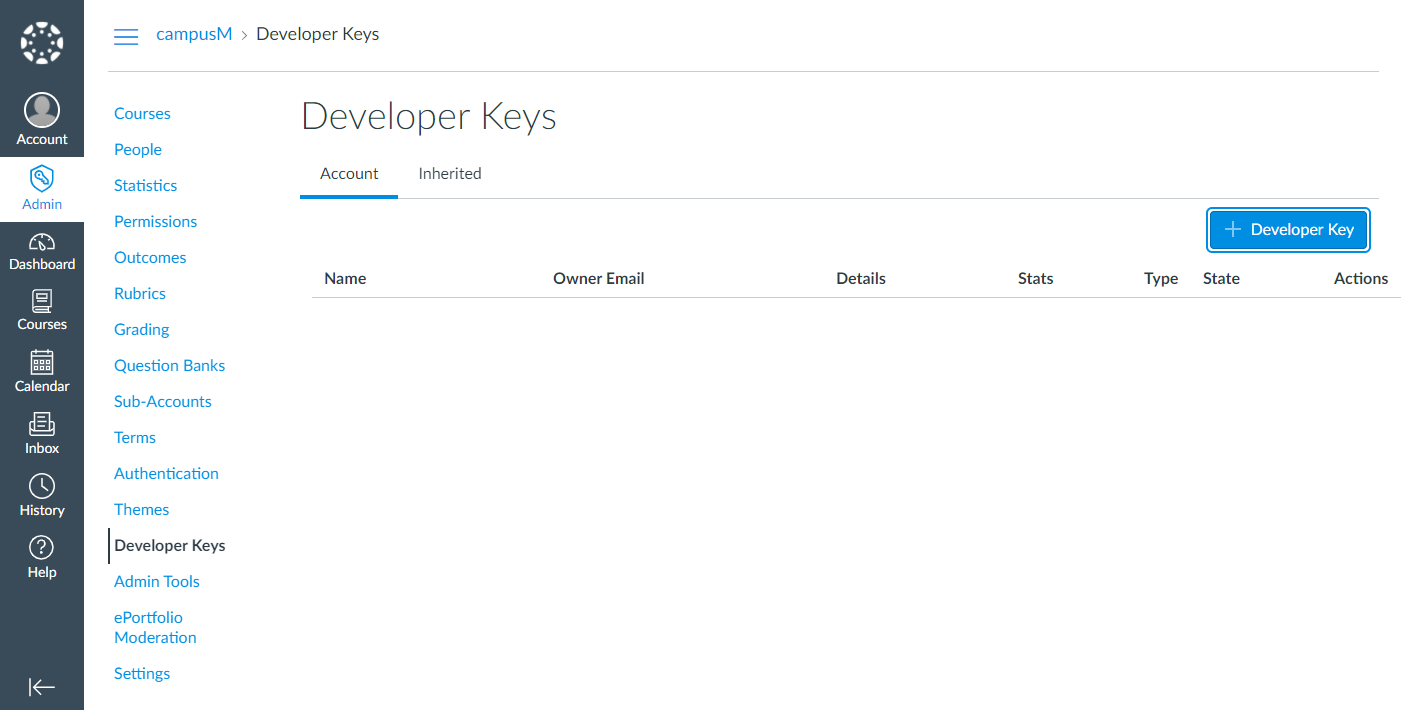 Developer Keys
Enter the URI in the Redirect URI field and select Save.
 URI Redirect
Authentication
The following is the authentication workflow:
- The end-user opens the Canvas tile.
- campusM requests a token from the Canvas token API.
- The user logins into Canvas if they have not already done so.
- If valid, Canvas sends a response with the user's access token.
- campusM sends the access token with every Canvas API request made. It is automatically refreshed on expiry unless the user has logged out of the campusM app or their Canvas session.
Configuration
To configure the Canvas product integration, first configure an authentication integration profile (subtype OAuth) that you then select in the Product Integration configuration section.
OAuth Integration Profile Configuration
You add integration profiles from App Settings > Integration Profile > Add Integration Profile and edit integration profiles from App Settings > Integration Profile.
The following table describes the configuration options available on this page. All values are exactly as-is unless listed otherwise.
Fields not listed can be left empty.
| Configuration Option | Description |
|---|---|
| Name | Anything unique that describes the profile, for example, Canvas Sandbox. |
| Description | A description of the profile. Not required. |
| Type | Authentication |
| Subtype | OAuth |
| OAuth Client ID | The ID of the Developer Key created |
| OAuth Client Secret | The secret of the Developer Key created |
| Authorization Endpoint | https://CANVAS_HOST/login/oauth2/auth (CANVAS_HOST is your Canvas instance's hostname) |
| Access Token Endpoint | https://CANVAS_HOST/login/oauth2/token |
| Token Endpoint Auth | Basic |
| User Info Endpoint | https://CANVAS_HOST/api/v1/users/USER_ID |
| Extract OAuth Tokens | Yes |
| Username Mapping | name |
| Mail Mapping | name |
| First Name Mapping | name |
| Last Name Mapping | name |
OAuth Scopes
Canvas does not enforce scopes by default on any new developer key created. However, you can enable scopes and then set them in the OAuth Scope field of the Integration Profile.
This is the current list of scopes used by the Canvas product integration:
url:GET|/api/v1/users/:id

url:GET|/api/v1/users/:user_id/courses

url:GET|/api/v1/courses/:course_id/activity_stream/summary

url:GET|/api/v1/courses/:course_id/assignments

url:GET|/api/v1/conversations/unread_count

url:GET|/api/v1/calendar_events
These scopes must be pasted into the field as-is. If you are entering them yourself, note that if you enter multiple scopes into the field, they must be separated by spaces. Any change to the scopes listed above, or their formatting, will result in a failed authentication attempt.
If you are also using the Data Export feature in Attendance, and you want to use the same Integration Profile for Data Export and a PI instance, the combined scopes look like this:
url:GET|/api/v1/courses/:id

url:GET|/api/v1/courses/:course_id/users

url:GET|/api/v1/sections/:id

url:GET|/api/v1/courses/:course_id/assignments

url:POST|/api/v1/courses/:course_id/assignments/:assignment_id/submissions/update_grades

url:POST|/api/v1/courses/:course_id/assignments

url:PUT|/api/v1/courses/:course_id/assignments/:id

url:GET|/api/v1/users/:id

url:GET|/api/v1/users/:user_id/courses

url:GET|/api/v1/courses/:course_id/activity_stream/summary

url:GET|/api/v1/conversations/unread_count url:GET|/api/v1/calendar_events
Product Integration Configuration
| Configuration Option | Description | Mandatory | Data Type | Default | Example |
|---|---|---|---|---|---|
| Enable Product Integration | Select to enable the product integration on the user's campusM app. | No | |||
| Product Integration Description | A description of the product integration for internal use. | Yes | |||
| Vendor | |||||
| Integration Profile | The name of the Integration Profile created previously, selected from a list of available profiles. | Yes | String | ||
| URL to Retrieve Information | The encoded base URL of your Canvas instance, provided by Ex Libris. | Yes | URI | Provided by Ex Libris | |
| Live Tile | |||||
| Enabled | Enables or disables the live tile itself. | Yes | Checkbox | Yes | |
| Badge Color | The color of all the icons on each Canvas widget on the live tile. | No | Color Code | #FFFFFF | #EEEEEE |
| Tile Error Background Color | Used when the tile displays an error. | No | Color Code | #AD0000 | |
| Update Rate | Frequency of updates from Canvas to the live tile (in minutes). Has a minimum of 20 (minutes). | No | Integer | 60 | |
| Enrollment Type | Sets the Canvas enrollment type for the tile. This determines what course information is returned. | No | Array | Student | |
| Live Tile Items | |||||
| Show Live Tile Header Text | Select to display the header on the live tile. If cleared, the text does not appear in the header. If both the header text and the header logo are disabled, the header does not appear. | No | Checkbox | Yes | |
| Show Live Tile Header Logo | Select to display the logo on the live tile. If disabled, the logo does not appear in the header. If both the logo and the header text are disabled, the header does not appear. | No | Checkbox | False | |
| URL for Header Logo | The URL of the image to be used as the logo in the header. | No | String | ||
| Customise Live Tile Header Padding | If enabled, enables you to customise the blank space around the header block. All values have a minimum of 0. | No | Checkbox | No | |
| The First Widget(s) Should Display on the Same Row as the Header | If disabled, the first widget row will start below the header. | No | Checkbox | Yes | |
| Widgets Per Row | This sets the number of widgets to display per row. There is a minimum of 1 and a maximum of 5. | No | Integer | 3 | |
| Show Inbox | If disabled, the inbox widget will not appear on the live tile. | No | Checkbox | Yes | |
| Show Courses | If disabled, the courses widget will not appear on the live tile. | No | Checkbox | Yes | |
|
Exclude courses that have already ended. This will also exclude all related course content. |
No | Checkbox | Yes | ||
|
Include courses that have no end date set. This will also include all related course content. |
No | Checkbox | Yes | ||
| Show Assignments | If disabled, the assignments widget will not appear on the live tile. | No | Checkbox | Yes | |
| Assignment Options | |||||
|
Assignment Buckets Canvas filters assignments into 'buckets'. This PI fetches the 'upcoming' bucket by default - enable more below. Please note this will increase API load. |
|||||
|
|
No | Checkbox |
No |
||
|
|
No | Checkbox |
No |
||
|
|
No | Checkbox |
No |
||
|
|
No | Checkbox |
No |
||
|
|
No | Checkbox |
No |
||
|
|
No | Checkbox |
No |
||
| Show Grades | If disabled, the grades widget will not appear on the live tile. | No | Checkbox | Yes | |
| Show Calendar Events | If disabled, the events widget will not appear on the live tile. | No | Checkbox | Yes | |
| Show Announcements | If disabled, the announcements widget will not appear on the live tile. | No | Checkbox | No | |
| Show Discussions | If disabled, the discussions widget will not appear on the live tile. | No | Checkbox | No | |
| Show Next Assignment Row | If disabled, the live tile will not display the next upcoming assignment. | No | Checkbox | Yes | |
| Assignment Row Filters | |||||
| Hide Past Assigments |
Hide past assignments from the upcoming assignment row. |
No | Checkbox | No | |
| Filter Buckets
Canvas filters assignments into 'buckets'. If you've configured this PI to fetch additional buckets, you can exclude them from the Next Assignment row here. |
|||||
|
|
No | Checkbox | No | ||
|
|
No | Checkbox | No | ||
|
|
No | Checkbox | No | ||
|
|
No | Checkbox | No | ||
|
|
No | Checkbox | No | ||
|
|
No | Checkbox | No | ||
|
|
No | Checkbox | No | ||
| Always Display Widget Count | If enabled, all widgets will display the count even if the count is 0. | No | Checkbox | Yes | |
| Prioritize Live Tile Items | |||||
| Priority | This ordered list prioritizes the items that appear on the live tile. The item at the top of the list appears first, while the last item appears last. | No | Ordered List | ||
| Icons | |||||
| Use Custom Icons | Select to use custom icons instead of the default live tile icons | No | Checkbox | No | |
| URL | Enter the URLs of custom images for the icons of the various widgets | No | String | ||
| Web Links and Deep-Linking | |||||
| Always Prefer Action (URL) | If enabled, the live tile will always redirect to the target of the Action (URL) set in App Builder (if any), on all platforms. | No | Checkbox | No | |
| Use Web Links on Native Devices | If enabled, the live tile will not use the deep links into the Canvas app on native devices, and will open the Canvas website instead. | No | Checkbox | No | |
| App Store URLs | |||||
| Canvas Google Play Store Page URL | This is required for the fallback behavior in all deep links to third-party apps. | No | URI | https://play.google.com/store/apps/details?id=com.instructure.candroid | |
| Canvas Apple App Store Page URL | This is required for the fallback behavior in all deep links to third-party apps. | No | URI | https://itunes.apple.com/gb/app/canvas-by-instructure/id480883488 | |
| Text/Labels | |||||
| Live Tile Header Text | This sets the text for the live tile header. It is displayed if the Show Live Tile Header Text checkbox is selected. It is recommended you keep this text short. | No | String | Canvas | |
| Text - "Inbox" | Displayed underneath the Inbox widget, if enabled. | No | String | Inbox | |
| Text - "Courses" | Displayed underneath the Courses widget, if enabled. | No | String | Courses | |
| Text - "Assignments" | Displayed underneath the Assignments widget, if enabled. | No | String | Assignments | |
| Text - "Grades" | Displayed underneath the Grades widget, if enabled. | No | String | Grades | |
| Text - "Events" | Displayed underneath the Calendar Events widget, if enabled | No | String | Events | |
| Text - "Announcements" | Displayed underneath the Announcements widget, if enabled. | No | String | Announcements | |
| Text - "Discussions" | Displayed underneath the Discussions widget, if enabled. | No | String | Discussions | |
| Text - "Next Assignment" | The label for the Next Assignment Row block. | No | String | Next Assignment | |
| Text - "No assignments" | Displayed if 'Show Next Assignment Row' is enabled, but there are none returned by Canvas. |
No | String | No assignments | |
| Date Format (long) | You can enter any ISO-standard date format here. For more information on LL, LLL and LLL, see Locale aware formats at Moment.js Documentation. | No | String | LL | |
| Text - "Error fetching courses from Canvas" | Displayed if Canvas does not return all of the required content needed for the live tile. | No | String | Error fetching courses from Canvas | |