
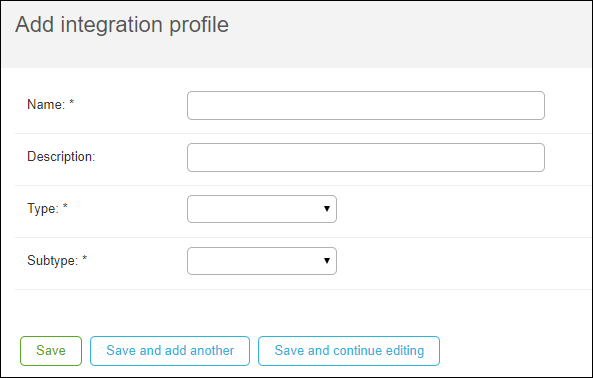
Configuring Integration Profiles
![]()
Permissions
- System administrators with the All Permissions option selected
- Users with the Can change integration profile permission
General Configuration
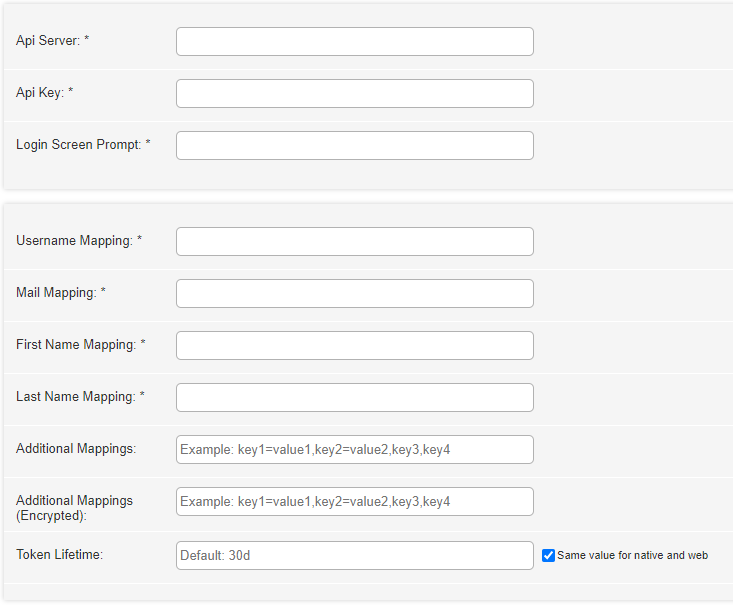
For all campusM token based authentications, the following attributes appear in the second part of the authentication configuration page:
- Username Mapping (required) — The name of the attribute in the response to be used as the campusM app username.
- Mail Mapping (required) — The name of the attribute in the response that contains the user’s email.
- First Name Mapping (required) — The name of the attribute in the response that contains the user’s first name.
- Last Name Mapping (required) — The name of the attribute in the response that contains the user’s last name.
- Additional Mappings (optional) — This field takes multiple comma delimited name and value pairs that are added in a designated part of the token, where additional information can be kept and then used in the different parts of the application. A single value can be supplied if the same attribute name in the response should be used (so instead of department=department, you can type just department). For example: job=title,tel=mobile,office,department.
- Additional Encrypted Mappings (optional) — Same as Additional Mappings but is encrypted on the token.
- Attribute to Persist – Attribute that can be defined against the user record, such as Student Identifier, that enable the institution to allow the user record to persist, in spite of changes to the email address. An example would be StudentId=<field value from IDP>.
- Token Lifetime — The expiration date for the generated token used by campusM. If left empty, the default is 30 days for both Web and Native mobile. Example values are: 30d, 120m, 72h.
It is recommended to have the token lifetime (expiration) configured at the 30d level to avoid the need for the user to frequently need to re-login/authenticate to campusM.The token lifetime definition represents the campusM authentication token lifetime (the one used within campusM to ensure the user is authorized to use the system functions), NOT the IdP session/token lifetime (when relevant) which is typically much shorter than 30d and may be passed by the browser to seamlessly login to other systems covered by the same IdP.
Configurations Per Authentication Type
SAML2
Customer Configuration for SAML2
campusM Configuration for SAML2
For new configurations, only Default is available as a campusM certificate metadata file version.
For existing profiles, you can select:
- Default, exp 07-Jan-25, cert_Id: SAML_120723
- Old, exp 09-Aug-24, cert_Id: SAML_090723
- Deprecated, exp 09-Jan-24, cert_Id: SAML_081222
- Deprecated, exp: 08-Jun-23, cert_Id: SAML_140622
- Deprecated, exp: 05-Jan-23, cert_Id: SAML_030122
- Deprecated, exp: 07-Jun-22, cert_Id: SAML_020621
- Self-signed, exp 15-Jan-32, cert_id: SAML_SELFSIGNED
The certificate must be replaced prior to the expiration date of the chosen certificate. If you opt to use a previous certificate, campusM continues to accept the certificate even after the expiration date. If you edit an existing profile and select a new certificate, once you save the profile, the previous certificate becomes unavailable. Before changing your certificate, you must check with your IT department.
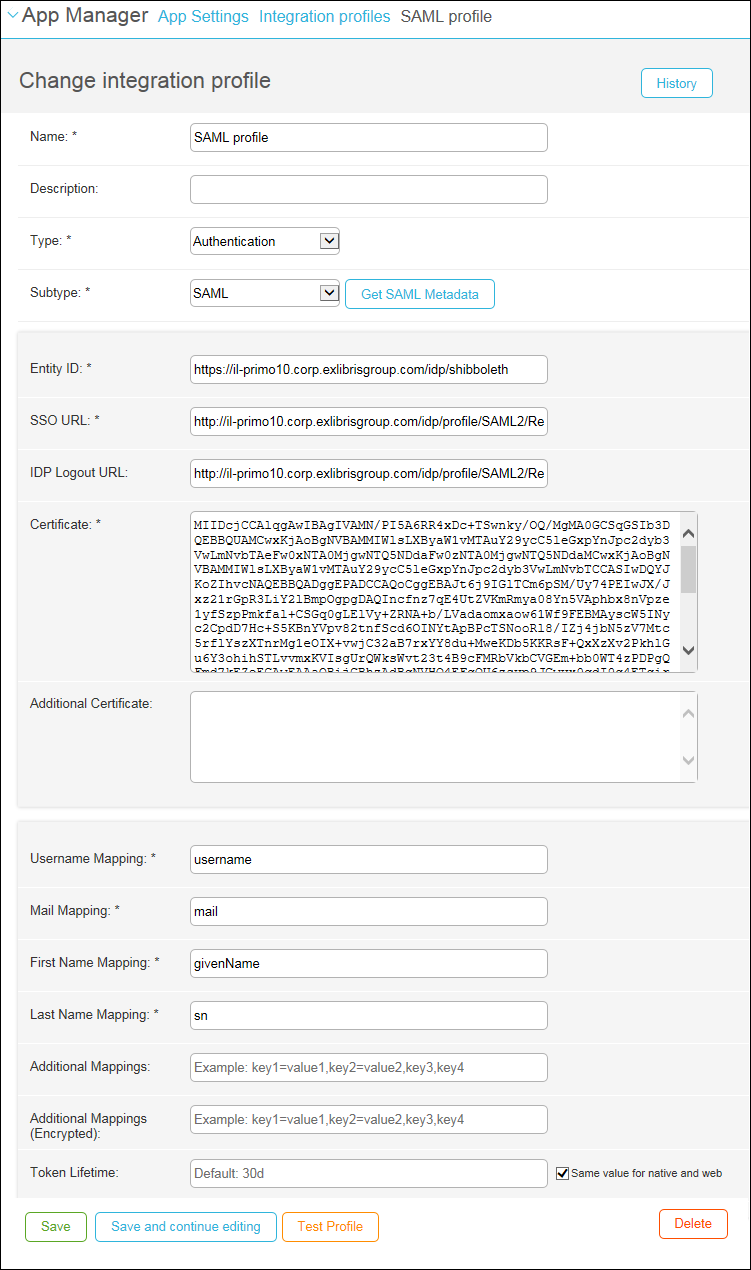
- campusM Certificate (required) — The certificate used for communication. Select the one with the latest expiration date.
- Entity ID — An attribute on the root EntityDescriptor element in the IdP’s metadata.
- SSO (Single Sign On) URL (required) – At the end of the IDPSSODescriptor element (the first one if there are multiple) is one or more SingleSignOnService elements. Take the one that has its Binding element set to: urn:oasis:names:tc:SAML:2.0:bindings:HTTPRedirect and enter the Location attribute here.
- IDP Logout URL — The URL we redirect to when logging out of campusM.
- Use SLO — When checked, a SAML SLO request is sent to the "IdP Logout URL" instead of a simple redirect.
- Show Platform — When checked, we add a parameter that indicates the originating platform to our SAML requests, can be used for different behaviour by platform.
- Certificate – In the IDPSSODescriptor element of the metadata, there are one or more KeyDescriptor elements that may have an optional use attribute. Copy the attribute that is set to signing and put it in the X509Certificate element.
- Additional Certificate – You can add an additional certificate.
For other general configuration parameters that are common across the different authentication types see General Configuration.
OAuth2
Customer Configuration for OAuth2
campusM Configuration for OAuth2
- OAuth Vendor — Default “Custom” – change to Google/Facebook/Auth0 if relevant. When choosing Google or Facebook, some parameters are populated for you automatically.
- OAuth Client ID (required) — The client ID that the customer’s system produces when registering the campusM app.
- OAuth Client secret (optional) — This is provided when registering the app. Optional, but recommended.
- Authorization endpoint (required) — The endpoint to where the user is redirected for login. When selecting Google or Facebook, this is populated for you automatically.
- Add re-authenticate prompt — When checked, if we don't have an access token for the user, we add the "Prompt=login" to authentication request, which forces the user to choose a user to authenticate.
- Access token endpoint (required) — The endpoint from where the OAuth tokens are fetched. When selecting Google or Facebook, this is populated for you automatically.
- Token Endpoint Auth — The authentication method used for the token endpoint. Options are Post or Basic.
- User info endpoint (optional) — The endpoint from which user information is retrieved by using the access token. If this is not provided, it is expected that the user information is contained in an id_token (JWT) returned from the access token endpoint response. If that is not found, the access token is expected to be a token containing the information. When selecting Google or Facebook, this is populated for you automatically.
- OAuth Scope (optional) — Used to define the amount of information sent back in the responses. For Facebook, enter email. For Google, enter profile email. For Microsoft Azure, enter openid email profile offline_access.
- Logout URL (optional) — A general logout URL that allows the IdP to terminate the user’s session. For Shibboleth, an example syntax is: https://
/idp/profile/Logout. If this is not provided, the user’s session with the IdP is not terminated when logging out of campusM. - Token verification certificate (optional) – The certificate with which the token (either id_token or access_token where a user info endpoint is not provided) can be verified. Only one certificate is supported currently, so if there is a rotating set of keys that is being used to sign the tokens, leave this empty.
- Extract OAuth tokens (optional) — Not selected by default. Selecting this option saves encrypted during the login process the tokens returned from the access token endpoint on the resulting campusM token for later use.
The following is required for this to function properly:
- Access token and expiry (expires_in)
- Refresh token (refresh_token)
For other general configuration parameters that are common across the different authentication types see General Configuration.
For iOS, social login is only supported when your default browser is Safari.
OIDC
Social Login
Before using Social Login, contact support to enable this option for you.
Configuring Social Login for Facebook
The following steps are required to enable social login in campusM using Facebook.
Configuring and Enabling campusM Login for Facebook
- Create a Facebook account for the institution. The account is used for defining the application on the institution’s behalf.
- Connect to the Facebook Developers site with the institution’s Facebook account. Register as a developer.
- Create an application for enabling social login — see Defining Facebook App for social login in campusM.
- From the created app, copy the client ID and secret.
Configuring Social Login for Google
The following steps are required to enable social login in campusM using Google.
Configuring and Enabling campusM Login for Google
- Create a Google account for the library. The account is used for defining the application on the institution’s behalf.
- Connect to Google’s APIs Console with the library’s Google account.
- Create an application for enabling social login — see Defining Google App for social login in campusM.
- From the created app, copy the client ID and secret.
Configuring Social Login for Linkedin
The following steps are required to enable social login in campusM using Linkedin.
Configuring and Enabling campusM Login for Linkedin
- Create a Linkedin account for the institution. The account is used for defining the application on the institution’s behalf.
- Connect to the Linkedin Developer Site with the institution’s Linkedin account.
- Create an application for enabling social login.
- From the created app, copy the client ID and secret.
Alma Social Login
Perform the following configurations in campusM for Alma IdP setup, with the following:
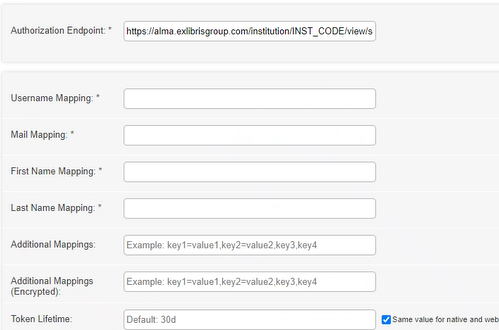
The Authorization Endpoint must use the following template: https://alma.exlibrisgroup.com/institution/01BC_INST/view/socialLogin
Connect Layer
Customer Configuration for Connect Layer
campusM Configuration for Connect Layer

- Login screen prompt (required) – the message to be displayed on the login screen
- Authentication server (required) – the connect layer against which to authenticate
- Login service path (required) – the path to the login service
campusM Configuration for LDAP
Perform the following configurations in campusM for LDAP:
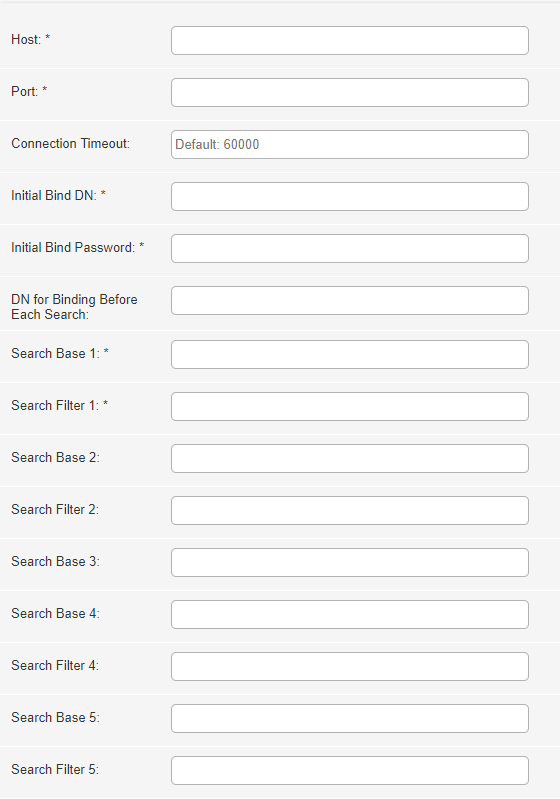
Fill out the fields of the integration profile configuration, according to the following:
- Host (required) — The required LDAP server.
- Port (required) — The LDAP secured connection port for the server.
- Connection Timeout — The amount of time after which to disconnect if the LDAP server does not respond. The default is 60000 ms.
- Initial Bind DN (required) — An object comprised of user and user location in the LDAP directory tree, which binds the LDAP to grant permissions to access
- Initial Bind Password (required) — The password of the initial bind user.
- DN For Binding Before Each Search — Parameter to specify the DN to use for dynamic password binding instead of a hard-coded password for the initial bind.
- Search Base — Specifies the base of the subtree in which the search is to be constrained.
- Search Filter — Select the users in the subtree that match the filter.
- Login Prompt Label — The message to be displayed on the login screen.
- Username Label — The label used for the "username" parameter.
- Password Label — The label used for the "password" parameter.
- Submit Label — The label used for the "submit" parameter.
- Login Failure Label — The message to be displayed on the login screen in case of a failure.
- For other general configuration parameters that are common across the different authentication types see General Configuration.
It is possible to define up to five bases and filters. If the results of the search base/search filter are not unique (or a zero-size result), the search step is repeated for the next provided search base/search filter.
campusM Configuration for Alma IdP
Perform the following configurations in campusM for Alma IdP setup:
Fill out the fields of the integration profile configuration, according to the following:
- Api Server (required) — The API server relevant for your geographic location, the options are:
- North America — https://api-na.hosted.exlibrisgroup.com
- Europe — https://api-eu.hosted.exlibrisgroup.com
- Asia Pacific — https://api-ap.hosted.exlibrisgroup.com
- Api key (required) — The API key you receive from Ex Libris support or project team with User API Read/Write permission.
- Login screen prompt (required) – The message to be displayed on the login screen.
campusM Configuration for Alma Social Login
Perform the following configurations in campusM for Alma Social Login setup:

Populate the integration profile configuration fields according to the following:
- Authorization endpoint (required) — The endpoint to where the user is redirected for login.
Testing Integration Profiles
- From the Main Menu, select App Settings > App Settings > Integration Profiles. A list of your integration profiles appears.
- Select an integration profile. The following page, for example, displays the integration profile information:
 Change Integration Profile
 - To test the profile, select Test Profile. The following page appears, displaying the authentication request and the request redirect URL.
Any changes you make must be saved before you can test the profile.
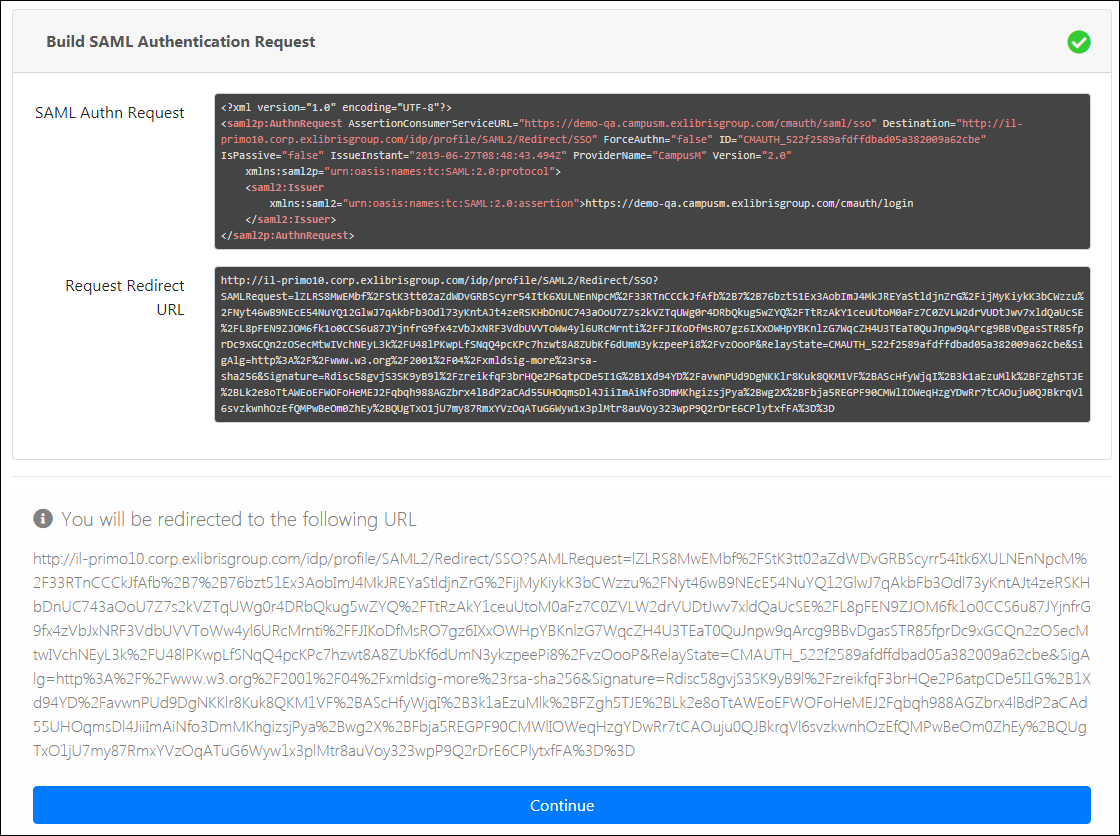 Build Authentication Request
 - Select Continue. A new IdP login page appears.
- Enter your username and password and log in.
A test report appears indicating if the test passed successfully or if there were any failures. Select an element to see more information.
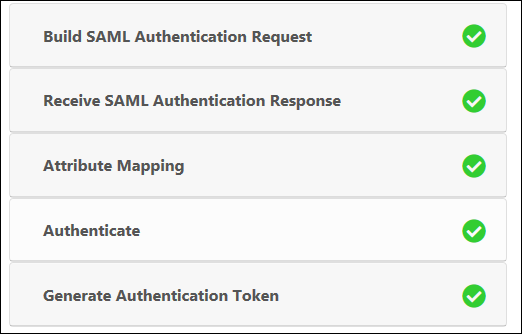 Profile Test Report