
Primo November 2015 Highlights
Introduction
This guide summarizes the various enhancements and changes that are new for the November 2015 release of Primo. The most significant changes were made to the following areas: User Experience, Administration Tools, and Infrastructure.
Product Interoperability Matrix
The following table lists the minimum version that is needed for other Primo products to support some of the new features in Primo version 4.0 and later releases.
| Product | Version |
|---|---|
|
Aleph
(to allow OvP) |
Aleph 18 with the April 2010 service pack (SP), Aleph 20.1 with the February 2010 SP, Aleph 22 (photocopy requests)
|
|
Voyager
(to allow OvP) |
Voyager 7.2 with the April SP (7.2.1)
|
|
MetaLib
(to allow Find Database) |
4.3.3
|
|
SFX
|
March 2010 revision
|
New User Experience Functionality
The updates to the Front End include the following main enhancements:
UI Notification for Expanded Search Results
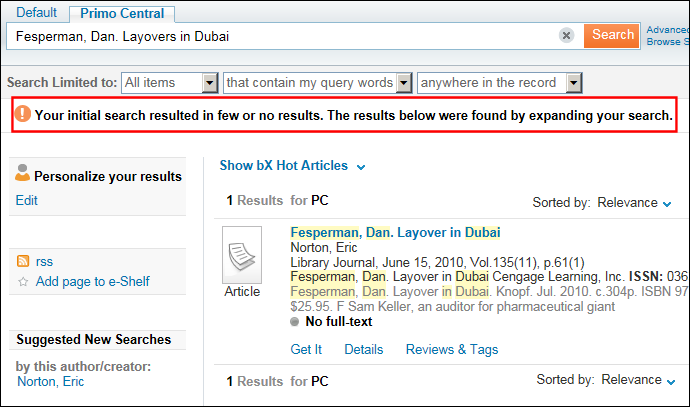
This enhancement notifies users when the system expands their search results due to few results returned in their original queries.
The Did you mean functionality overrides this notification.
Description
When an initial search yields zero or very few results, the system alters the query in order to return relevant records. Because this could cause confusion to users for specific queries, a notification now appears at the top of the results page in the following cases:
-
For local Primo searches, a notification message now appears when the original search yields no results and an additional search was performed using the following methods:
-
stemming
-
OR query (some of the search words are dropped according to a predefined algorithm)
-
-
For Primo Central searches, the UI message now appears when expansion to full text occurs in the following cases:
-
when the number of results is less than two
-
when the number of results is less than 10 and topScore is less than 0.000001
 Expansion Notification in the Front End
 -
Back Office Configuration
This feature is enabled by default. You may disable the notification or update the text that displays for the notification. The following table describes the configuration associated with this capability:
| Configuration | Description |
|---|---|
|
Error messages code table in the Front End subsystem
|
The following code allows you to localize and modify the expansion notification that displays in the Front End:
default.results.note.expanded_search – Your initial search resulted in no hits. The results below were found by expanding your search.
|
|
CSS
|
If you want to hide the notification, add display: none to the following line in your view’s CSS file, as follows:
.EXLSystemFeedbackExpanstionMessage{display:none;}
|
Ordering the Actions List
This enhancement allows customers to set the order of the actions that appear in the following drop-down lists in the Front End:
-
e-Shelf drop-down list – lists the enabled push-to actions defined in the PushTo Adaptors mapping table.
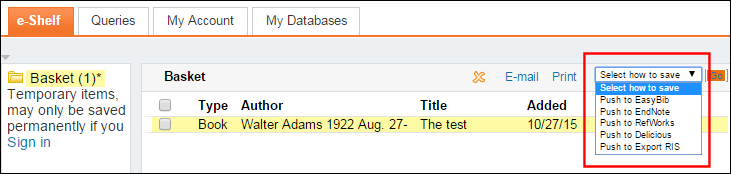 e-Shelf Push-to Actions
 -
Per record Actions list – lists the enabled push-to actions defined in the PushTo Adaptors mapping table and additional actions.
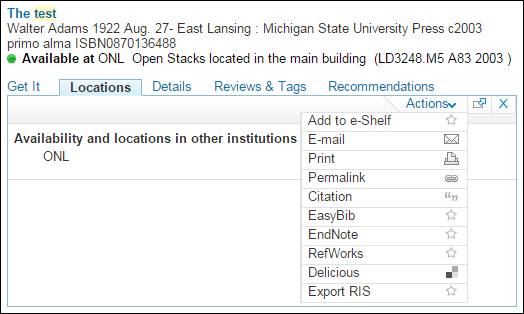 Per Record Actions List
Description
The Actions List mapping table allows you control the order in which actions appear in the Actions drop-down lists in the Front End. This new table contains the following fields:
-
Enabled – Indicates whether the action is enabled in the Front End.
-
Action name – A drop-down list
-
Order – Enter a number for each action indicating its position in the Actions drop-down list. The actions are listed in ascending order in the Front End.
-
View – Select a specific view name or default if you want the setting to apply as the default setting for all views.
-
Description – An optional description for the mapping row.
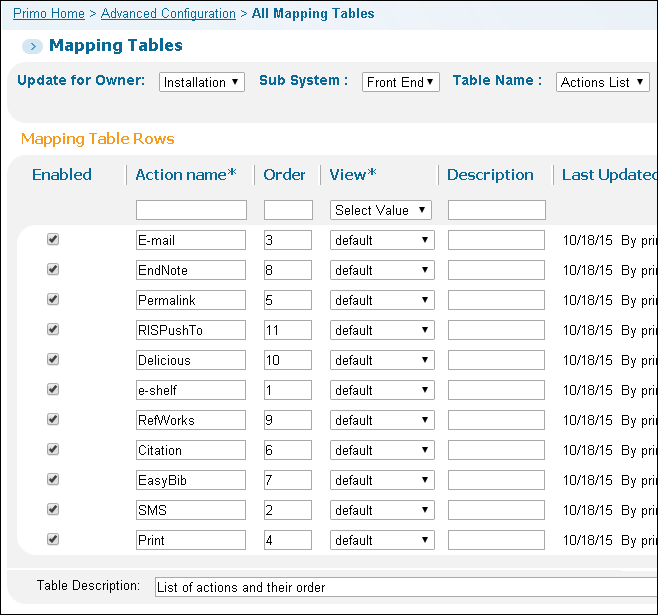
Actions List Mapping Table
In the e-Shelf only the push-to options enabled in the PushTo Adaptors mapping table appear in the Actions list.
Support Maximum Renewal Data for Alma
This enhancement adds support for Alma's Maximum Renewal Date field, which can be displayed in My Account.
Description
The max_renew_date field has been added to the Loans Detailed Display mapping table under the OPAC via Primo subsystem, which is enabled in the My Account > Loans Details page out of the box. To add the field to the My Account > List of Loans page, you must swap it for one of the six existing columns. If the max_renew_date field is empty, the system will not display it.
In addition, the following code has been added to the Loans List Labels code table under the OPAC via Primo subsystem to allow you to customize the display text and provide localization in the Front End:
default.loans.max_renew_date – Maximum renewal date:
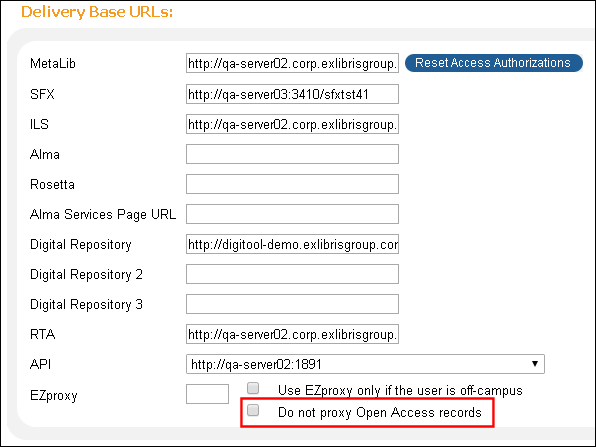
Disabling Proxies for Open Access Records
This enhancement allows customers to disable proxies in outgoing URLs for open access Primo Central records if EZproxy has been enabled.
Currently, open access is determined at the collection level and not for individual articles within a collection.
Description
The Do not proxy Open Access records check box has been added to the Institutions Wizard under the Delivery Base URL section (Primo Home > Ongoing Configuration Wizards > Institution Wizard). When selected, this check box disables the EZproxy for open access PC records.
Institution Wizard - Edit or Create Wizard Page
New Administration Tools Functionality
The updates to the Back Office include the following main enhancements:
Configuring Normalization Test Files Per Institution
This enhancement allows customers to create and maintain normalization rule test files at the institution level instead of sharing files across all institutions in a multi-institutional environment.
Description
The following options have been added to the Configure Test page, which can be accessed by clicking Test next to the normalization rules set that you want to test on the Normalization Rules Sets page (Primo Home > Advanced Configuration > Full Normalization Rule Configuration):
-
Load – This option allows you to load a test file that you have created on your local machine and save the new file to the server.
-
Duplicate – This option allows you to make a copy of a test file, update its contents, and save the institution-specific changes to the server.
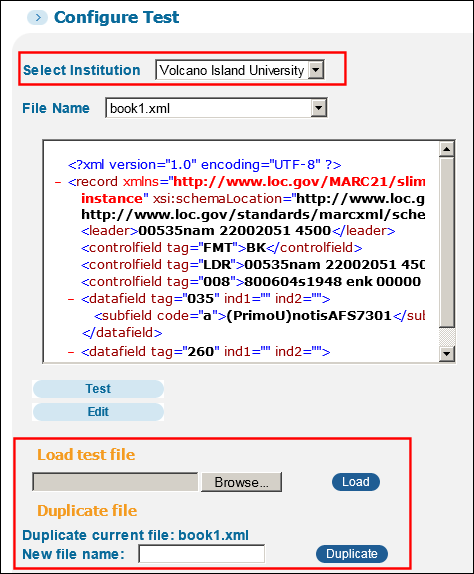
Configure Test Page
The Select Institution field allows you to associate a test file with an institution.
Scheduling Primo Analytics Reports
This enhancement enables customers who have access to Primo Analytics to schedule report and dashboard jobs from the Primo Back Office.
Description
The Schedule Reports and Dashboards page (Primo Home > Schedule Primo Analytics) has been added the Back Office. It allows you to create and modify report and dashboard jobs. In addition, the Last Run Date and Last Run Status columns allow you to monitor the status of your report and dashboard jobs. For more details, see Overview of Primo Analytics.
Schedule Reports and Dashboards Page
Primo Analytics Improvements
With this release additional data will be sent to the Primo Analytics database and will be available for use in December. The new data includes the following elements:
-
The active tab – added to all search and results list related actions and search related Subject Areas
-
The resource type prefilter and search type – added to the Zero Results Searches Subject Area
-
Number of clicks on help, My Account, and e-Shelf
-
Facet values for the Top level and Resource type facets.
-
Number of clicks for the Expand beyond library collections option
-
On/off campus
More details will be provided in the December release of the Primo Analytics Guide.
New Infrastructure Functionality
The updates to Primo’s infrastructure include the following main enhancement:
Support for Additional Authentication Methods
The Primo User Authentication Manager (which is an alternative method to PDS) has been updated to support the following types of user authentication: LDAP, SAML (Security Assertion Markup Language), and Alma.
Description
The Primo Authentication Manager supports the authentication of users using SAML, LDAP, and Alma. Login profiles allow you configure the authentication stages (user authentication and user information) separately so that you can specify different systems for each. The following features are available with the Primo Authentication Manager:
-
Login Profile – Each login profile includes the definitions for both user authentication and user information so that you can define user authentication with one system and fetch user information from another system. For example, you can configure the profile to authenticate users with SAML (such as Shibboleth) and fetch user information from Alma. For more information, see Login Profiles.
-
Parallel Login – defines two login profiles for different groups within an institution. For example, if students and staff authenticate using Shibboleth (SAML) and temporary library users that are registered in Alma authenticate using Alma, you can define two profiles: one for SAML and another for Alma. The Primo sign-in page will display both sign-in options. For more information, see the Primo Back Office Guide.
-
Cascading Login – You can configure multiple login profiles that are assigned an order of precedence. This allows you to attempt authentication with the profile with the highest precedence and then attempt authentication with the login profile with the next highest precedence if authentication was unsuccessful. Cascading logins are possible only when Primo interfaces directly with the authentication system and the login page is a Primo page, which is provided with LDAP and Alma authentication only. For more information, see the Primo Back Office Guide.
Login Profiles
The Login Profiles page (Primo Home > Ongoing Configuration Wizards > User Authentication Wizard) allows you add and manage login profiles, which may be configured to support multiple authentication systems (such as SAML, LDAP, and Alma).
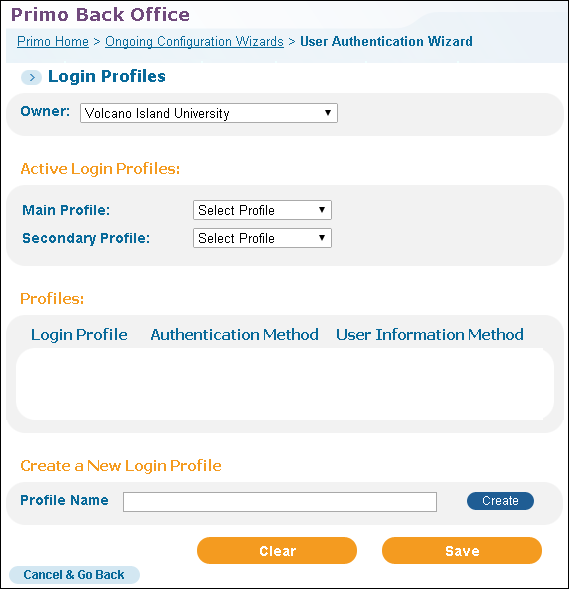
Login Profiles Page
During the creation of a login profile, you will need to specify the authentication system and configure related parameters. For example, the following parameters appear for SAML authentication:
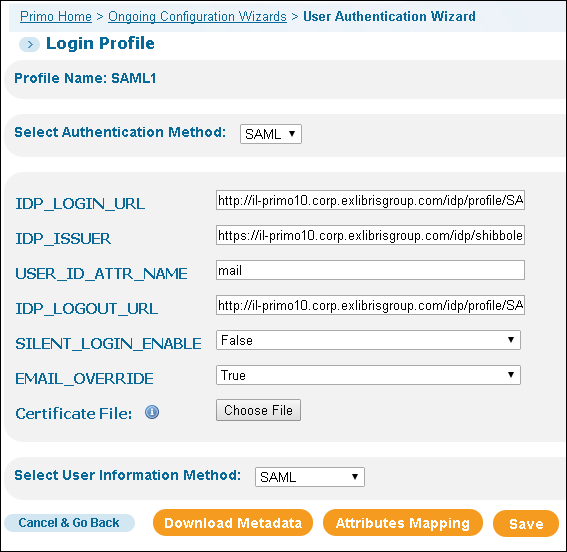
SAML User Authentication Parameters
In addition, you will need to select a user information system and map attributes from the user information system to Primo. For details on creating login profiles, see the Primo Back Office Guide.
Attribute Mapping
In addition to authenticating users, Primo also needs some basic information about the users. The user information can be obtained from the same system that is used for user authentication or a different system. The most common combination is to authenticate with an authentication system like Shibboleth (SAML) or LDAP and to fetch user information from the ILS (Alma).
Primo allows you to map the following values from the user information system:
-
email_address – The user’s email address. Primo will use this email address if the user does not have an email address defined in Primo.If the EMAIL_OVERRIDE parameter has been enabled, the value of this attribute will override the email address defined for the user in Primo.
-
group – The user group.
-
id – The user ID.
-
ils_api_id – The ID used for OPAC via Primo in case it is not the same as the regular ID.
-
institute – The Primo institution. This attribute can be used if there is a need to override the institution that the user signed in with (that is the institution of the view).
-
name – The name that displays for the user in the Primo Front End.
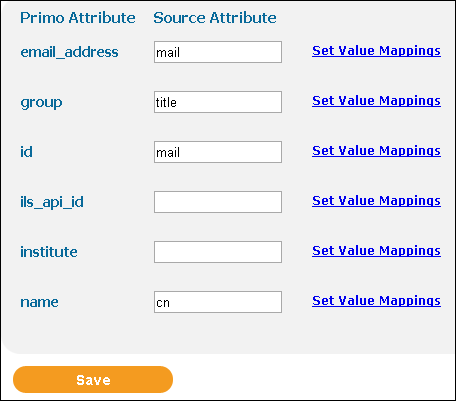
SAML Attribute Mapping
Login Pages
The following login pages have been added to allow users to log on to the Primo Front End:
-
Login page – Used when signing in locally using LDAP or Alma. This page allows users to specify their credentials to gain access to the Primo Front End. Optional login tips can be added to a new static HTML, which can be displayed at the bottom or the right side of the page.
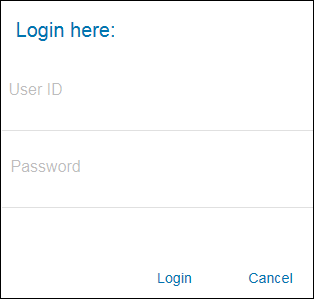 Login Page
 -
Parallel login page – Used when both primary and secondary login profiles are enabled in the login profile. This page allows users to select the login page for either the primary or secondary user authentication system. For each link, you can specify an optional description for the link.
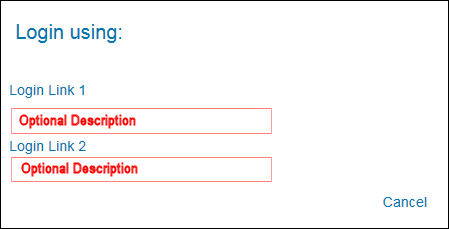 Parallel Login Page
Back Office Configuration
The following table lists the changes to various components in the Back Office. For more details, refer to the Back Office Guide.
| Component | Description |
|---|---|
|
Views Wizard
|
The signin_tips.html static HTML file was added to the Home Page > Static HTML tile in the Views Wizard to allow you to add login tips to the new login page. Out of the box, this file is empty.
|
|
User Authentication Wizard
|
The Login Profiles page (Primo Home > Ongoing Configuration Wizards > User Authentication Wizard) was modified to support SAML, LDAP, and Alma user authentication methods.
|
|
Code tables
|
The User Login code table has been added for the customization and localization of the labels on the login pages.
|
|
CSS
|
The following elements were added to support the new login pages:
|