User Groups Configuration Wizard
Every user in the system is associated with a single user group. User groups are used to define the user's search and delivery restrictions. Before the user signs in to the system, the user's user group is Guest.
The User Groups Configuration wizard (Primo Home > Ongoing Configuration Wizards > Configure User Groups) allows you to manage your user groups via the User Group code table. From this code table, you can perform the following operations on user groups:
Changes to the user groups must be deployed before changes take effect. To deploy these changes, click Deploy on the Configure User Groups page (see User Groups Code Tables Page).
Creating a User Group
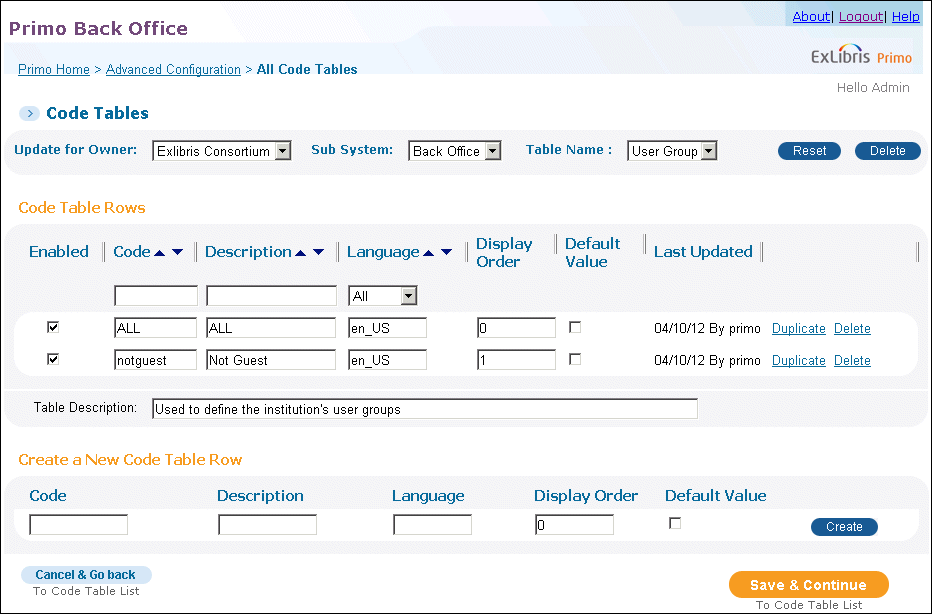
The User Group code table page allows you to create different user groups for the various users of your institution's system.

User Groups Code Tables Page
To create a User Group:
-
Select the owner of the normalization rules from the Update for Owner drop-down list.For installation-level staff users, select the installation name or a specific institution from the drop-down list. The valid values are Installation (if using the default name) or a specific institution.For institution-level staff users, this field is set to your institution.
-
In the Create a New Code Table Row area, enter the user group information, as described in the following table:
Create a New Code Table Row Field name Description EnabledSelect this check box to enable the the user group.CodeThe user group's ID code.DescriptionDescriptive information about the User Group.LanguageThe interface language for the User Group.Display OrderThe order in which the value (Description) displays in Back Office drop-down lists. If rows are assigned the same value, the items will appear as they are listed in the table.Default ValueWhether this is the default User Group. -
Click Create.The new user group appears in the list of code table rows.
-
Click Save & Continue.
Editing a User Group
The User Group code table page allows you to edit your institution's user groups once they are created.
To edit a User Group:
-
In the Code Table Rows area, edit the code table fields according to Create a New Code Table Row.
-
If the code table rows are grayed out, you will need to click the Customize button to create a version for your configuration level (or another institution if you are an installation-level staff user) so that it can be edited.For more information on using code tables, see Code Tables.
-
Select the Enabled check box to indicate which user groups are enabled in the system.
-
Click Save & Continue.The User Groups code table is updated.
Deleting a User Group
The User Group code table page allows you to delete a user group.
To delete a User Group:
-
If the code table rows are grayed out, you will need to click the Customize button to create a copy for your configuration level so that it can be edited.For more information on using code tables, see Code Tables.
-
In the Code Tables area, click Delete next to the row of the user group that you want to delete. Do not confuse this button with Delete button above the table, which deletes the entire table from your configuration level and restores the table to the previous configuration level (such as institution-level to installation-level or installation-level to OTB).Deleting a user group deletes all the user group restrictions and the user group's attribute mappings.The user group is deleted from the system, and the code table row is deleted from the code table list.

