
Using Normalization Mapping Tables
Normalization mapping tables are used to translate one set of codes to another. Primo uses several pre-defined normalization tables for its template normalization rules. These rules can be modified. You can create, edit, or delete the normalization mapping tables during ongoing configurations.
The Normalization Mapping Table section enables you to manage only the normalization mapping tables. If you want to manage other mapping tables, use the instructions in Mapping Tables.
To manage the normalization mapping tables, you must first access the Pipes Configuration wizard. After accessing the Normalization Mapping Tables Configuration wizard, you can perform the following:
Creating Normalization Mapping Tables
You can create new mapping tables for your normalization rules.
To create a Mapping table:
-
On the Pipe Configuration Wizard page, click Normalization Mapping Tables Configuration.The Mapping Tables page opens (see Mapping Tables Page).
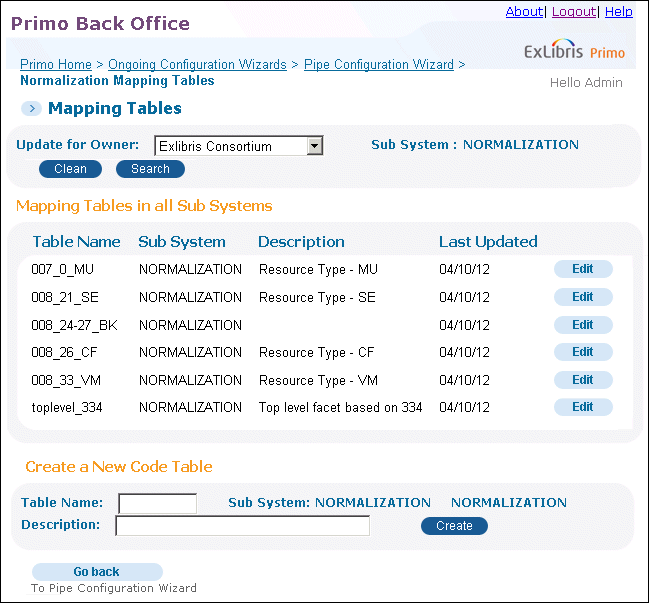 Mapping Tables Page
 -
Select the owner of the normalization rules from the Update for Owner drop-down list.For installation-level staff users, select the installation name or a specific institution from the drop-down list. The valid values are Installation (if using the default name) or a specific institution.For institution-level staff users, this field is set to your institution.
-
In the Create a New Code Table area, enter your mapping table information (see Create a New Normalization Mapping Table Details for a list of fields).
Create a New Normalization Mapping Table Details Field name Description Table NameThe name of the table as used in the Normalization rules. (In the Normalization Editor page use the Use Mapping Table transformation routine.)Sub SystemThe sub system to which the table is added. For this table, the subsystem is Normalization.DescriptionDescriptive information about the table. -
Click Create.The new mapping table appears in the Mapping Table List page. You can now edit the mapping table.
Editing Normalization Mapping Tables
You can use the instructions in this section to add mapping table rows. You can edit the mapping details at any time.
To edit Mapping Table details:
-
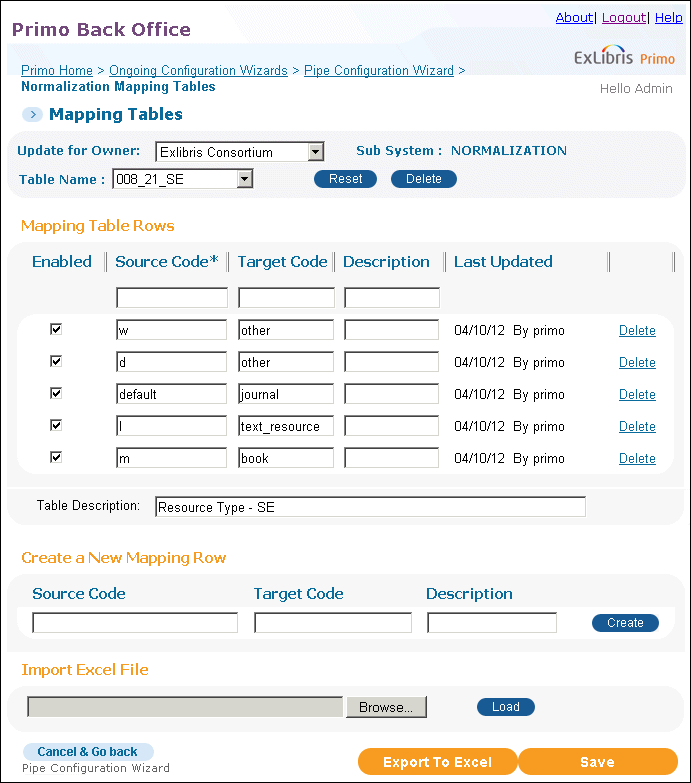
On the Pipe Configuration Wizard page, click Normalization Mapping Tables Configuration.The Mapping Tables page opens, displaying the normalization mapping tables (see Mapping Tables Page).
-
Click Edit next to the mapping table that you want to update.The Mapping Tables page for editing appears.
-
Select the owner of the normalization rules from the Update for Owner drop-down list.For installation-level staff users, select the installation name or a specific institution from the drop-down list. The valid values are Installation (if using the default name) or a specific institution.For institution-level staff users, this field is set to your institution.
 Mapping Tables Page for Editing
 -
If the mapping table rows are grayed out, you will need to click the Customize button to create a version for your configuration level (or another institution if you are an installation-level staff user) so that it can be edited.See Mapping Tables for a description of the normalization mapping tables.
-
In the Mapping Table Rows area, edit the mapping table rows. The out-of-the-box mapping rows have specific names for the source and target fields. If the mapping table is not an out-of-the-box mapping table, the mapping row field names are generic, and can be edited according to the following table:
General Mapping Table Rows Details Field name Description Source CodeThe source value.Target CodeThe target value to which the source is being mapped.DescriptionA description of the mapping rows. -
Click Save to save all changes to the mapping rows.
Creating Normalization Mapping Table Rows
You can create a new mapping table row during ongoing configuration.
To create a new Mapping table row:
-
On the Pipe Configuration Wizard page, click Normalization Mapping Table.The Mapping Tables page opens (see Mapping Tables Page).
-
Click Edit next to the mapping table to which you want to add a row.The Mapping Tables page for editing opens (see Mapping Tables Page for Editing).
-
If the mapping table rows are grayed out, you will need to click the Customize button to create a version for your configuration level (or another institution if you are an installation-level staff user) so that it can be edited.
-
In the Create a New Mapping Row area, enter the mapping row's information (see General Mapping Table Rows Details for a list of fields).
-
Click Create.The new mapping table row appears in the Mapping Table page for editing.
-
Click Save to save other changes to the mapping rows.