
Configuring User Authentication
Introduction
Rapido supports several authentication schemes, which are defined using Rapido’s integration profiles. An institution may choose to use more than one of the following authentication schemes:
- LDAP
- SAML based authentication such as Shibboleth
- CAS
- OAuth based authentication with Facebook, Google, Twitter, or using email
- Rapido internal users
After you have configured the integration profile in Rapido, you must use the User Authentication page to specify which authentication systems are relevant to end users in Rapido. For information about the Ex Libris Identity Service, see https://developers.exlibrisgroup.com/alma/integrations/user-management/authentication/exl_identity_service.
Login Pages

Configuring the Login Links
-
Open the User Authentication page (Configuration > Discovery > Authentication > User Authentication) and select the Profiles tab (which is the default tab).
 Profiles Tab
 -
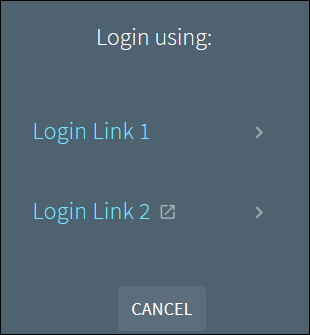
In the Authentication Profiles section, activate the types of authentications that you want to provide to users. If multiple authentication types are enabled, the system shows the Parallel Login page to users.
-
In the Authentication Settings section, specify the following options:
-
Single Sign Out Upon Timeout — When selected, a single sign-out request is sent to the authentication system (CAS and SAML) when Rapido times out. Otherwise, the system logs the user out of Rapido and remains open to other campus applications.
-
Enable Silent Login — When enabled for CAS and SAML authentication methods, users who have already signed in to other campus applications are automatically signed in to Rapido when they open a Rapido session in a new window or tab with the same browser. Otherwise, users must sign in to Rapido.
-
Currently, this option is not supported if you are using an Azure IDP.
-
If you have configured multiple authentication profiles, Primo attempts to apply the silent login with the first eligible profile only.
-
-
Enable extending the session — When selected, users receive a message 60 seconds before timeout, and it will allow them to extend the session for another session period. If the users do not want to continue their session, they are signed out, the screen is refreshed, and the UI redirects to the configured URL for timeouts. By default, this field is disabled.
-
Enable extending the session to maximum — When selected, users receive a message 60 seconds before timeout, and it enables them to extend the session to the maximum period (which is seven days and is not configurable). During this period, users who decide to continue with the maximum session are automatically signed in when using the same device. If the users do not want to continue their session, they are signed out, the screen is refreshed, and the UI redirects to the configured URL for timeouts. By default, this field is disabled.
If both the Enable extending the session and Enable extending the session to maximum parameters are enabled, enable extending the session to maximum has precedence.
-
Enable user setting for extending the session — When selected, this parameter adds the Automatically extend my session option to the My Library Card > Personal Details and Settings tab, which enables the users to extend their sessions automatically without being prompted to extend the session. By default, this field is disabled.
-
-
Select Save.
Configuring the Help Links
-
On the User Authentication page (Configuration > Discovery > Authentication > User Authentication), select the Profiles tab (which is the default tab).
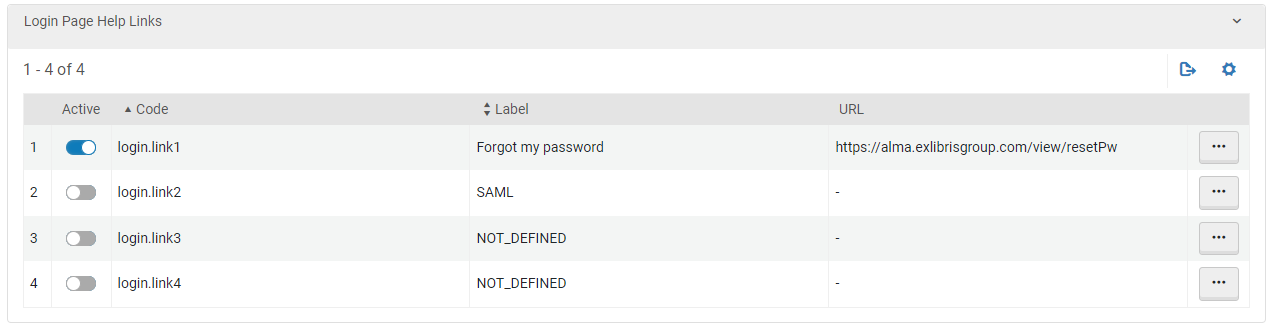 Profiles Tab
 -
Select Edit next to the login link for which you want to add a help page.
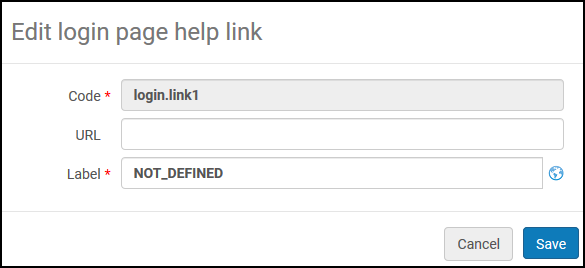 Define Help Link Page
 -
Specify the label and URL for the help page.
-
Select Save.
Configuring the Labels
-
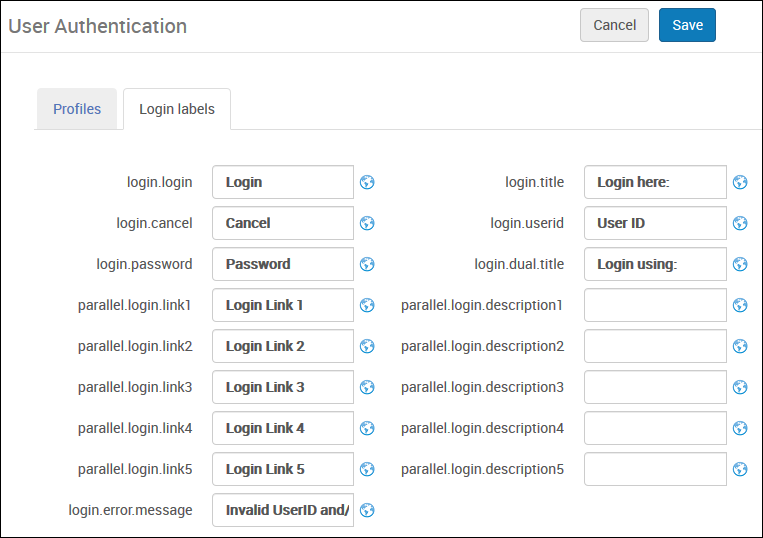
Open the User Authentication page (Configuration > Discovery > Authentication > User Authentication) and select the Login labels tab.
 Labels Tab
 -
Use the following table to configure the fields associated with each label:
Define Labels on the Login and Parallel Login Pages Field Description login.loginThe label for the Login button.login.cancelThe label for the Cancel button.login.passwordThe label for the Password field.parallel.login.link1 - parallel.login.link5The labels for up to five parallel login links on the Parallel Login page.login.error.messageThe error message that appears when users are unable to sign in.login.titleThe label for the title of the sign-in page.login.useridThe label for the User ID field.login.dual.titleThe label for the title of the Parallel Login page.parallel.login.description1 - parallel.login.description5The descriptions for each of the links on the Parallel Login page. -
Select Save.