
Primo VE
|
Overview
About Ex Libris Alma
About Ex Libris Primo VE
User Experience
User Activities
Authentication
Offline Support
Screenshots
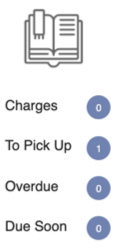
| Primo VE Legacy Live Tile | Primo Live Tile Example of 3 x 2 Dimensions | Selecting the tile opens PrimoVE per configuration, and allows full functionality, similar to the responsive mobile browser experience. |
 |
 |
 |
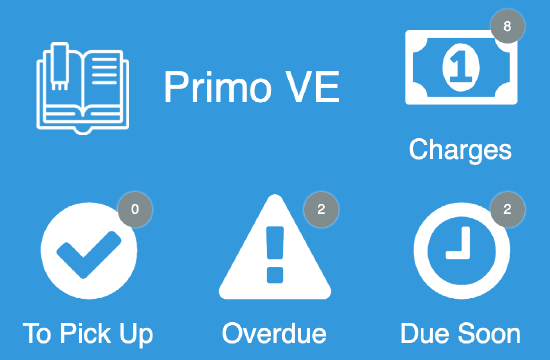
Live Tile
For the Primo VE live tile legacy UI, we recommend using the following dimensions for an optimized experience:
- 1 width x 2 height
- Up to 4 widgets
The new Primo VE live tile UI is designed to work with the following sizes. The tile will attempt to display as many elements as possible regardless of the dimensions set, but we cannot guarantee the intended experience if you do not adhere to the following dimensions. The tile dimensions are set in the App Builder, while the widgets per row (and other details) are set in the Configuration page for this product integration.
- 1 wide x 1 high
- This is a special case. The tile only displays one widget (the highest prioritized, enabled widget).
- 2 wide x 1 high
- We recommend using 1 - 2 widget rows and using 1 - 3 widgets per row.
- 2 wide x 2 high
- We recommend using 2 - 3 widget rows and using 1 - 3 widgets per row.
- 3 wide x 1 high
- We recommend using 1 - 2 widget rows and using 2 - 4 widgets per row.
- 3 wide x 2 high
- We recommend using 2 - 3 widget rows and using 2 - 4 widgets per row.
We also recommend keeping the header text and widget labels for the live tile short.
Technical Overview
Supported Versions
Prerequisites
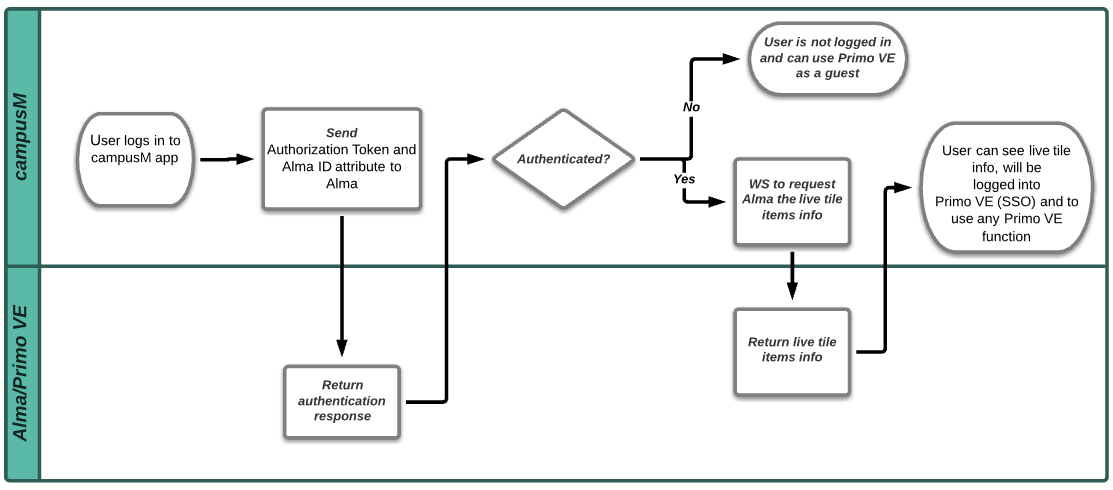
- IDP should return the AlmaID attribute. The Alma ID attribute is a unique ID controlled by the customer that is defined per student/staff member in Alma.
If using CMAuth - this attribute can have any name in the IDP attributes response (from SAML/OAUth/LDAP) but need to be mapping in Additional Mapping in the CMAuth Integration Profile.
Otherwise - AlmaID attribute must be returned in LDAP attributes response.
Due to this new mapping in authentication token, users need to logout & login to the app. - Handshake between Alma and campusM: to enable secured access to Primo VE, an authorization token needs to be configured in Alma (Configuration> Discovery> customer settings > app_authorization_token) and the same code needs to be configured in the app (App Manager> Product Integrations> Add Product Integration> Primo VE> Authorization Code).
- Native app (Android/iOS).
- The native apps (Android and iOS) need to be at running at least the January 2021 release.
Technical Flow Diagram
Configuration
| Configuration Option | Description | Mandatory | Data Type | Default | Example |
|---|---|---|---|---|---|
| Enable Product Integration | Select to enable the product integration on the user's app. | No | Check box | Yes | |
| Product Integration Description | A description of the product integration for internal use. | Yes | Description | - | |
| Screen Title | The title that appears in the top header of the service. | No | String | Primo VE | |
| General | |||||
| Base URL | The base URL of your Primo VE instance. | Yes | URL | - | https://alma-eu02-.campusm.exlibrisgroup.com |
| View ID | The View ID of your Primo VE | Yes | String | - | NORTH_INST |
| Authorization Token | Must be the same authorization token as in Alma, in the following format: "^((?=[^\\s])[\\w\\W\\d]){8,}$" For more information, see Prerequisites. |
Yes | String. |
- | q58151J4bD |
| Language Code | The language to display Primo VE integration. Not applied to the live tile. | No | String | en |
en |
| General Error Message | General error message if the page fails to load. | No | String | Please try again later | Failed to load. Please try again later |
| Landing Page | The page displayed by default on the Primo VE PI homepage. | No | Drop-down List | Primo VE home page (Search) | |
| Navigation Bar | |||||
| Item Tab Minimum Width | The minimum width in pixels for all tabs in the navigation bar. | No | Integer | 160 | |
| Item Tab Minimum Width (Large Screen) | The minimum width in pixels for all tabs in the navigation bar, if sidebar navigation is enabled, or the page is in landscape mode. | No | Integer | 240 | |
| No | Checkbox | Yes | |||
| Look and Feel | |||||
| Main Theme Color | Select a color for the main elements on the page | No | Color Code | #444444 | |
| Live Tile | |||||
| Enabled | Select to make the Primo VE tile live. | No | Check box | Yes | |
| Design | Select the UI design (new or legacy). | No | Dropdown | Enable Latest Live Tile Design | |
| General | |||||
| Loading Label | The text that is displayed while loading the Live Tile. | No | String | Loading... | |
| Please Login Label | The text that is displayed when the user is not logged in. | No | String | You are not logged into Primo VE | |
| Live Tile Look and Feel | |||||
| Badge Color | Select a color for the badge. | No | Color Code | #cd5c5c | |
| Badge Opacity |
Alters the opacity for all badges shown on the live tile. Has a minimum of 0.5, and a maximum of 1.
Only applicable for the legacy UI design.
|
No | Number | 0.65 | |
| Displayed Items | |||||
| Header | |||||
| Header Text Enabled | Not available in the legacy design. Select to display the header on the live tile. If cleared, the text does not appear in the header. If both the header text and the header logo are disabled, the header does not appear. | No | Boolean | False | |
| Header Text | Not available in the legacy design. Set the header text | No | String | Primo VE | |
| Header Icon Enabled | Not available in the legacy design. Select to display the logo on the live tile. If disabled, the log does not appear in the header. If both the log and the header text are disabled, the header does not appear. | No | Boolean | False | |
| URL for Header Icon | Not available in the legacy design. The URL of the image to be used as the logo in the header. | No | String | ||
| Customise Live Tile Header Padding | Not available in the legacy design. If enabled, enables you to customize the blank space around the header block. All values have a minimum of 0. | No | Checkbox | No | |
| The First Widget(s) Should Display on the Same Row As the Header | Not available in the legacy design. If disabled, the first widget row starts below the header. | No | Checkbox | Yes | |
| Hide Widget Labels |
If enabled, hides all labels for any configured widgets on the tile. Does not affect the Live Tile Header. |
No | Checkbox | No | |
| Widgets Per Row | This sets the number of widgets to display per row. There is a minimum of 1 and a maximum of 5. | No | Integer | 3 | |
| Charges | |||||
| Enabled | Select to display charges. | No | Checkbox | Yes | |
| Label | Label for charges. | No | String | Charges | |
| On Hold Shelf | |||||
| Enabled | Select to display the on hold shelf items. | No | Checkbox | Yes | |
| On Hold Items Only | Only displays items with a status of "On Hold Shelf" | ||||
| Label | Label for the on hold shelf items. | No | String | To Pick Up | |
| Overdue Loans | |||||
| Enabled | Select to display the overdue loans. | No | Checkbox | Yes | |
| Label | Label for the overdue loans. | No | String | Overdue | |
| Item Due Back Soon | |||||
| Enabled | Select to display the due back soon items. | No | Checkbox | Yes | |
| Label | Label for the due back soon items. | No | String | Due soon | |
| Days before Due Date | The maximum number of days before the due date to be considered an Item Due Back Soon. | No | Number | 3 | |
| Current Loans | |||||
| Enabled | Select to display current loans | No | Checkbox | No | |
| Label | No | String | Current Loans | ||
| Blocks and Messages | |||||
| Enabled | Select to enable Blocks and Messages | No | Checkbox | No | |
| Label | No | String | Blocks and Messages | ||
| Always Display Widget Count | If enabled, all widgets will display the count even if the count is 0. | No | Checkbox | Yes | |
| Enable Integration Deep Linking | Enables or disables linking through to Primo VE from this live tile. If this is disabled the tile will fall back to the 'Action (URL)' property set on the tile from App Builder. | No | Checkbox | No | |
| Prioritize Live Tile Items | |||||
|
Priority
|
This ordered list prioritizes the items that appear on the live tile. The item at the top of the list appears first, while the last item appears last.
|
No
|
Ordered List
|
|
|
| Icons | |||||
| Use Custom Icons | Select to use custom icons instead of the default live tile icons. | No | Boolean | False | |
| URL | Enter the URLs of custom images for the icons of the various widgets. | No | String | ||