
campusM Attendance Lecturer Experience
![]()
This section describes the lecturer check-in experience for the campusM Attendance feature. The screenshots in this section are taken from the campusM app for illustrative purposes. The end-user experience is consistent for all campusM apps – Android, iOS, and Web.
Lecturer Check-in Functionality
The Lecturer Check-in function allows end users designated as lecturers (using App Roles) to view a class list, updated in real-time, that displays which students have checked in to a class. They can check in students by selecting the student’s name. This is useful if students forget their device or are otherwise unable to check in on their own. It also provides a one-time code that students can use to check in if this has been configured as a validation mechanism for the institution. (For more information, see Attendance Configuration.)
Lecturer Reminder Notifications
Notifications can be configured to be displayed on the lecturer's device. These notifications are saved on the device, so they are sent even if the lecturer is offline and does not have an internet connection.
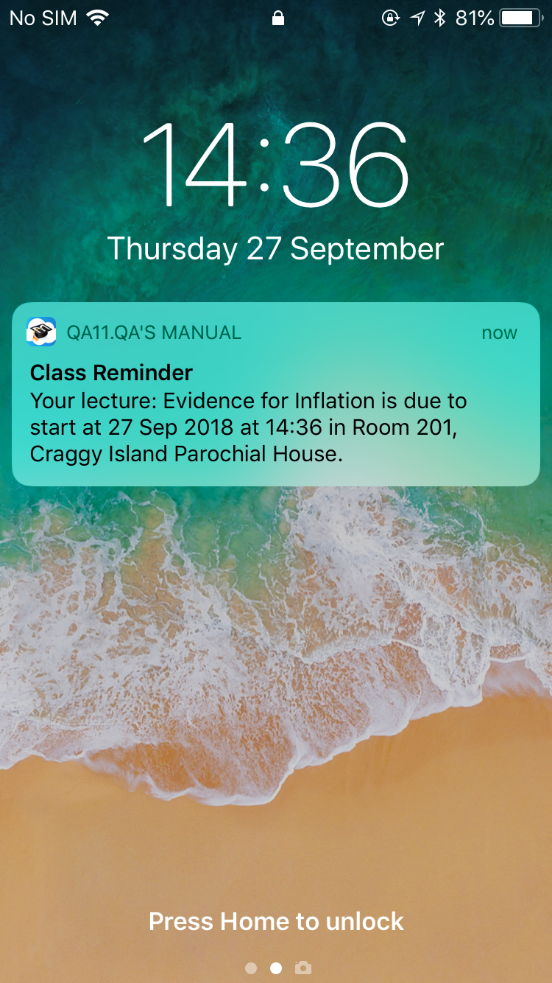
When a lecturer selects a notification, the Check-In page is displayed.
Lecturer Check-In Page
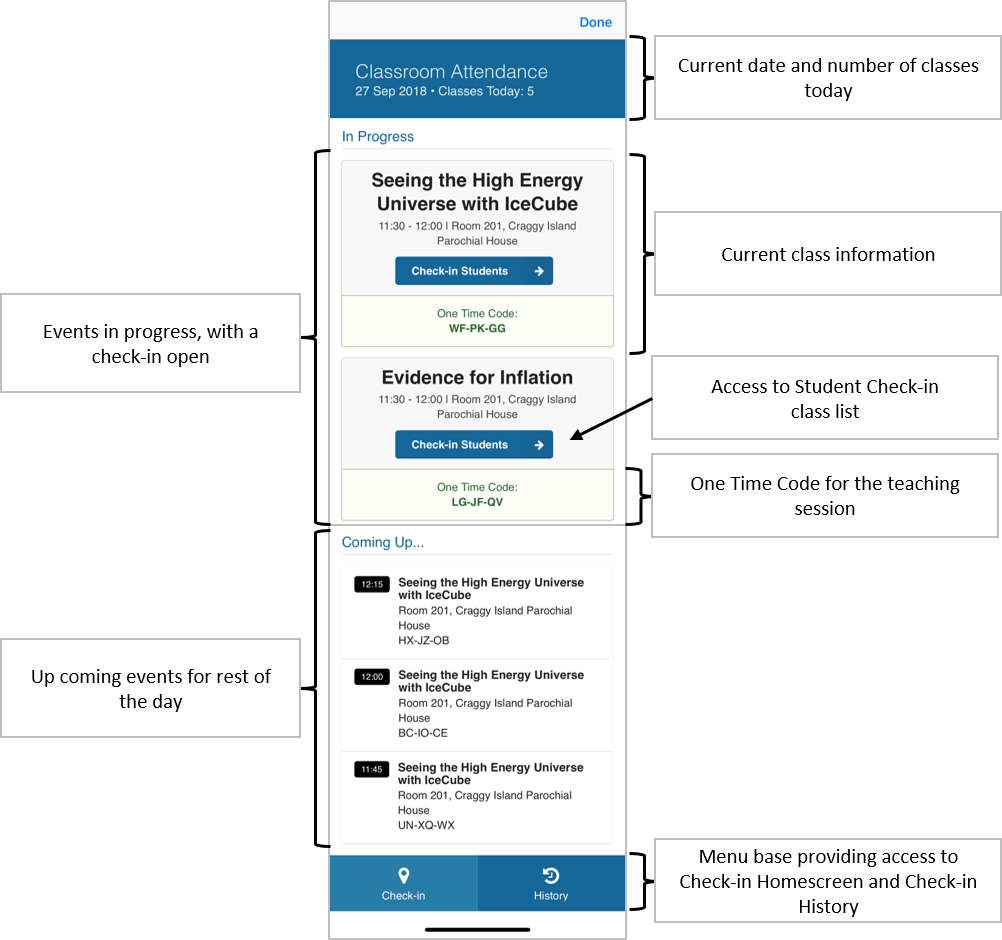
The Lecturer Check-In page displays the lecturer's current and upcoming classes for the day. On this page, the lecturer can do the following:
- View the classes currently in progress and those that are scheduled for that day
- View the one-time code for the class in progress (if configured). This code is only valid for the class with which it is associated. The lecturer informs the students of the code for them to enter into their app and check in.
- Access the class list a class in progress to check in students or mark them as absent.
- Access past classes to view who attended and to retroactively check in students or mark them as absent.
The diagram below describes the key components of the Lecturer Check-In page.
Lecturer Check-In Workflow
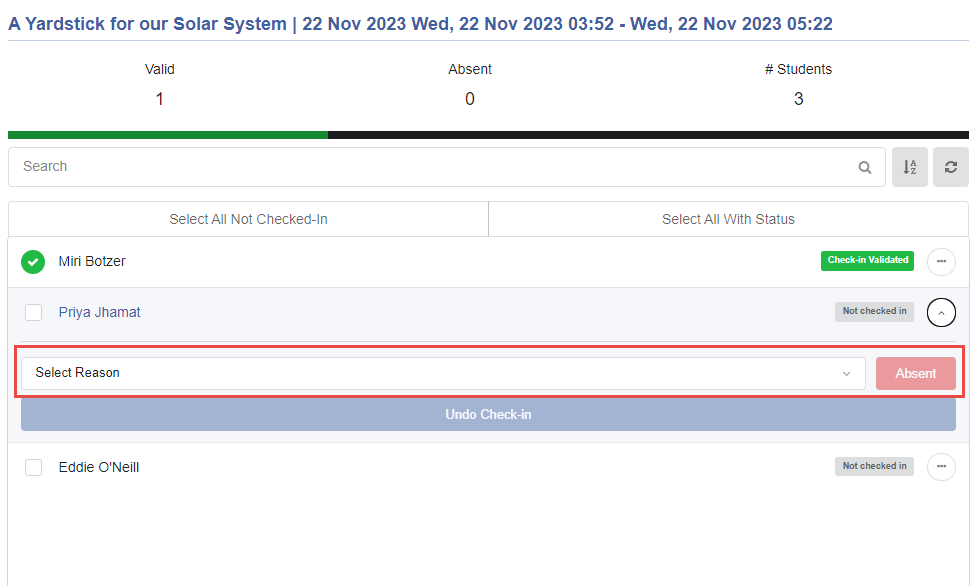
After selecting the Check-In Students button, a page appears with a list of students who are assigned to attend that class and their current attendance statuses. The statuses are indicated by color-coded icons and labels in the students' rows, based on the color-coding defined in the Attendance settings (App Manager > Attendance > Attendance Settings > Attendance Configuration > Check-in History Settings > Check-in Statuses); see Configuring Attendance.
To change the sort order of the list of students, select the Sort button ( ).
).
To filter the list of students, in the Search field, enter a string of characters. Only those students whose names contain the search string are displayed.
Students can be checked in or marked absent in bulk by selecting multiple students and then selecting the required action from the options below the list of students. The number of selected students is indicated in the options. Multiple students can be selected manually or by selecting one of the multi-select options at the top of the list: Select All Unsubmitted Students, Select All With Status. (When some students are selected, Unselect All Not Checked In, Unselect All With Status options may appears instead of one or both of these options.)
Students can also be marked absent, or have their current statuses removed, individually from their row actions ( ). These options are available even when one or more students are selected.

Checking Students In
Lecturers can manually check a student in if the student forgot their device or otherwise cannot check in on their own.
To check students into the class, select the students you want to check in, and then select the Check-in ... students option. After a student is checked in, the icon and status label in the student's row change to reflect this.
Marking Students Absent
To mark a student absent individually, from their row actions, select Absent, and then, from the dropdown list, select the reason for the absence.
To mark students absent in bulk, select each student you want to mark absent. Select the Mark ... students as absent option and then, from the dropdown list, select the reason for the absence. (Note that all of the selected students must be assigned the same absence reason.) After a student is marked absent, the icon and status label in the student's row change to reflect this.
Undoing Check-In or Absence
Lecturers can undo students' statuses - checked-in or absent - so that they revert to having no current status. For example, if a student is checked in by mistake, the check-in for that student can be removed.
To undo a student's status individually, from their row actions, select Undo Check-in.
To undo students' status in bulk, select each student you want to include in the action, and then select the Undo ... selected check-ins option.
Check-In History
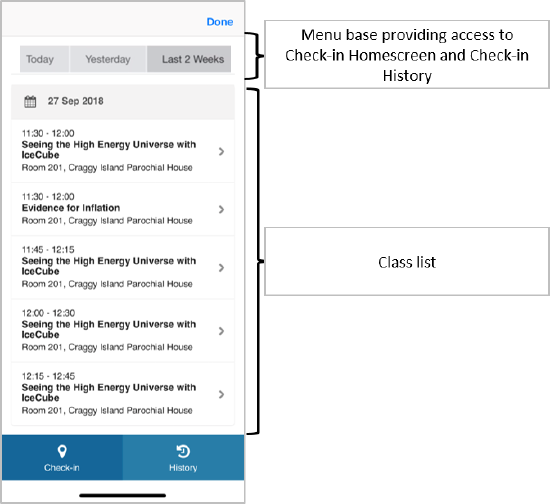
Clicking the History button displays a list of the lecturer's past classes. The page has a date filter tab at the top, enabling lecturers to switch between views of the classes of that day, the previous day (yesterday), and the last 4 weeks. Selecting a class displays the students associated with that class and their check-in status. The lecturer can check in or mark students as absent retroactively.