
July 2017 - campusM Personalization
What is campusM Personalization?
The campusM Personalization features allow users to better enhance their experience by customizing various areas and functions of their app and web interface.
The homescreen personalization includes the ability for users to customize their tile layout, moving, adding and selectively removing tiles. In this way, users can make the app their own, moving what’s important to them to the top of the screen and removing those tiles that may not apply to their situation.
With this significant enhancement, users can:
- Move and arrange tiles on their homescreen
- Add and remove selected tiles from their homescreen
- Search and find new tiles to enhance their homescreen
- Synchronize web interface homescreen customizations across devices, retaining their layout as they move from one desktop to another
- Retain app customizations locally on their native devices when using the campusM native app
And institutions can:
- Select which profiles to enable users to personalize
- Indicate certain tiles as mandatory, that cannot be removed from a user’s homescreen
How does it work?
For the End User:
From a user’s point of view, if a profile is enabled for personalization, they gain access to the Arrange option:
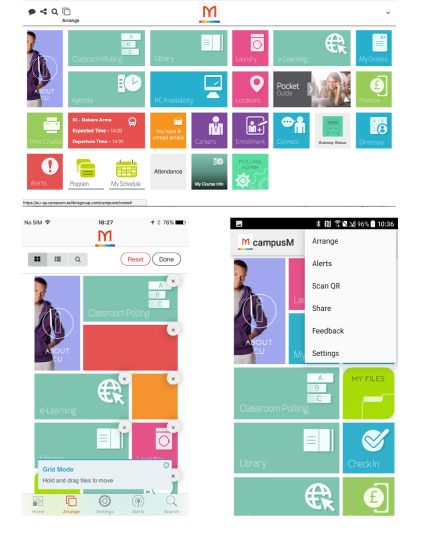
Selecting this opens the editable grid view, which enables tiles to be dragged and dropped into different locations, to be removed from the home screen, or to reset the screen to the default for that user’s profile/role(s).
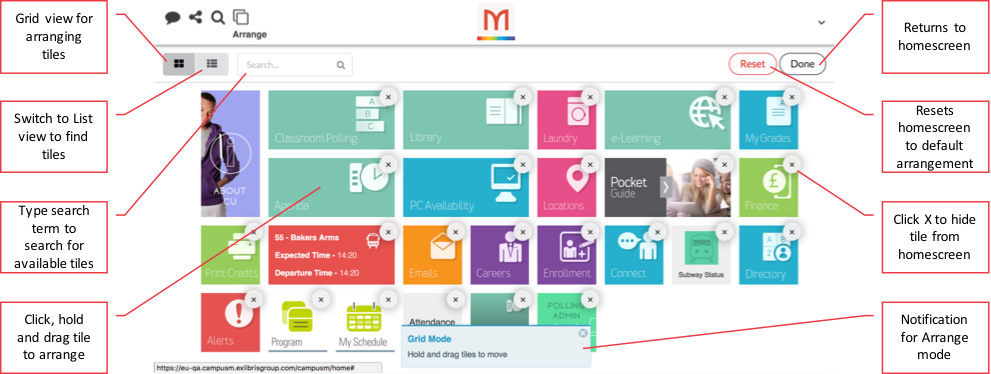
campusM Web App Personalization in Grid View
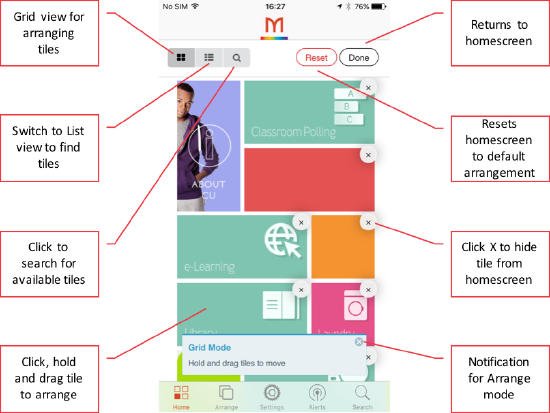
campusM Native App Personalization in Grid View (Shown on iPhone)
To move a tile, the user simply clicks (on Web) and/or holds the tile until it gives a small shake. The user can then move the tile to the desired location, with the unselected tiles flowing around the selected one. Releasing the tile positions the tile in the home screen.
The app adjusts the background tiles around the moving tile to provide an optimized layout.
Once the tiles are in the desired position, clicking Done will return the user to the home screen and the app resumes standard function.
When in configuration mode, you can select the list view to review the available tiles and their current ordering and visibility.
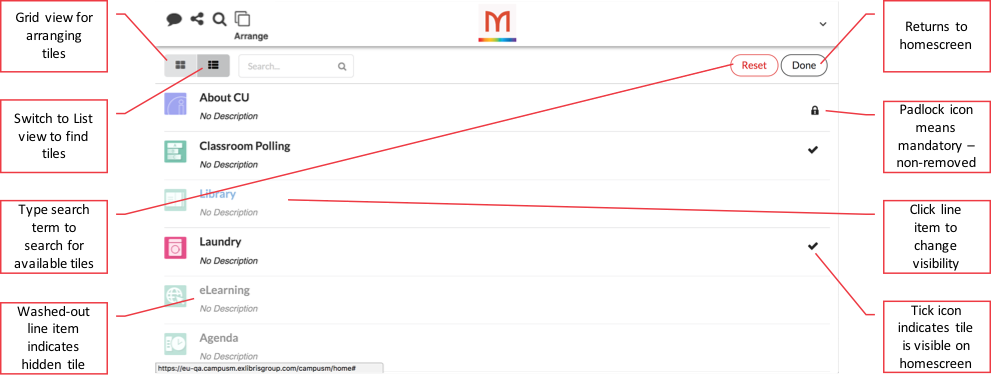
campusM Web App Personalization in List View
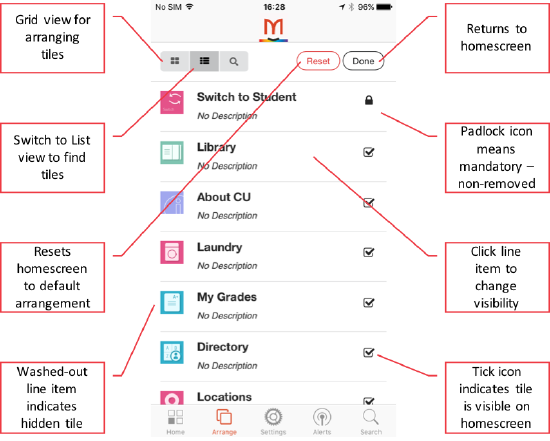
campusM Native App Personalization in List View (Shown on iPhone)
Each available tile will be listed here (and a search is available to discover tiles from the list), along with an indication of whether it is visible (checked) or mandatory (padlock). Selecting a list item switches between visible or hidden (unless padlocked in which case the tile is always visible). Returning to the grid view enables the tiles to again be reordered.
Finally, the reset button allows the user to return the home screen back to the default tile ordering and visibility.
The user’s personalization selection is synced in the cloud. The personalization preferences for the web app are stored separately from the native app, given the usual differences in screen size. Therefore, personalization changes made on the native app do not affect those made on the native app.
For the Institution:
From an institution's point of view, personalization is managed through the App Manager. Using App Builder manager interface, you can first define which profile(s) to enable personalization on. This can be found in App Settings > App Profiles Menu (located in the Enterprise Roles panel):
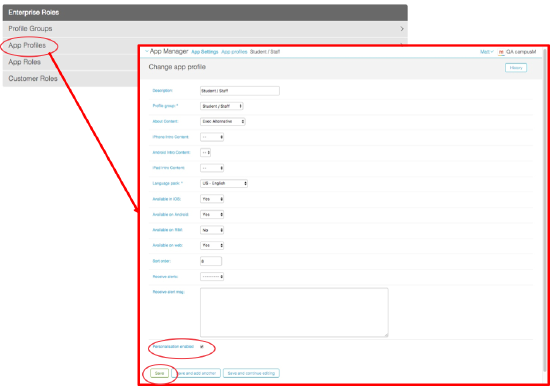
campusM App Manager – Enabling personalization for a Profile
To enable a profile for personalization, tick the option box labelled ‘Personalization enabled’ and click save. To make the change live, you will need to publish profiles through the usual publishing mechanism: https://knowledge.exlibrisgroup.com/CampusM/Product_Documentation/050App_Settings_Module/110Publishing_Section.
You can then define which tiles are mandatory (can’t be removed from the user's home screen) using the App Builder. Select the tile required and the Menu Option Config panel opens. Within here, select the checkbox labelled Mandatory (Personalization) to ensure the tile cannot be hidden by the user. To make the change live, select Save and Publish at the bottom of the panel:
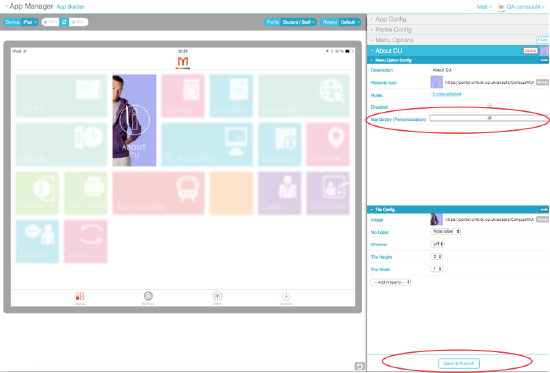
campusM App Manager – Mandating a tile within App Builder
Rollout Process
As part of this significant enhancement, we have re-engineered the underlying technology that delivers the home screen. This provides a great foundation from which to augment the home screen experience going forward, with Personalization of tile arrangements being the first of many such enhancements.
Whilst every effort has been made to reduce the potential impact of the reengineering, due to the highly customizable nature of the apps (and for some institutions, the development of their own Live Tiles within the home screen environment), there will be a need for each institution to review the impact of this change in their own production environment.
To this end, we have developed a mechanism that enables you to preview your production app environment with minimal effort and review how the implementation of the new home screen impacts the user experience, as well as identify any potential issues that may occur due to employed customizations.
The rollout process started on the week beginning July 31. Customers are asked to raise a Salesforce ticket requesting access to the preview environment for their apps. As this will also require new native apps to be prepared, the rollout is queued on a first come first serve basis.
Once the preview has been enabled, institutions have a period to preview and work with the campusM team to resolve issues before making the new Personalization feature generally available. Further information and instructions will be made available at the time of making the preview available to the customer.