
Configuring Requests
|
This page covers the configuration of requests including request pickup rules, request type priorities, additional personal delivery locations, etc.
For links to all the main fulfillment documentation pages see Fulfillment.
Configuring Request Task Names
- General System Administrator
- Fulfillment Administrator
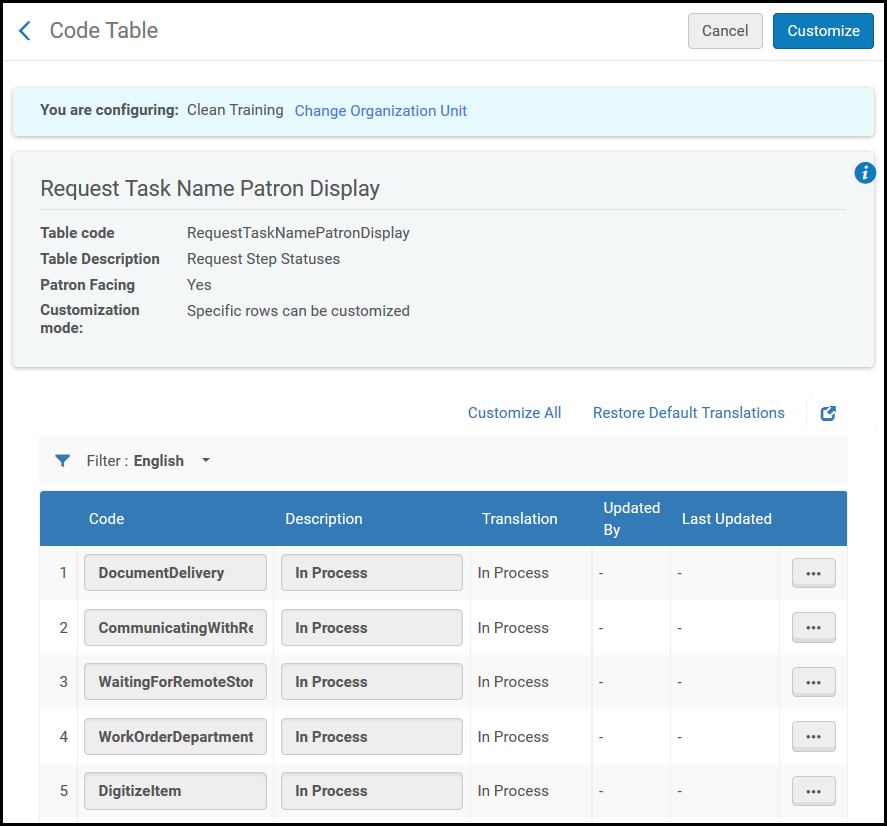
- On the Request Task Name Patron Display Code Table page (Configuration Menu > Fulfillment > Physical Fulfillment > Request Task Name), modify the values in the Code and Description fields for the relevant status in the Request Step Statuses table.
- Select Customize.
Configuring Request Pickup Rules
- General System Administrator
- Fulfillment Administrator
- On the Request Pickup Configuration page (Configuration Menu > Fulfillment > Physical Fulfillment > Request Pickup Configuration), select Add Rule. The Request Pickup Configuration page appears.
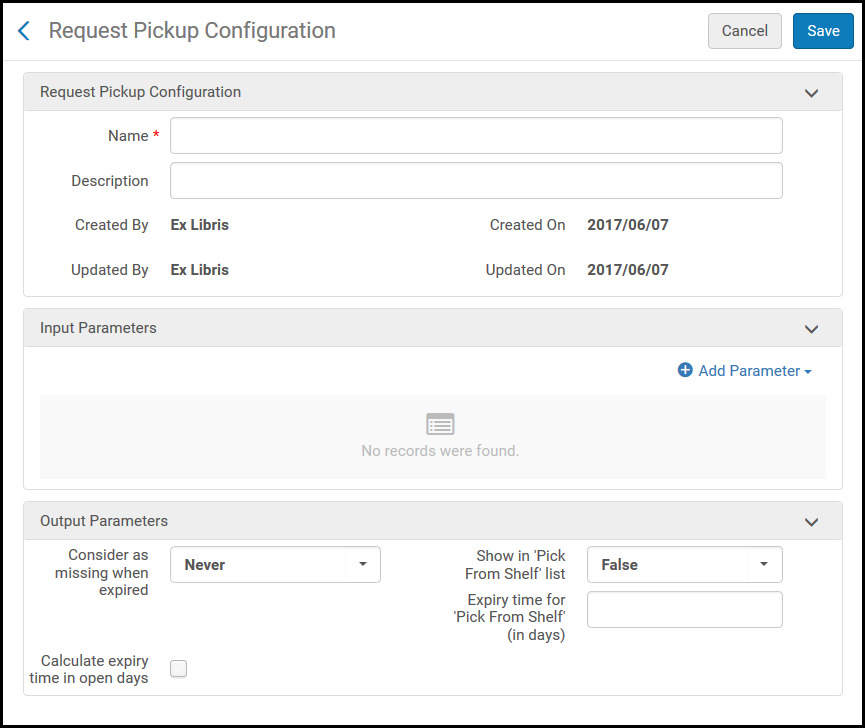 Request Pickup Configuration Page
 - In the Name field, enter a name for the request pickup configuration rule.
- In the Input Parameters section, specify the components of the input parameters (Name, Operator, and Value). A set of input parameters may look like this: User Group = Graduate student.
The available Name input parameters are:
- Location
- Request Type
- User Group
- In the Output Parameters section, specify the following parameters that are to apply to the indicated Location, Request Type, or User Group:
- Consider as missing when expired - Whether the requested item is considered missing if it is not fulfilled within a specified number of days.
- Only when expired not due to Date Needed by - Relevant if the rule is set so that the expiry of the request will also trigger marking the item as lost. The expiry of the request can happen either because the defined period of time has elapsed (default is a week) or because the last interest time arrived - the shorter of the two. In the first case, it means that the library has tried to fulfill the request for some time but could not find it. In the latter, it means the request expired just because the patron is no longer interested, but it could be that the library could fulfill the request.
The Only when expired not due to Date Needed by option can be used to say that an item should be considered lost only in the first case (which indicates the library could not find the item) but not in the second.
- Only when expired not due to Date Needed by - Relevant if the rule is set so that the expiry of the request will also trigger marking the item as lost. The expiry of the request can happen either because the defined period of time has elapsed (default is a week) or because the last interest time arrived - the shorter of the two. In the first case, it means that the library has tried to fulfill the request for some time but could not find it. In the latter, it means the request expired just because the patron is no longer interested, but it could be that the library could fulfill the request.
- Show in 'Pick From Shelf' list - Whether the requested item appears on the Pick From Shelf list.
- Expiry time for 'Pick From Shelf' (in days) - The number of days after which the request is considered expired. For example, if you specify 5 in this field, once a requested item is not picked up within 5 days, the request is considered expired. If you do not specify the expiry time, the default is 7 days.
- Calculate expiry time in open days - allows the number of days before a request is expired to be calculated for open days only. For instance, if the rule is 7 days but that calculated date is a closed day and the check box is selected, the Pick From Shelf task will expire on the next open day. If the check box is deselected (which is the default), the Pick From Shelf task will expire on the closed day.
When the item's expiration time arrives, the Requests – Handle Expiration Step job cancels the requests (see Viewing All Scheduled Jobs). - Consider as missing when expired - Whether the requested item is considered missing if it is not fulfilled within a specified number of days.
- Select Save. The rule appears on the Request Pickup Configuration page.
-
If you defined more than one rule, use the Move Up and Move Down arrows to set the order of the rules. The order of the rules is important, since Alma applies the first (and only the first) appropriate, enabled rule.
-
Rules may be enabled or disabled in the Enabled column.
- Select Calculate Existing Requests Retroactively. Alma retroactively applies the rules to existing requests. Otherwise, rules are applied only to requests created after the rule was enabled.
If no rule is configured, the item is always considered as missing when expired.
Configuring Request Type Priorities
- General System Administrator
- Fulfillment Administrator
The Request Priorities mapping table allows you to configure the priorities for each of the different library request types. It is accessed at Configuration Menu > Fulfillment > Physical Fulfillment > Request Priorities.
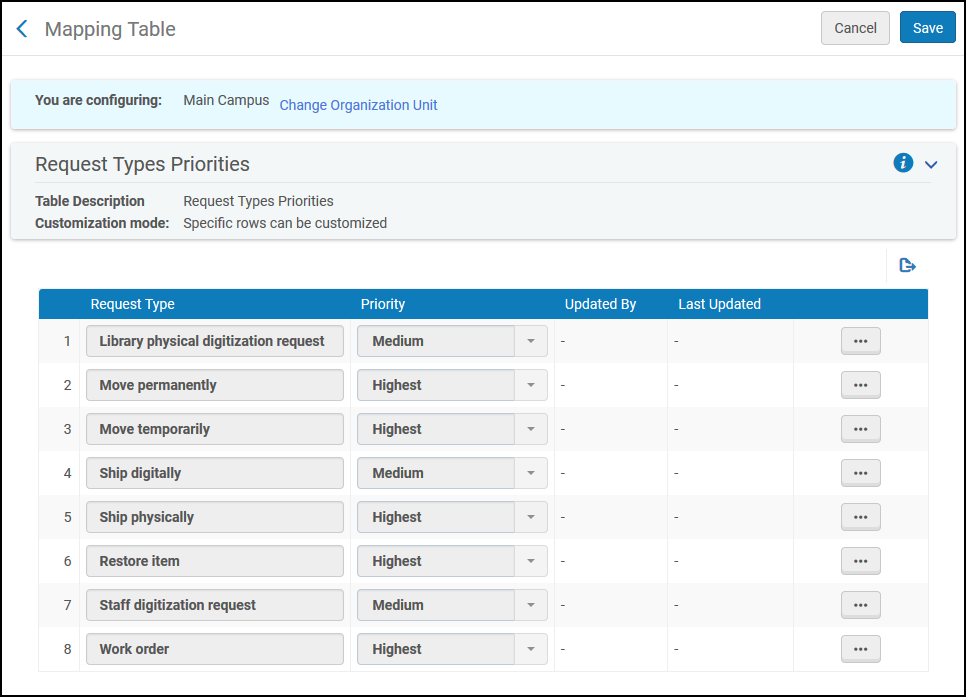
- On the Request Priorities page, select Customize from the row actions list of the message that you want to configure.
- Select the new priority in the Priority field. Repeat these two steps for all messages that you want to configure.
- When you are done, select Save to save your changes.
The available request types are:
|
Request type |
Meaning |
|---|---|
|
Library physical digitization request |
A digitization request placed from a reading list |
|
Move permanently |
Request for a physical item to be moved to a new location |
|
Move temporarily |
Request for a physical item to be temporarily moved to a new location |
|
Ship digitally |
An internal digitization request placed by resource sharing staff |
|
Ship physically |
An internal physical item request placed by resource sharing staff |
|
Restore item |
Restore an item from a temporary location |
|
Staff digitization request |
Staff digitization request |
|
Work order |
Work order request |
Configuring Additional Personal Delivery Locations
- General System Administrator
- Fulfillment Administrator
Patrons that are eligible for personal delivery can request to pick up resources at address other than their registered home/office address. This enables using the personal delivery service, even when no known home/office address has been uploaded to the system.
- Navigate to Configuration > Fulfillment > Patron Configurations > Additional Personal Delivery Address Types.
- Enable the relevant delivery location and update the description.

- The new delivery location appears in the Pickup At field on the Create Request page (see Supporting Personal Delivery Requests) if the patron is eligible for personal delivery.
.png?revision=1)
It also possible for patrons to easily change the registered home/office address in PrimoVE when requesting for personal delivery.
See Setting Personal Delivery Locations from Hold Request Form for more information.