Working with Citations
Adding a Note to a Citation
Also see Discussing the Citation with the Library.
When viewing a citation, you can add public and private notes. Students can see public notes. Private notes can be seen only by the user who wrote the note.
Private notes can only be added by list owners or students. Guests cannot add private notes.

Citation public notes are visible when viewing the reading list.

Adding a URL to a Public Note


.png?revision=1)
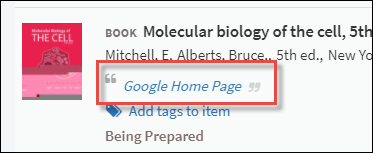.png?revision=1)
Copying Citations
You can copy a citation to the same or another reading list. You can also copy one or more citations by temporarily adding them to My Clipboard and then inserting all saved sections after another section in the list. In addition, you can copy a citation to your Collection.
- Duplicating a list in Alma/Leganto
- Copying a section to a different/same list
- Coping a citation in Alma/Leganto to a different/same list
- Moving a citation to a different/same list
- Using clipboard to copy/move
To copy a single citation to a reading list, select Copy citation in the citation menu, select the list and section and select CONFIRM.
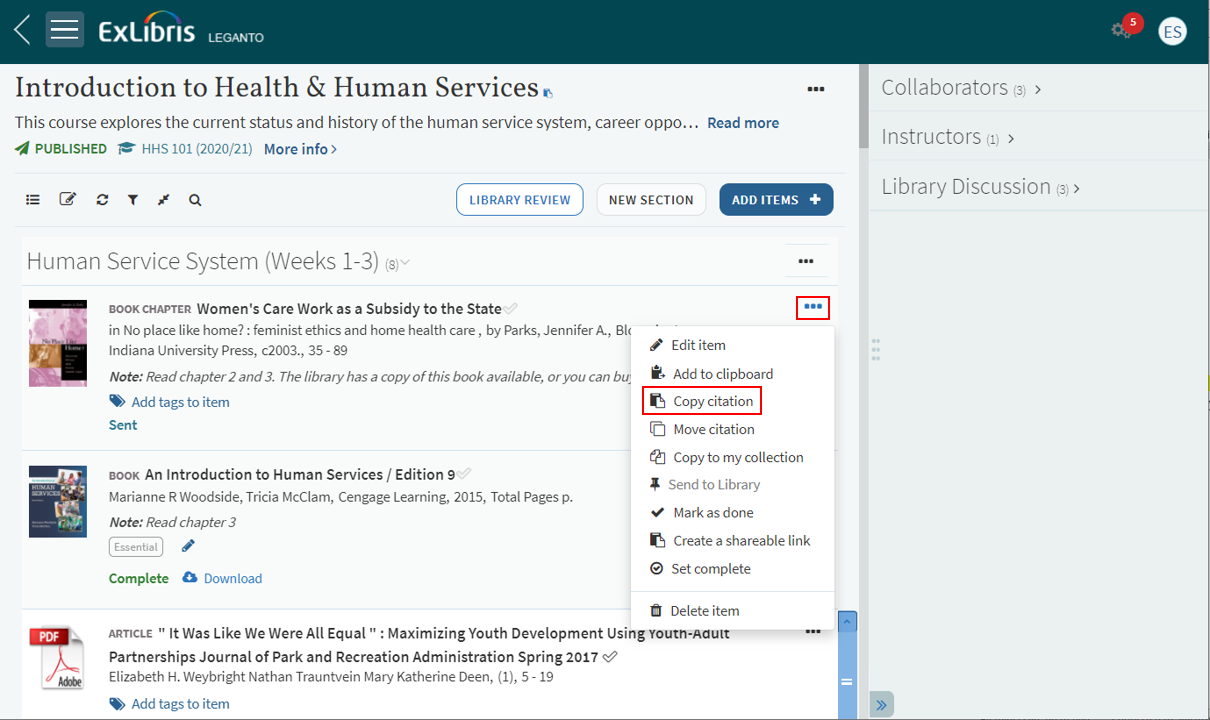
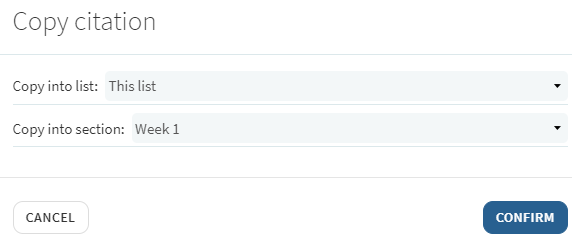
To copy one or more citations in multiple steps:
- Select Add to clipboard in the citation menu of a citation that you want to copy. The citation is added to My Clipboard. Repeat for all citations that you want to copy.
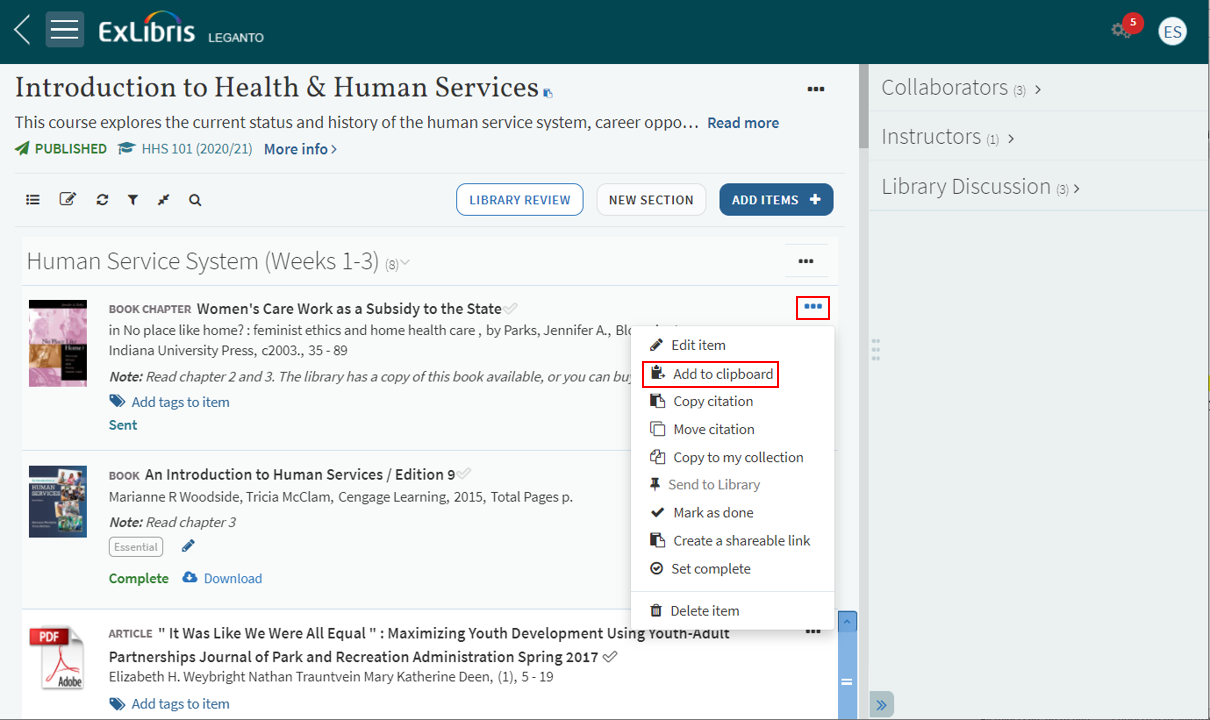 Reading List - citation clipboard option
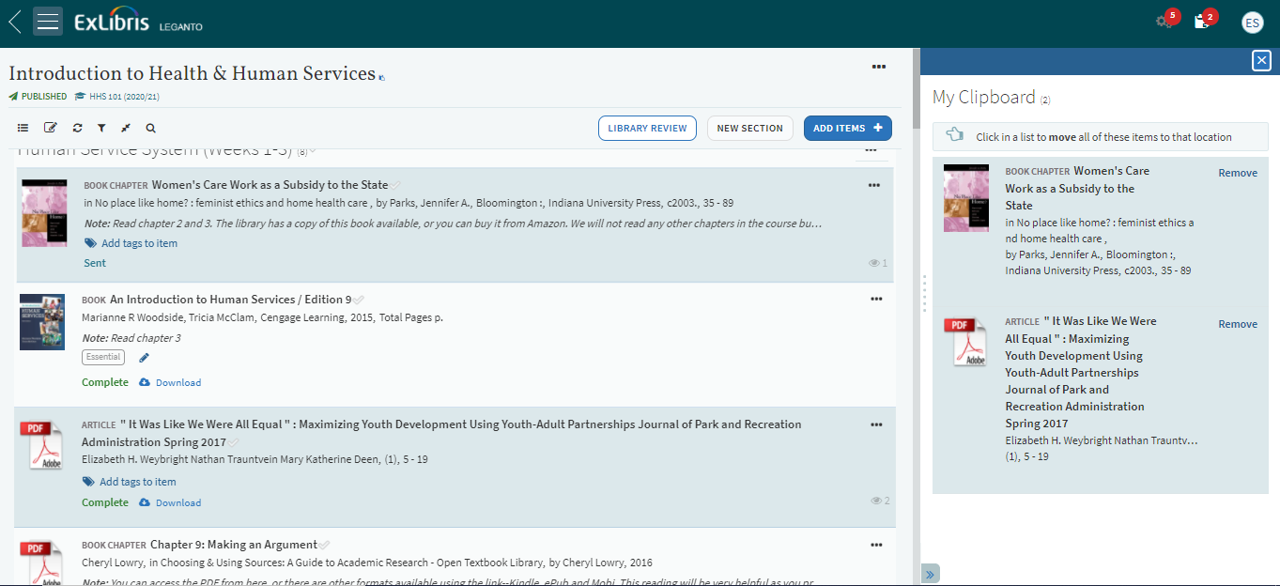 My Clipboard - citations
- You cannot use My Clipboard to copy sections.
- My Clipboard is emptied automatically if you navigate to another reading list.
- Hover your mouse at the bottom of the section after which you want to copy all the citations in My Clipboard and select Copy. The citations in My Clipboard are copied beneath this citation and My Clipboard is emptied.
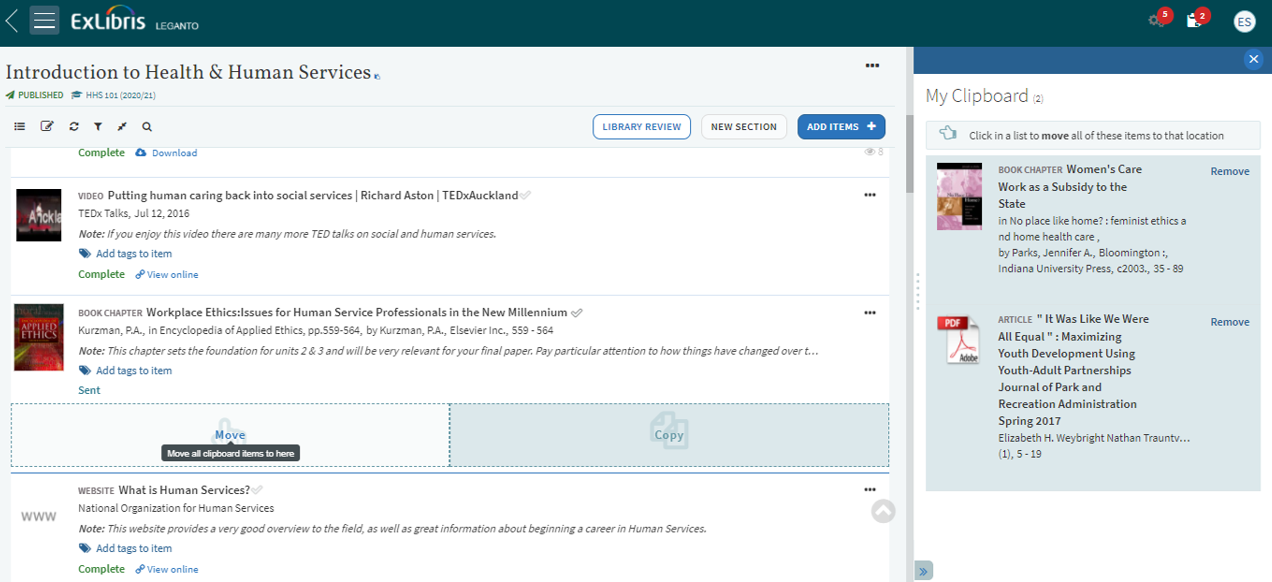 My Clipboard - prompt to copy citations
To copy the citation to My Collection, select Copy to my collection in the citation menu.
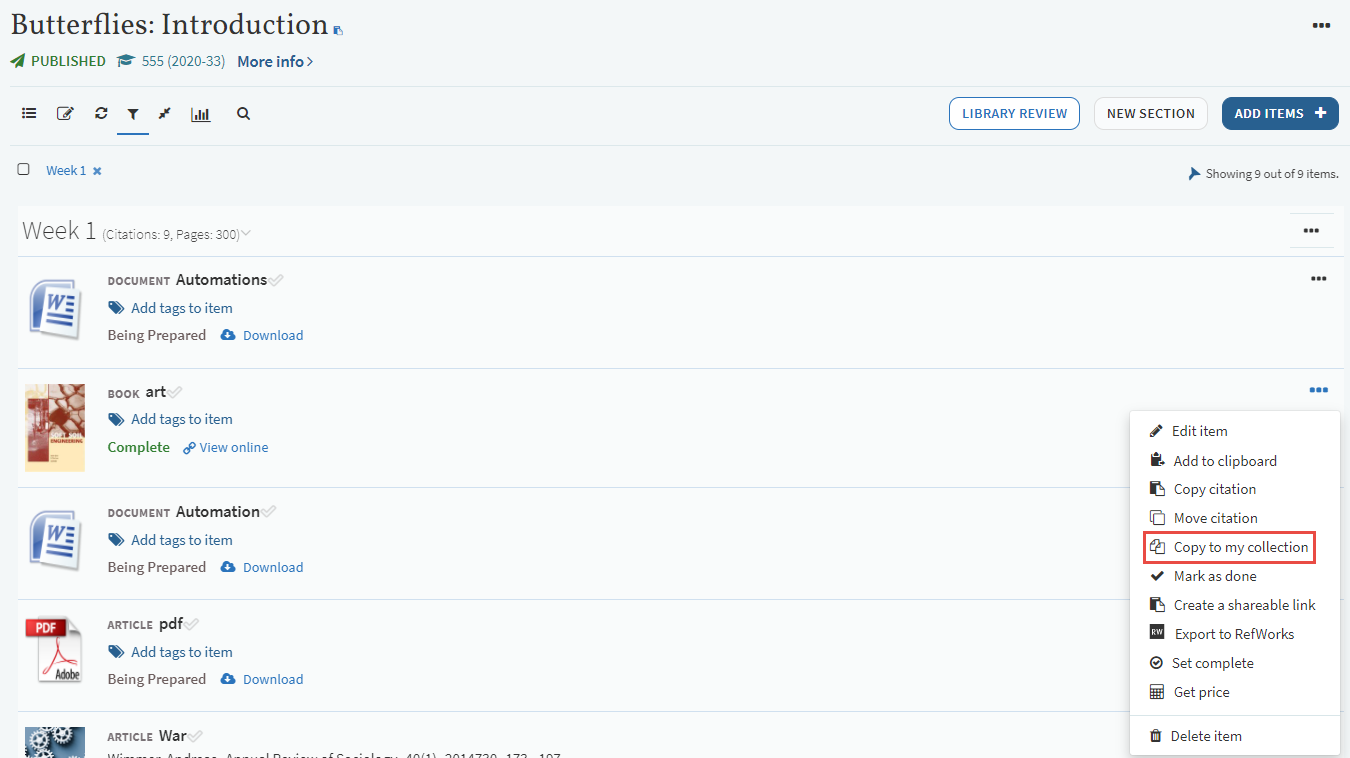
Creating a Citation
Aside from copying a citation to create a new one (see Copying Citations), there are several options for adding citations to a reading list (actually, to a section in a reading list):
- Search for a resource in the library's repository and add it to your reading list as a citation (or to My Collection).
- Manually, by entering all of the citation's details and (optionally) uploading a file containing the resource.
- Select an item previously saved to My Collection or an external citation manager.
- When on a website, add a citation using Leganto Cite It!, a bookmarklet that you can add to your browser bookmark bar.
- Select an item that was suggested by a user or automatically by Leganto.
For more information, watch Add a Resource to a Leganto List.
Certain actions can only be done after the citation is created. See, in particular:
- Digitizing Citations and Clearing Copyrights
- Managing a Citation's Due Date
- Managing a Citation's Links and Availability
- Managing Visibility Dates for Citation and/or Materials
- Sending a Citation to the Library for Fulfillment
Adding a Citation from the Library
Your library configures whether your library search is in Alma, Summon, or Primo, and/or whether you can select the Primo scope in which to search.
When viewing a reading list, select ADD ITEMS. The right sidebar changes, offering several options to add citations.

Select Library Search.

When available, select the search scope (from the Search in drop-down menu), and enter search criteria (Enter search criteria).
The following search filters are available:
- Search everything
- Library Catalog
- Articles and more
- Course Reserves
- Newspapers
- Alma
- Rialto
Optionally select whether to include or hide records that do not provide full-text access.
For additional search options, select Advanced Search. You can select which fields in which to search.
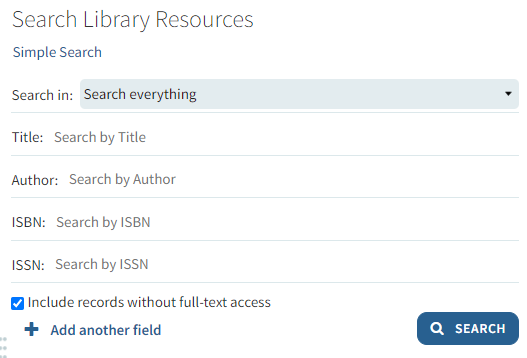
Select Search. The results appear in the sidebar.
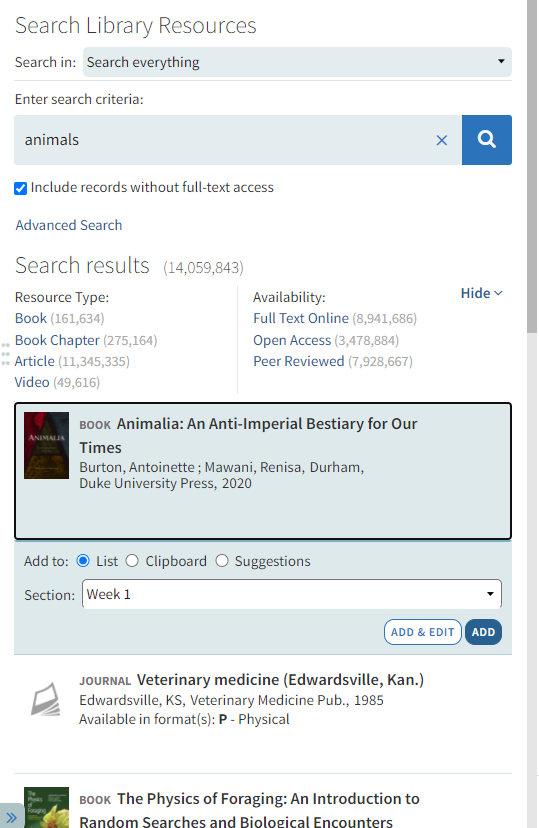
The search results include information about each resource, as well as several options.
- Select Add to List, select the section, and select ADD to add the resource as a citation to the selected section. You can also drag and drop the citation to a specific location in the list. Leganto now remembers the last used list and section.
- Select Add to Clipboard, and select ADD TO CLIPBOARD to add the resource to My Clipboard. You can add several resources to My Clipboard and add all of them to a reading list at once. For more information, see Copying Citations.
- Select Add to Suggestions, enter a note for the suggestion and select SUGGEST to add the resource as a suggestion. For more information, see Suggesting an Item from My Collection for a Reading List.
Adding a Citation Manually
Using the Blank Form
When viewing a reading list, select ADD ITEMS. The right sidebar changes, offering several options to add citations.

Select Blank Form.

Select the Type. The sidebar refreshes with fields that are appropriate for the selected type.
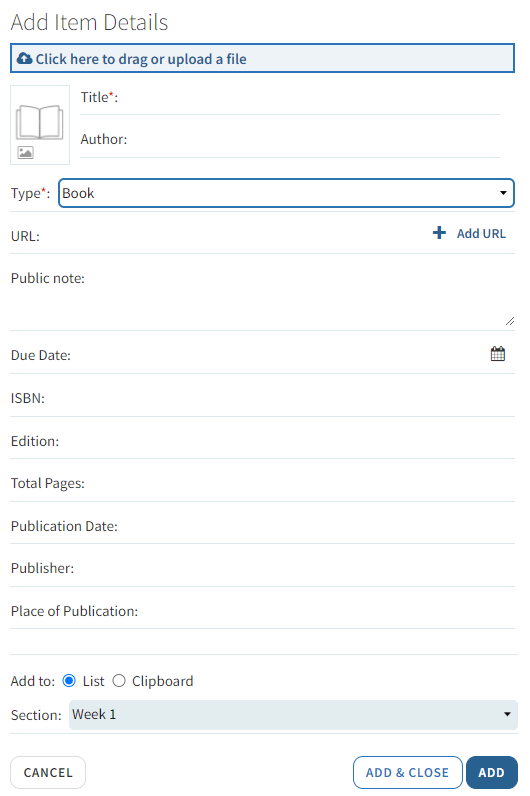
Depending on your library's configuration, the following types may appear (types in bold are the most commonly used types): Abstract, Anthology, Archive, Article, Archive, Artwork, Audio Recording, Blog, Book, Book Chapter, Case, Case Study, CD, Computer Program, Conference, Database, Dissertation, Document, DVD, E-book, Electronic Article, Eoffprint, Government Document, Grant, Image, Interview, Journal, Legal Document, Legislation, Letter, LibGuides, Manuscripts, Map, Music, Newspaper, Newspaper Article, Other, Pamphlet, Patent, Poem, Presentation, Reference Entry, Research Dataset, Review, Score, Series, Standards, Statistical Data Set, Technical Report, Text Resource, Thesis, Transcript, Video, Website, Working Paper.
The fields that appear depend on the type. Some of these fields appear only if you select More item details.
- All types include the following fields – Additional Person Name, Creative Commons License, DOI, Edition, LCCN, OCLC Number, Place of Publication, Publication Date, Publisher, Resource Notes, Source, and Volume. For all types, you can upload a file and add a public note.
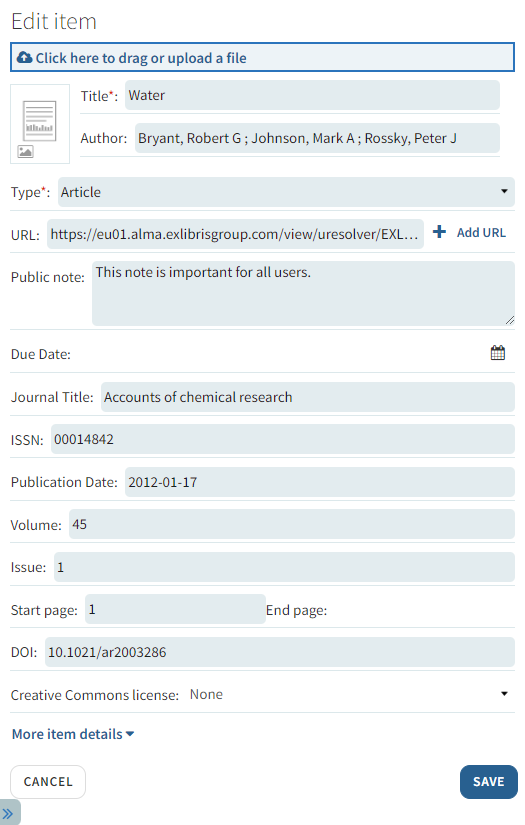
- Article, Electronic Article, and Journal include the following additional fields – Author, End Page, ISSN, Issue, Journal Title, Pages, Start Page, and Title (mandatory).
- Book, Conference, and E-book include the following additional fields – Author, ISBN, Title (mandatory), Total Pages.
- Book chapter includes the following additional fields – Book Author, Book Title, Chapter Author, Chapter Number, Chapter Title (mandatory), Editor, End Page, ISSN, Pages, and Start Page.
- All other types include the following additional fields – Author, Chapter, End Page, ISBN, ISSN, Issue, Journal Title, Pages, Start Page, Title, Total Pages.
- Additional field information:
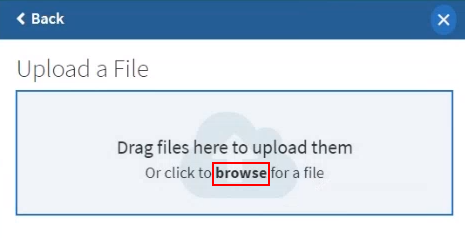
- To upload a file, you can drag a file to the right sidebar or select the file area and then browse for the file. After uploading a file, license options appear beneath the file name. You can select whether the citation requires no license (because you are the author), can be copied under your country's fair use guidelines, or requires a copyright review. If you intend to select a Creative Commons license, do not select any of these options.
- When enabled by your library, you can delete the file (select the trash icon
 to the right of the file). You cannot delete the file if:
- A copyright request was approved for the citation.
- The file is a CCC (pay-per-use) file.
When not enabled, ask your librarian to delete the file.
- The options available for Creative Commons license depend on your location. The Creative Commons license declaration for the reading list itself, if any, does not apply to citations in the reading list. If you intend to select one of the file upload licenses, do not select a Creative Commons license.
- A public note appears in the reading list and when viewing the citation details. A resource note appears at the top in the resource information area when viewing the citation details.
After configuring the fields, do one of the following:
- When Add to: List is selected, select ADD & CLOSE to add the citation to the selected section. You can also drag and drop the citation to a specific location in the list.
- When Add to: Clipboard is selected, select ADD TO CLIPBOARD to add the citation to My Clipboard. You can add several items or citations to My Clipboard and add all of them to a reading list at once. For more information, see Copying Citations.
Librarians can set citation prices by selecting the More item details toggle switch and entering a price.

Uploading a File
When display_file_option (Configuration > Leganto > Features > Leganto Features) is set to true, the option to Upload a File appears in the ADD ITEMS pane. The default for this parameter is true.
You can set the maximum file size in the parameter max_file_size_allowed_faculty_MB (Configuration > Leganto > General > Settings). The default is 50 MB.
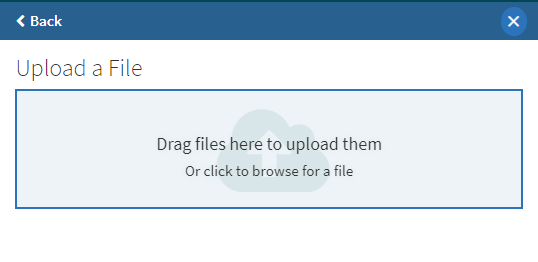
Select ADD ITEMS > Upload a File.

Drag a file or browse to upload a file.
Depending on your library's configuration, the following types may appear (types in bold are the most commonly used types): Abstract, Anthology, Archive, Article, Archive, Artwork, Audio Recording, Blog, Book, Book Chapter, Case, Case Study, CD, Computer Program, Conference, Database, Dissertation, Document, DVD, E-book, Electronic Article, Eoffprint, Government Document, Grant, Image, Interview, Journal, Legal Document, Legislation, Letter, LibGuides, Manuscripts, Map, Music, Newspaper, Newspaper Article, Other, Pamphlet, Patent, Poem, Presentation, Reference Entry, Research Dataset, Review, Score, Series, Standards, Statistical Data Set, Technical Report, Text Resource, Thesis, Transcript, Video, Website, Working Paper.
The fields that appear depend on the type. Some of these fields appear only if you select More item details.
For more information on the types, see above.
HTML tags can be included in the file component Description (code citation.edit.drag.file.or. Configuration > Leganto > General > Labels - Classic UI)
Adding a Citation from My Collection or a Citation Manager
When viewing a reading list, select ADD ITEMS. The right sidebar changes, offering several options to add citations. To add items from My Collection, select Collection.

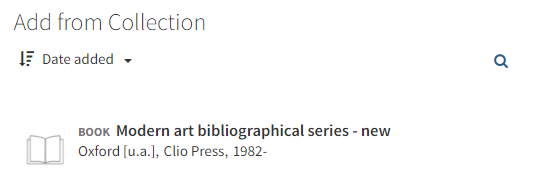
To add an item from an external citation manager, ensure that you have configured the citation manage for Leganto (see Linking Leganto to an External Citation Manager) and select Upload a File.
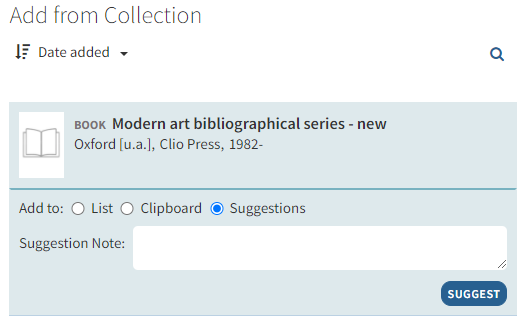
Select a citation and then perform one of the following actions.
- When Add to: List is selected, select ADD to add the citation to the selected section. You can also drag and drop the citation to a specific location in the list.
- When Add to: Clipboard is selected, select ADD TO CLIPBOARD to add the citation to My Clipboard. You can add several items or citations to My Clipboard and add all of them to a reading list at once. For more information, see Copying Citations.
- When Add to: Suggestions is selected, enter a note for the suggestion and select SUGGEST to add the citation as a suggestion. For more information, see Suggesting an Item from My Collection for a Reading List.
Exporting a Single Citation in a Specific Reference Format
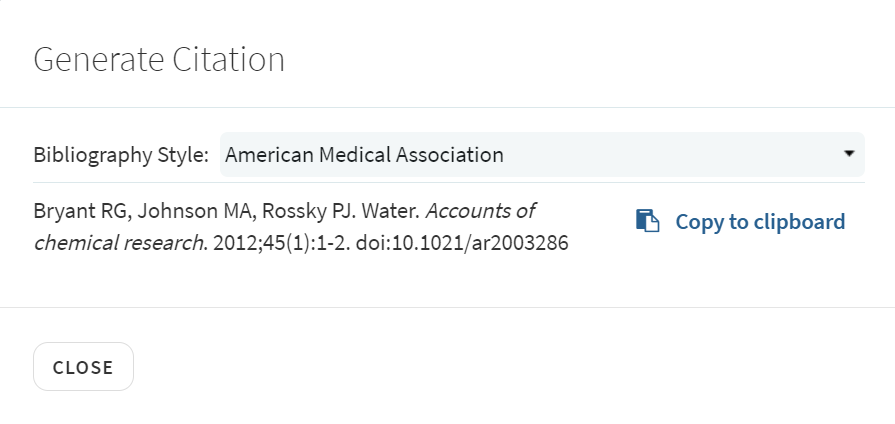
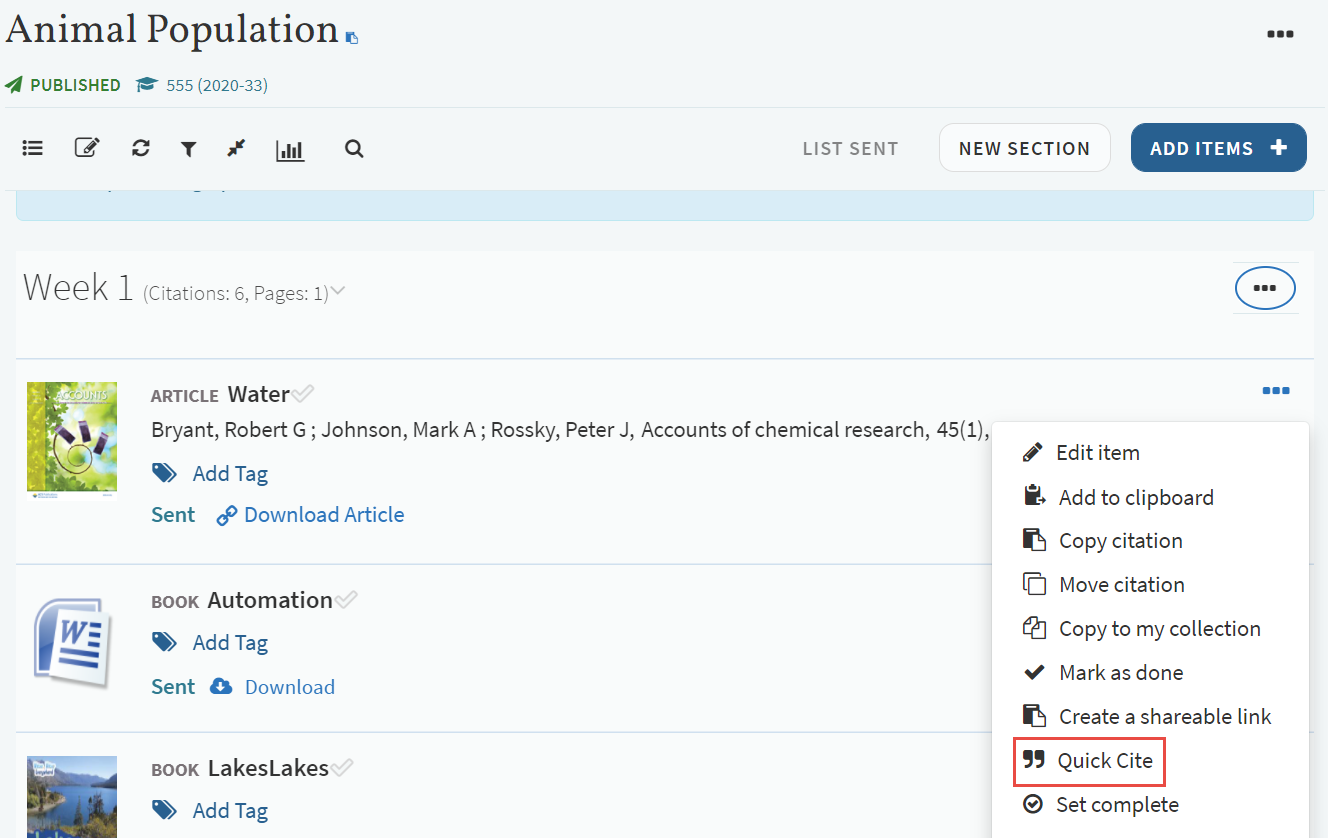
When quick_cite is enabled (default) in Leganto > UI > Citation Menu, you have the option to copy the default citation style set in Leganto > Features > Bibliographic Styles. If no default style is set, the first style in the Bibliographic Styles table appears.
From a citation select Quick Cite.
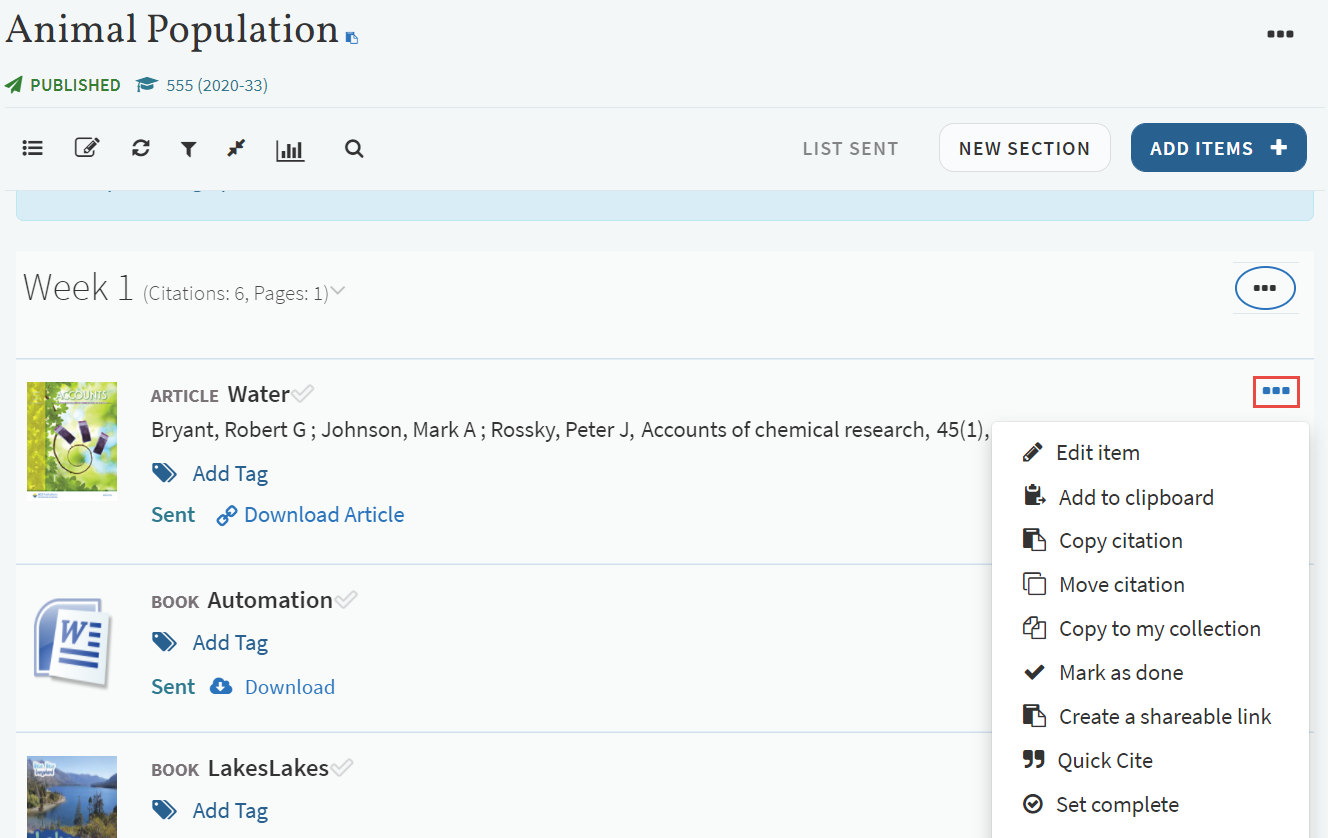
You can now copy the generated citation to your clipboard.
Adding a Citation from A Website (Using Cite It!)
Leganto Cite It! is a bookmarklet, a small javascript-based bookmark that you can add to your browser's bookmark bar. When you are browsing any website, Cite It! enables you to add the resource on the current page as a citation to a reading list in Leganto.
Installing Cite It!
The Cite It! window includes a link to a video that explains how to install the Cite It! button. If you open the guide to learn about Cite It!, the movie plays automatically.
Adding Cite It! to a Browser's Bookmarks Bar
To add Cite It! to your browser's bookmarks bar, select Cite It! in the user menu.
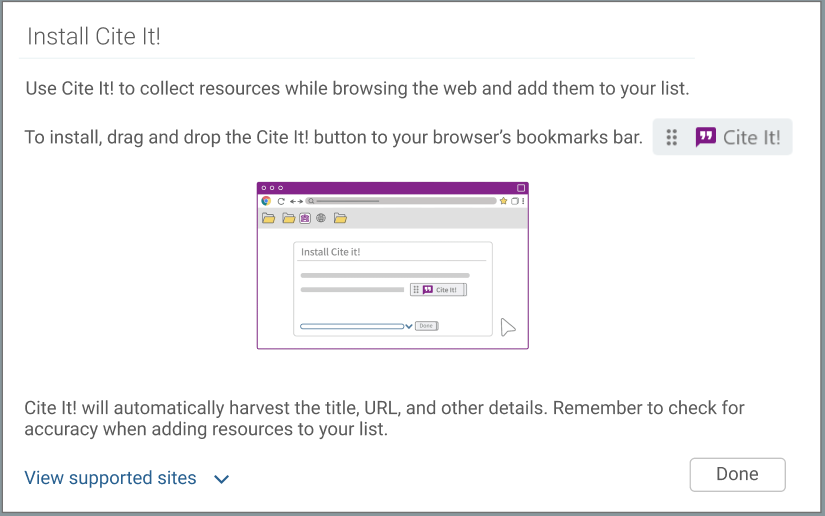
Drag the Cite It! button to your browser's bookmarks bar.
The list of sites that Leganto is specifically known to support appears in the Cite It! pane. Even if a website is not listed, Leganto is likely to work on the site if the resource information is easily identifiable to the bookmarklet code, so give it a try.
Using Cite It!
You must be logged in to Leganto to use Cite It! However, you do not have to have a specific tab with Leganto open in your browser. If you try to use Cite It! but you are not logged in, you are prompted to log in.
You can configure Leganto to display a small login window and then redirect the user back to CiteIt. To enable this feature, set the parameter citeit_login_new_tab (Configuration Menu > Leganto > Leganto Features) to true.
While on a website that contains a resource that you would like to add to a reading list, select the bookmarklet. The Cite It! pane appears.
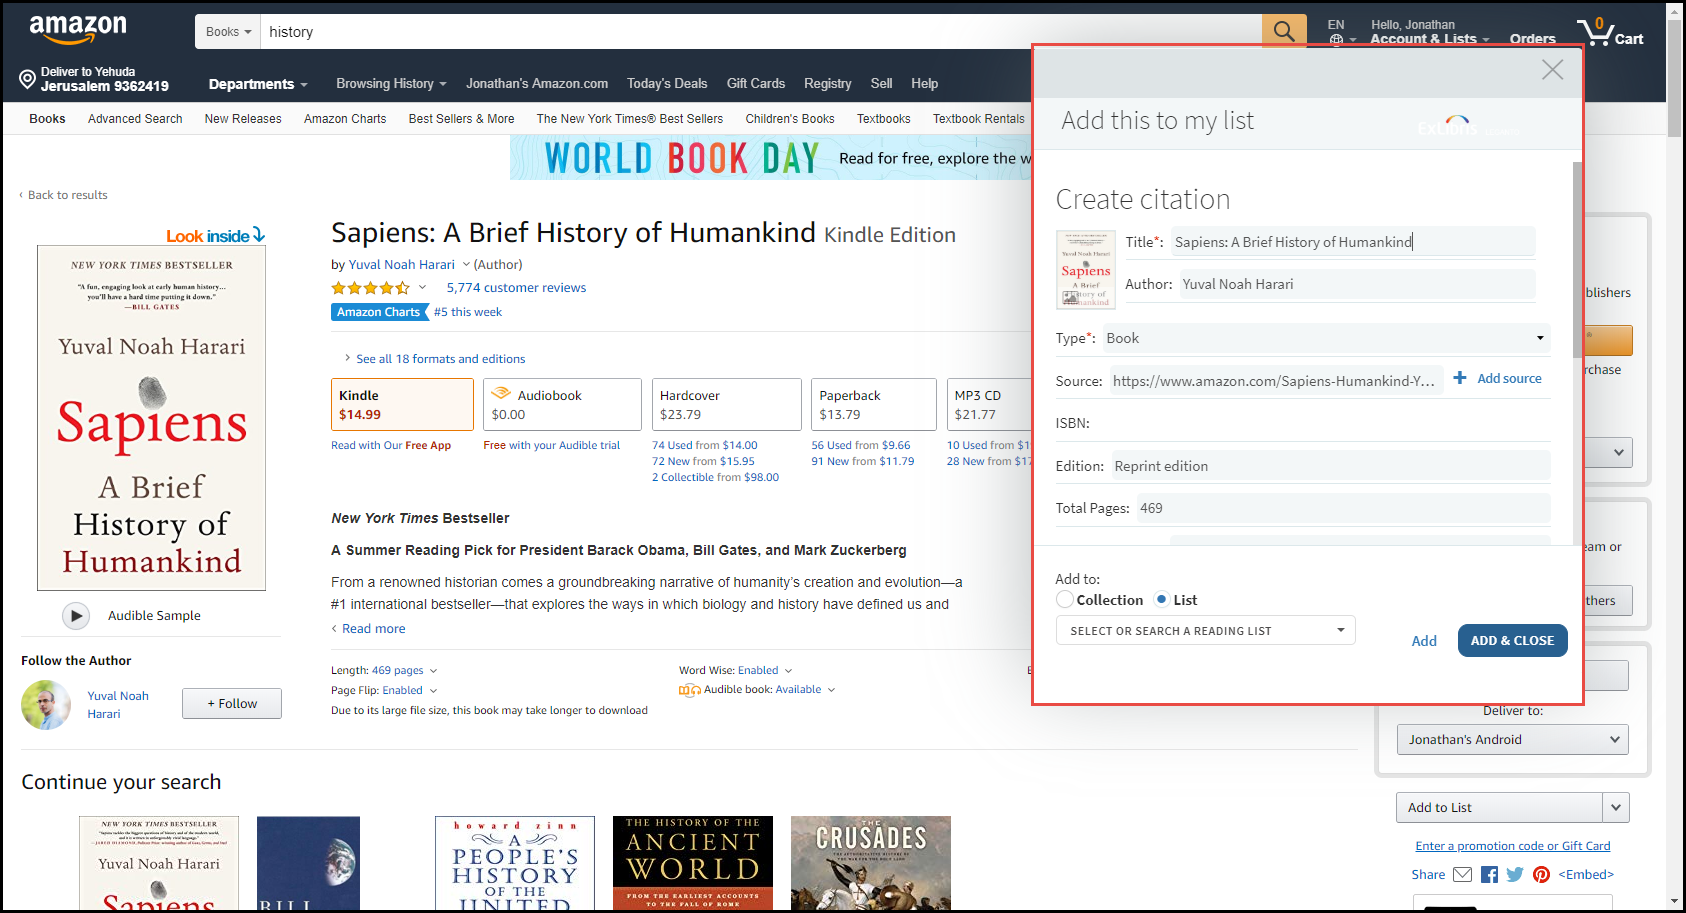
This pane functions exactly like the pane you see in the right sidebar when manually adding a citation; see Adding a Citation Manually for information about all of the fields.
After configuring the fields, do one of the following:
- Select Add to list, select the reading list and section, and select Add & Close to add the resource as a citation to that reading list and section.
- Select Add to Collection and select Add & Close to add the resource as an item in My Collection.
View this file for a list of supported Cite It! sites.
Cite It! automatically harvests the title, URL, and other details about web-based resources. Remember to check for accuracy when using Cite It! for adding resources to your list.
Enriching Citation Metadata
For institutions whose AUGMENTATION profile (Configuration > General > External Systems > Integration Profiles) is configured to work with CrossRef, when a citation containing a DOI is added, any missing metadata is automatically added to the citation.

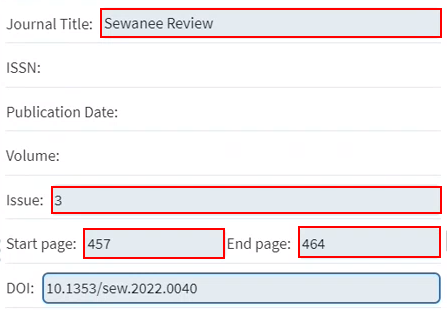
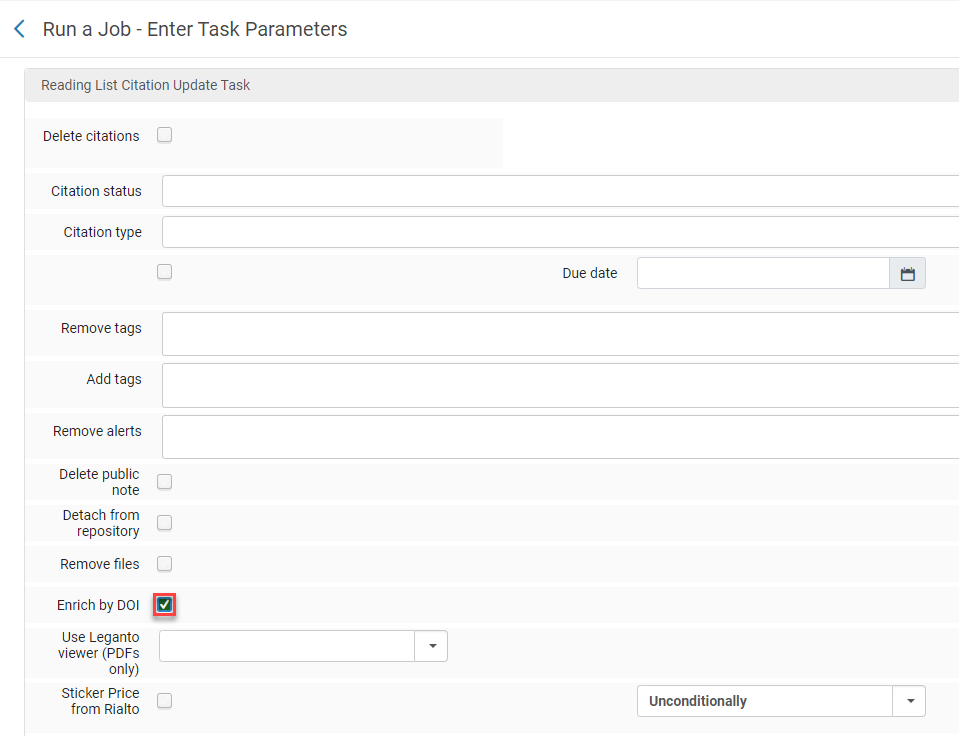
You can also automatically enrich citations containing a DOI with additional metadata in bulk by checking Enrich by DOI in the Reading List Citation Update Task job (Admin > Manage Jobs and Sets > Run a Job). The default setting for this checkbox is unchecked.
Importing a Citation to a Reading List
You can import an item from the library, or manually, in the same way that you add these to a reading list. Leganto supports importing files in the RIS, BibTex, and reference file formats. Reference files are any files that include formatted references, such as a bibliography section in an essay.
Files can be imported at the reading list, section, and citation levels by selectng the Import menu item.
When importing a citation with a material type not listed in your material types (Configuration > Fulfillment > Courses > Citation Material Type), Leganto automatically assigns the Default Material Type to that citation.
The following table shows Leganto's RIS field mapping format.
| RIS Field | Leganto Field |
|---|---|
| A2 | rlterms_additionalPersonName |
| A3 | rlterms_additionalPersonName |
| A4 | rlterms_additionalPersonName |
| AU | creator |
| CY | rlterms_placeOfPublication |
| DA | date |
| Y1 | date |
| DO | doi |
| EP | end_page |
| ET | rlterms_edition |
| J2 | rlterms_journalTitle |
| N1 | rlterms_note |
| PB | publisher |
| PY | date |
| RN | rlterms_note |
| SN | identifier_isbn |
| SN2 | identifier_issn |
| SP | start_page |
| T1 | title |
| T2 | rlterms_journalTitle |
| T3 | rlterms_journalTitle |
| TI | title |
| UR | source |
| VL | rlterms_volumePartNumber |
| IS | rlterms_issue |
See Adding a Citation from the Library and Adding a Citation Manually.
Creating a Citation Using an Import File from the Menu
- At the reading list, section, or citation level, select the ellipsis and select Import.
 Importing Files
 - Select the Type.
- When you have included all the required files, select SAVE.
 Import Batch Screen
Adding a Suggested Citation
Leganto offers several features that present you with suggestions for resources to add to a reading list. Some of these features must be enabled by your library.
- Users can suggest an item to add to a reading list. These suggestions appear in the right sidebar when viewing the list.
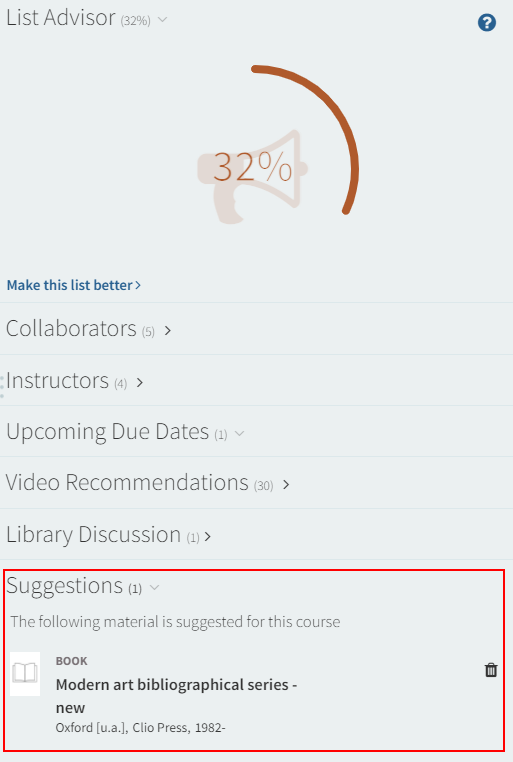 Reading List - Suggestions Pane
You can drag and drop a suggested item to the reading list. Select the trash icon
 at the top of the suggestion to remove the suggestion.
 - When viewing a list, your library may have enabled a recommendation service (bX, videos including Alexander Street Press (ASP), and/or shelf browsing) to offer suggested citations based on the citations already on your list. In the Video Recommendations pane, can toggle to view only ASP recommendations.
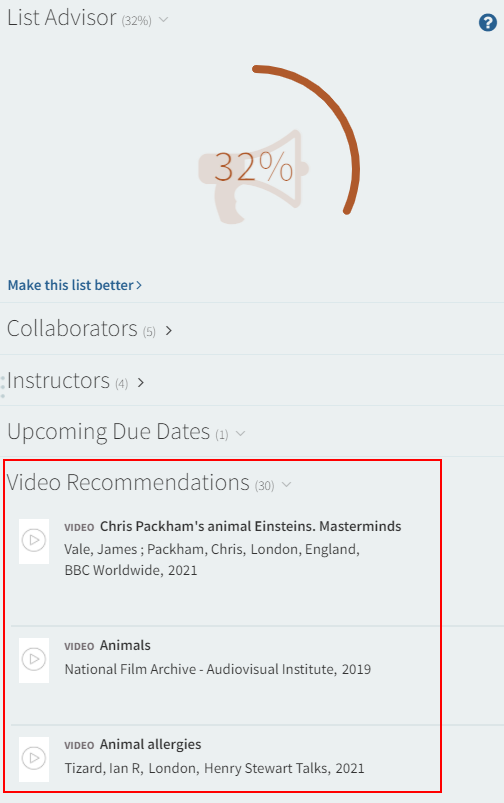 Reading List - Alexander Street Press Pane
Select the item and perform one of the following actions:
- Select Add to list, select the section, and select ADD to add the resource as a citation to the selected section. You can also drag and drop the citation to a specific location in the list.
- Select Add to Clipboard, and select ADD TO CLIPBOARD to add the resource to My Clipboard. You can add several resources to My Clipboard and add all of them to a reading list at once. For more information, see Copying Citations.
- Select Add to Suggestions, enter a note for the suggestion, and select SUGGEST to add the resource as a suggestion to this list. For more information, see Suggesting an Item from a Collection for a Reading List.
- When viewing a citation's details, your library may enable a pane that displays other formats and editions of the citation.
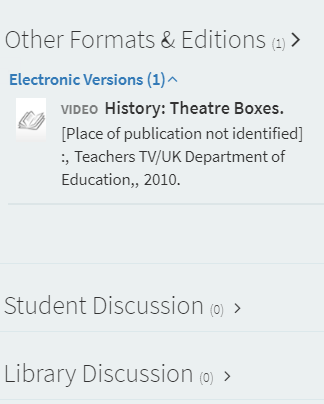 Citation - Other Formats & Editions Pane
Select the item and perform one of the following actions:
- Select Add to List to add the edition to the reading list.
- Select Add to Citation to add the edition to the citation as an alternate edition.
- When viewing a citation's details, your library may enable a pane that displays a citation's related items, as marked in the discovery service.
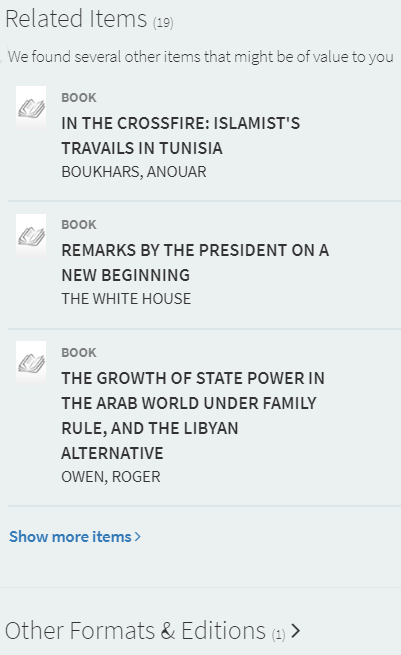 Citation - Related Items Pane
Select the item and select Add to List to add the item to the reading list.
Exporting a Citation
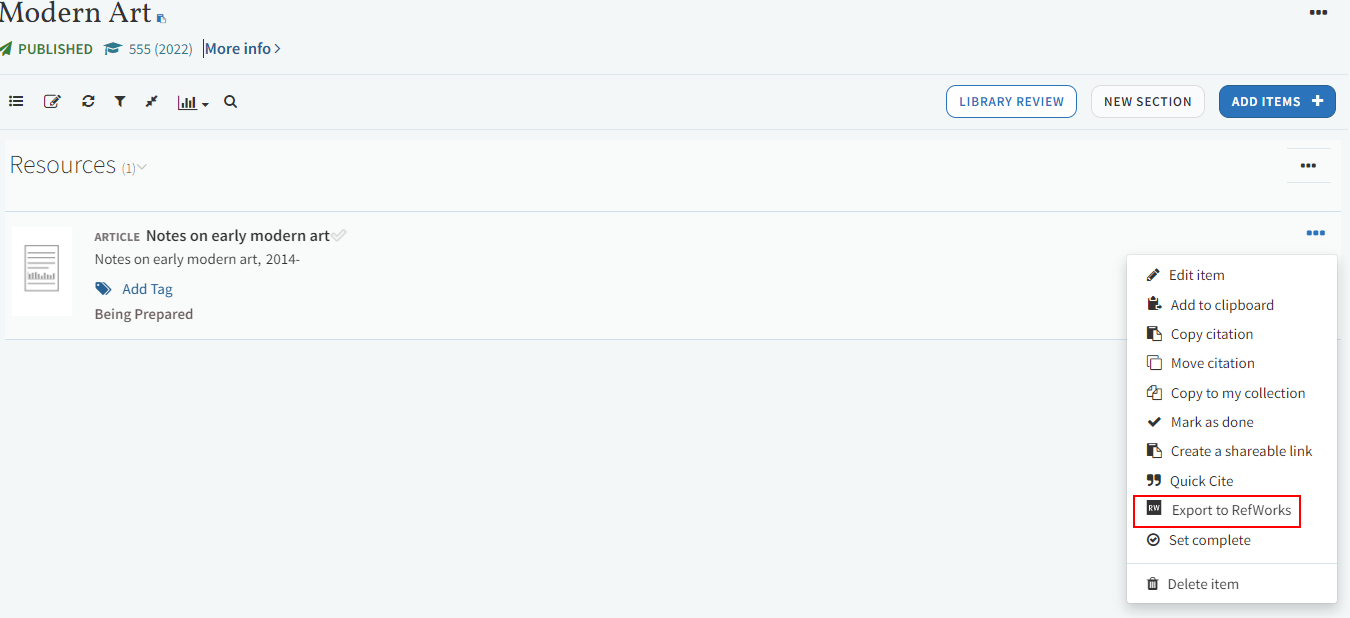
You can export a citation to RefWorks by selecting Export to RefWorks in the citation. You must set the export_to_refworks parameter must to yes to enable exporting citations to RefWorks (Configuration Menu > Leganto > UI > Citation Menu).
Quick Cite: Export a Single Citation in a Specific Reference Format
Quick Cite enables users to generate a citation for a single resource and specify the bibliography style for the citation. The default style is set in Leganto > Features > Bibliographic Styles. If no default style is set, the first style in the Bibliographic Styles table appears (see Managing Bibliographic Styles). The Quick Cite feature is enabled by default but can be disabled in Leganto > UI > Citation Menu.
After selecting Copy to clipboard a disclaimer appears: Remember to check citations for accuracy before including them in your work.
When generating and exporting formatted citations from Leganto, additional authors can be treated as contributors when export_additional_name_as_editor is set to true (default) or editors when set to false.

Displaying Item Sticker Prices in Citations


- Select and edit a citation in Alma.
- From the Citation Parameters section, in the Sticker price field, set a sticker price.
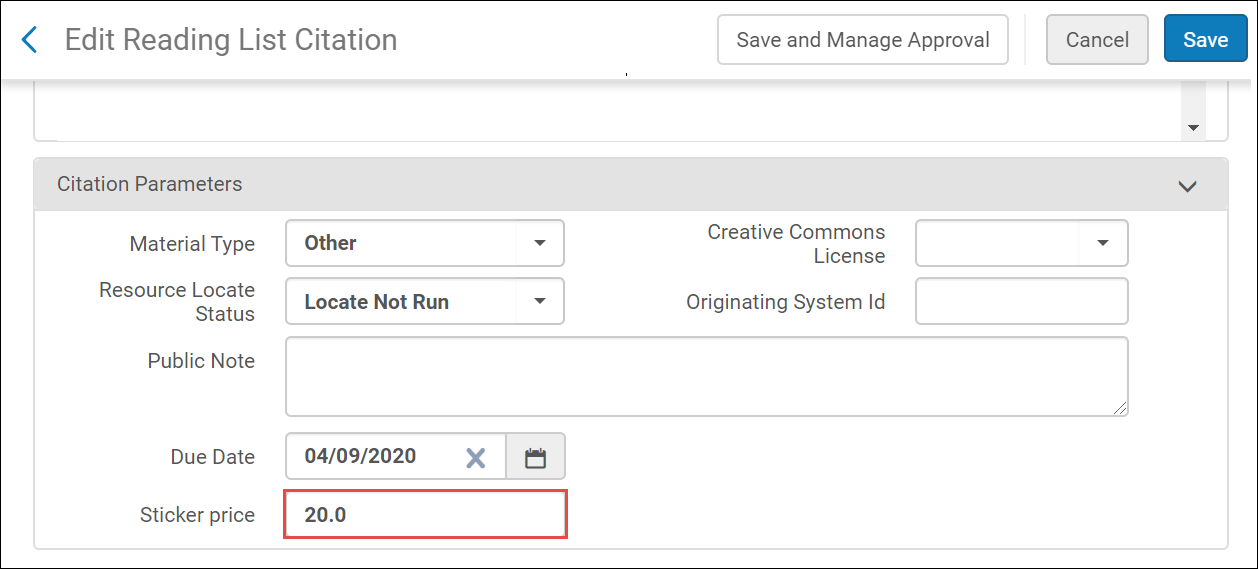 Setting Sticker Price from Citation Parameters section
 - Select Save.
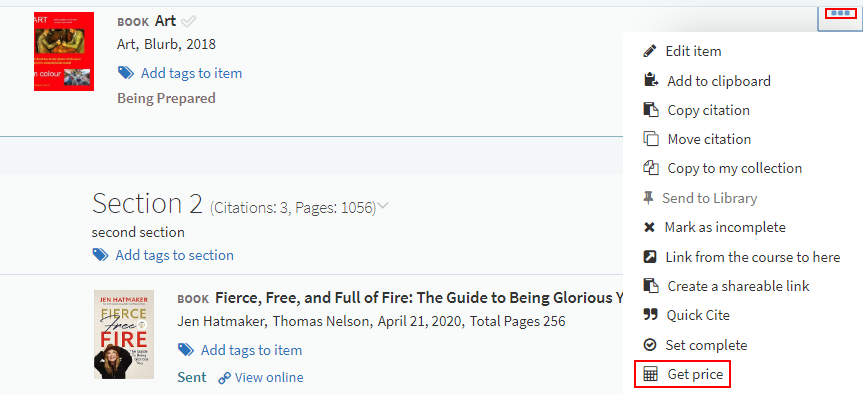
Getting Prices from Rialto


Deleting a Citation
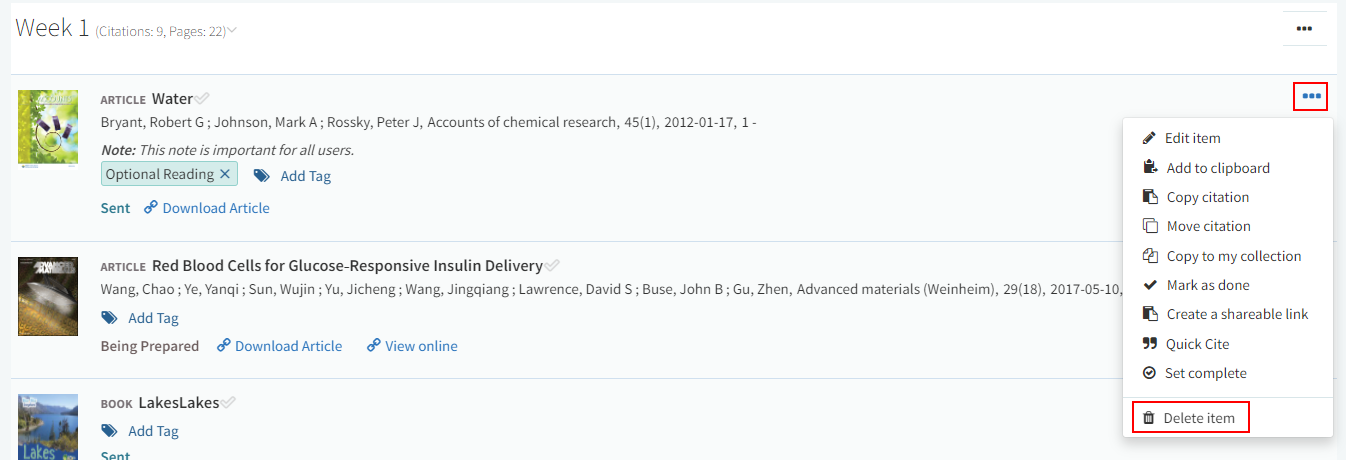
To delete a citation, select Delete item in the citation menu and select OK in the confirmation dialog box.
Digitizing Citations and Clearing Copyrights
There are several options for managing a citation's copyright, depending on your citation's material type.
Discussing the Citation with the Library
When viewing a citation, you can write messages to the library, and read their replies.
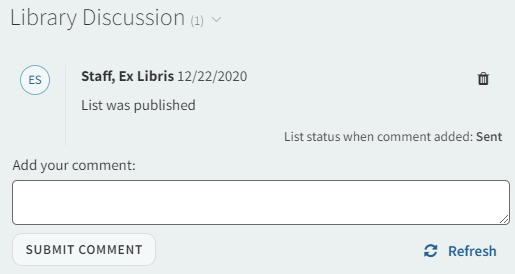
Messages that you enter into the Library Discussion pane create alerts for librarians in Alma, and you can view their responses in this pane. Students cannot see this pane.
Editing a Citation
To edit a citation, on the reading list page select Edit in the citation menu. Alternately, select Edit when viewing citation details. The right-pane displays the citation's parameters. See Adding a Citation Manually for information about the fields. When you are done, select Save.

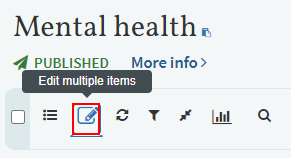
You can also edit multiple selected citations, using the Edit multiple items icon in the reading list view.
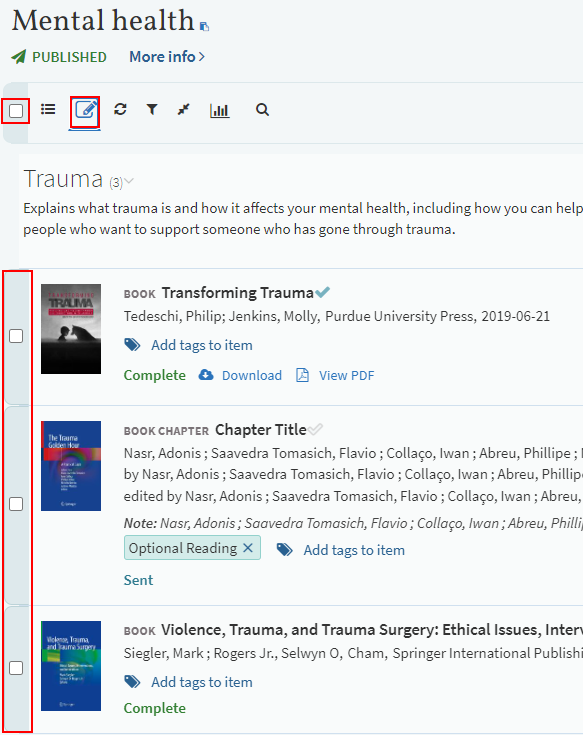
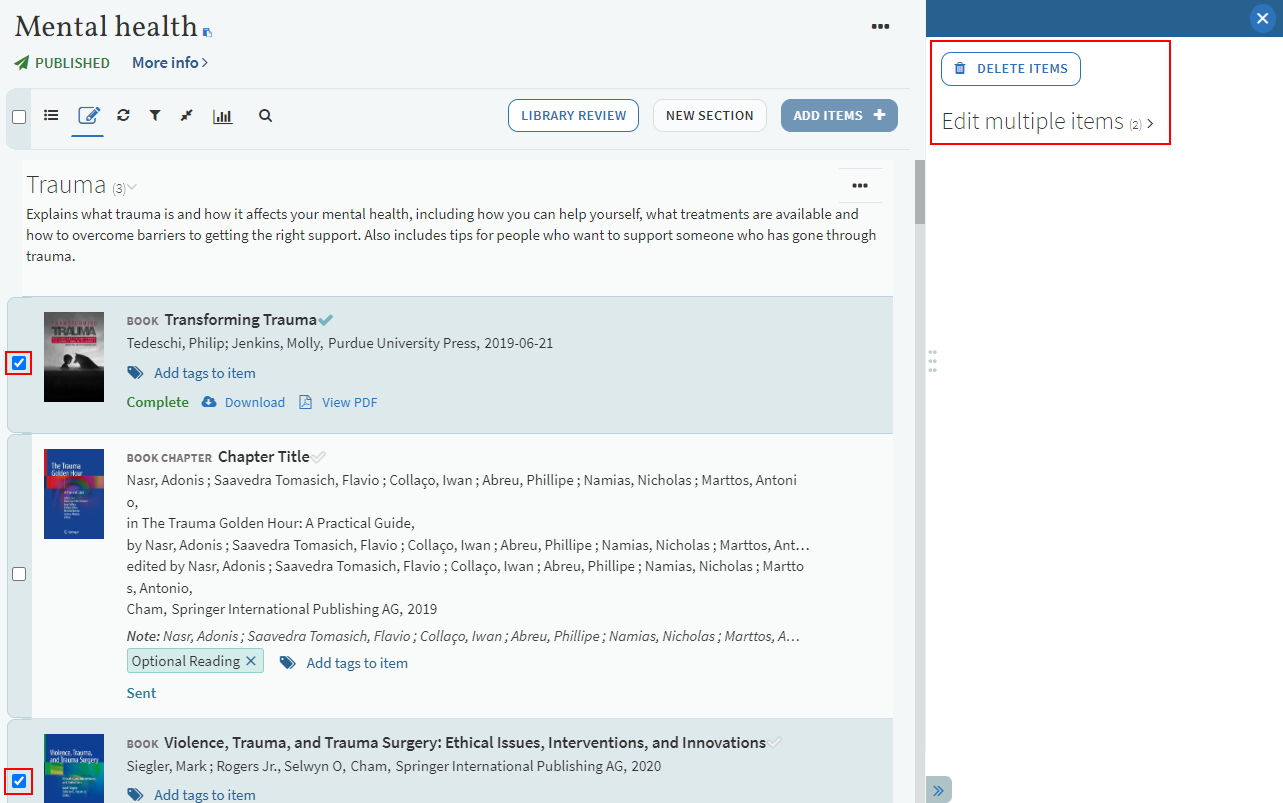
-
Add a tag
-
Remove a tag
-
Select a new due date - you can select a new due date using the calendar icon or select the checkbox to reset the due date to null.
-
Public note - you can enter a new public note or select the checkbox to reset the public note to null.
-
Private note - you can enter a new private note or select the checkbox to reset the private note to null.
Linking to a Citation
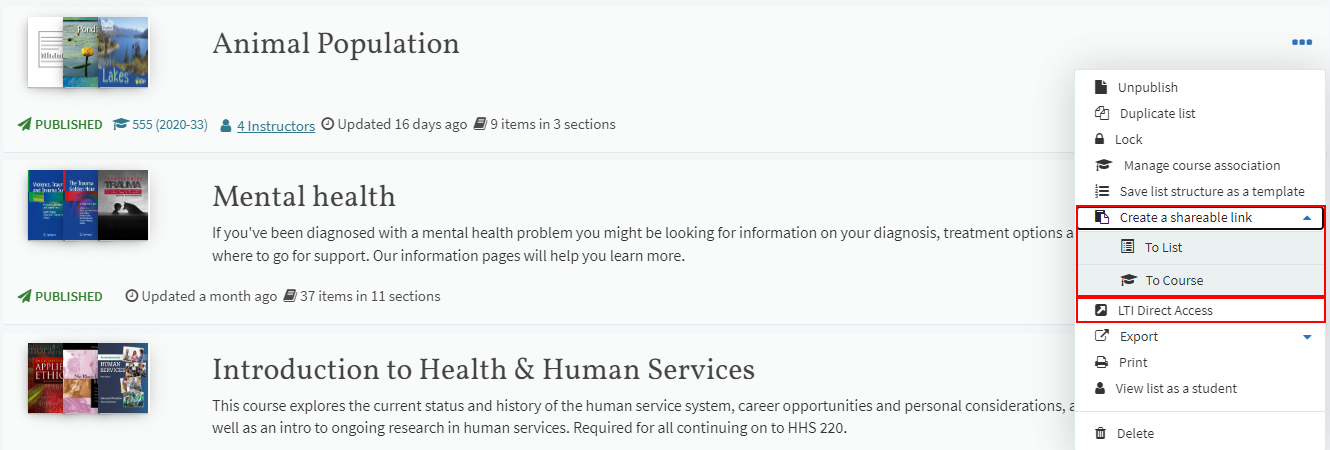
You can link to a citation using the citation shareable link (for embedding on any website, email, and so forth) or citation LMS link (for embedding in your LMS). When anyone accesses Leganto using the link, they see the citation details page.
You can find the citation shareable link by selecting Create a shareable link in the citation menu. To link to a citation from the LMS, select LTI Direct Access in the citation menu and add the parameter to the link from the LMS.
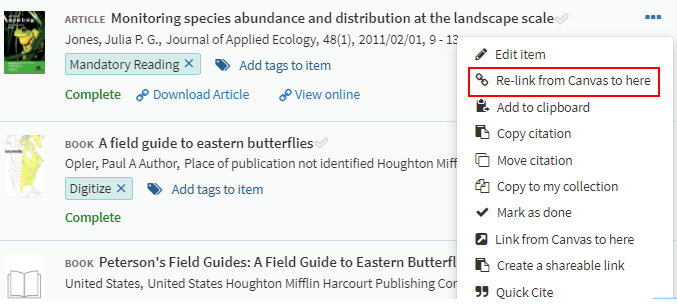
Moving a Citation
Managing a Citation's Due Date
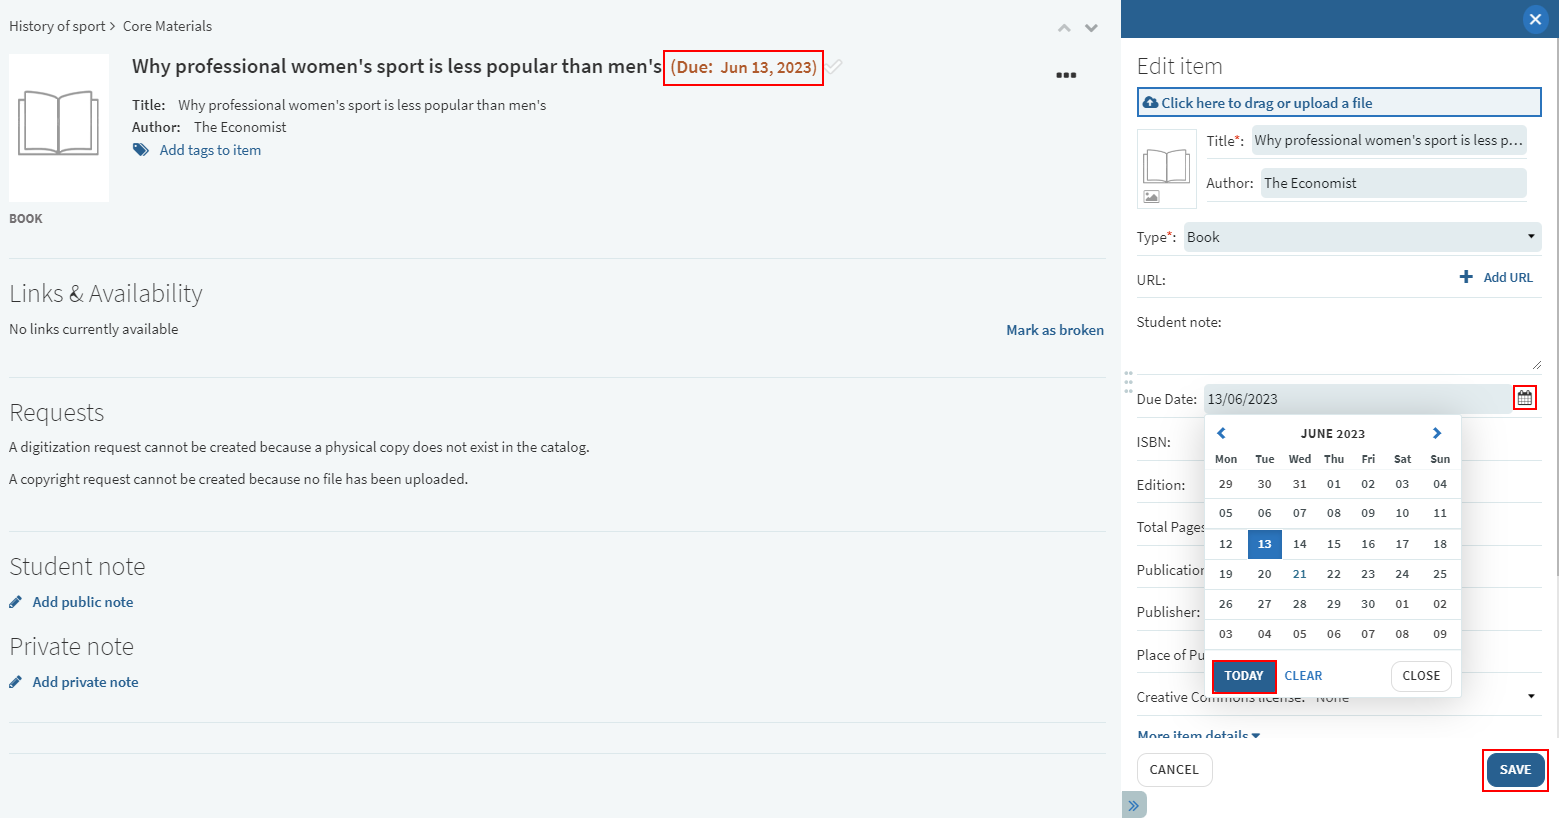
You can edit a citation's due date, which is the date by which the student should read/view the citation's resources.
- Set the due date on the item form.
- Select the calendar icon, select the date, and select SAVE (or simply select Today for today's date).
Managing a Citation's Electronic Links and Physical Availability
The citation details page presents electronic links and physical availability of a citation, when available. Physical availability includes the barcode, status, and location, as well as several options to make requests about the citation. When enabled by your library, you can select whether to hide or display this information (all physical availability) to students.
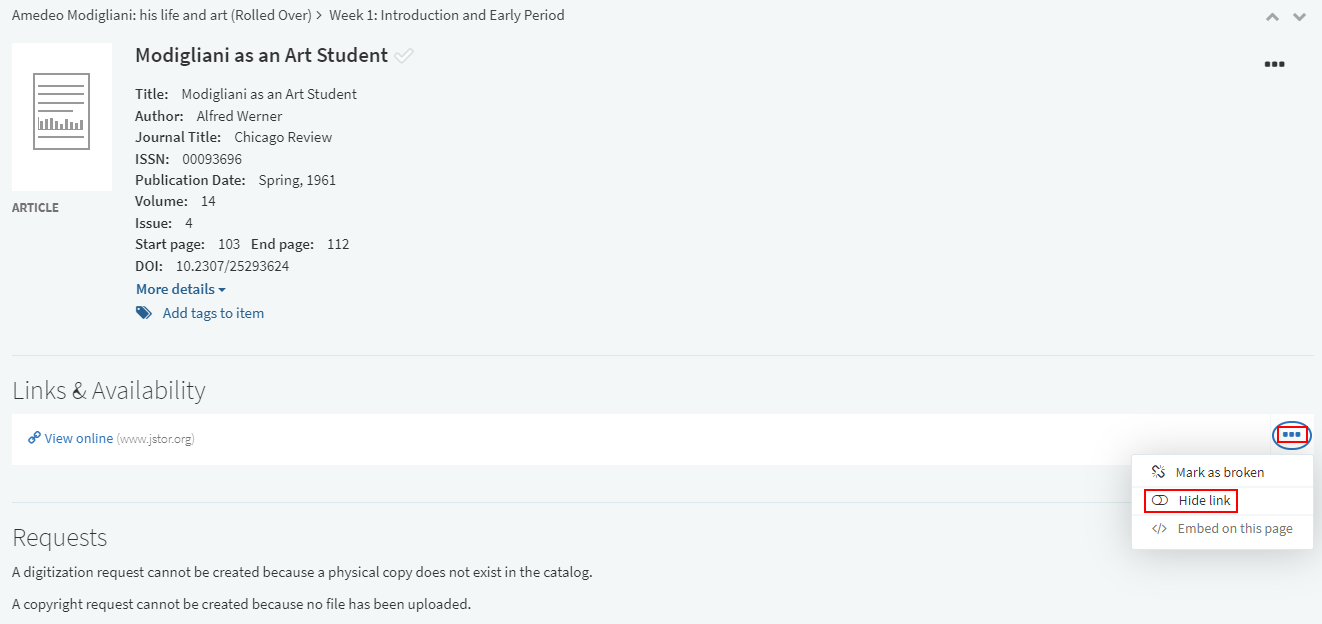
Other availability, including electronic, digital, and file uploads include the following row actions for each availability link, when made available by your library:
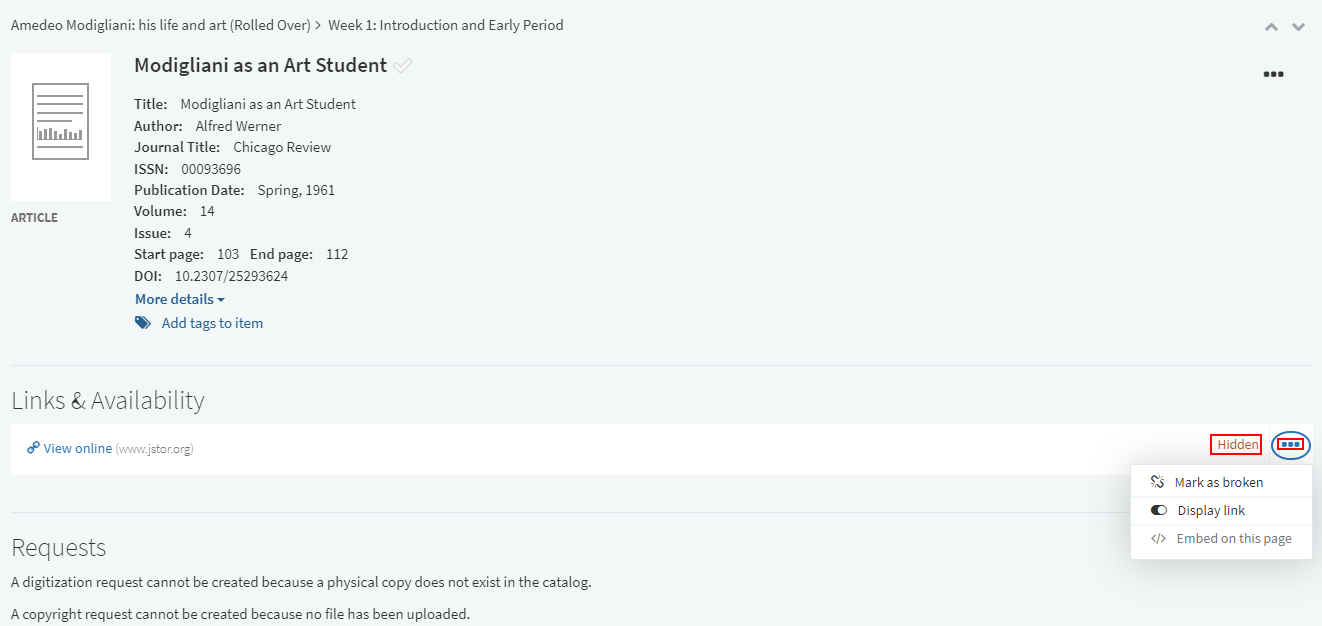
- Mark the link as broken. This hides the link from students and notifies the library to fix the issue at their discretion.
- For information about debugging the citation's uResolver (OpenURL) link, see the knowledge article Debugging Citation uResolver Links.
- Hide/display the link to students.
- Embed/do not embed the link directly on the page in an iFrame.
Managing a Citation's Files
Managing Citation Tags
When enabled by your library, citations can have tags. The list of tags is maintained by your library.
For more information, watch Modifying Lists and Resources.
Tags, as well as an Add Tag option to manage the tags, appear beneath the citation name.

To manage citation tags, select Add Tag.

To add a tag, enter all or part of a tag and select the tag from the drop-down list. To remove a tag, select the X in the tag box. When you are done, select SAVE.
You may see internal tags associated with a citation. These tags (with a dashed border) may be generated by Ex Libris due to an internal process, such as DCS flow. They cannot be created, deleted, or managed. If you do not see them, there is no cause for concern.
Managing Visibility Dates for Citation and/or Materials
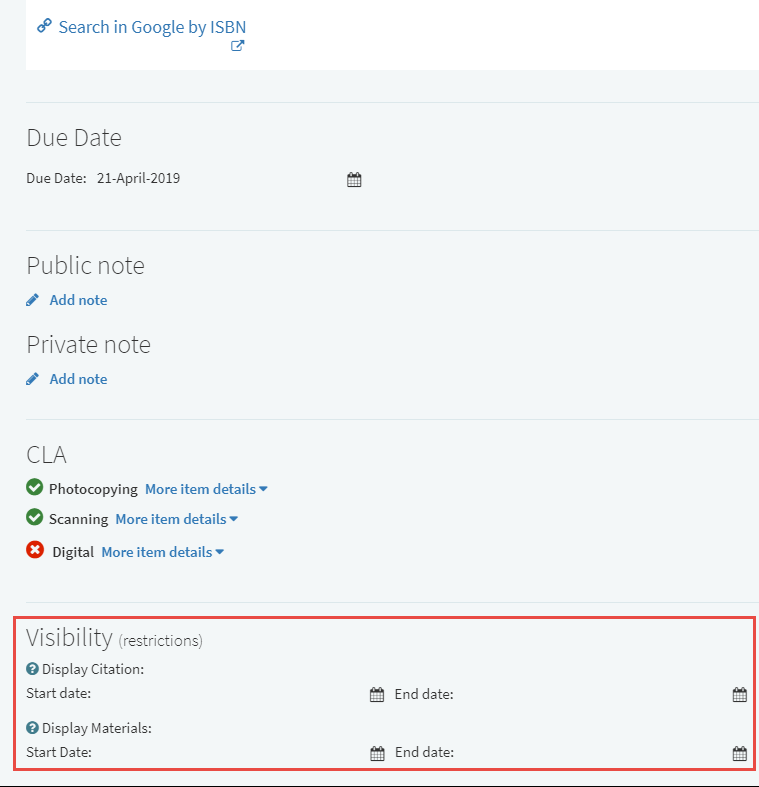
By default, the citation and its resources (materials, such as links or uploaded files) are visible if the section and reading list are visible.
You can set the visibility dates of both the citation and its resources. When configured, resources are visible only during the configured dates if the citation is visible as well. A citation is visible during the configured dates if the section is visible, as well.
Set the citation and resource date on the citation details page: For each date, both start and end, select the calendar icon, select the date, and select Close (or select Today for today's date).
Managing List Visibility Dates
When selected, the list is only available to students within the specified date range.

Moving Citations
To copy a citation to the same reading list or to another reading list, see Copying Citations.
You can move a citation within a reading list by dragging and dropping a single citation or by temporarily adding one or more citations to My Clipboard and then inserting all citations after another citation in the list.
You can move all citations in a reading list at once by reordering them.
To drag a citation, select the selection bar to the right of the citation.

To move one or more citations in multiple steps:
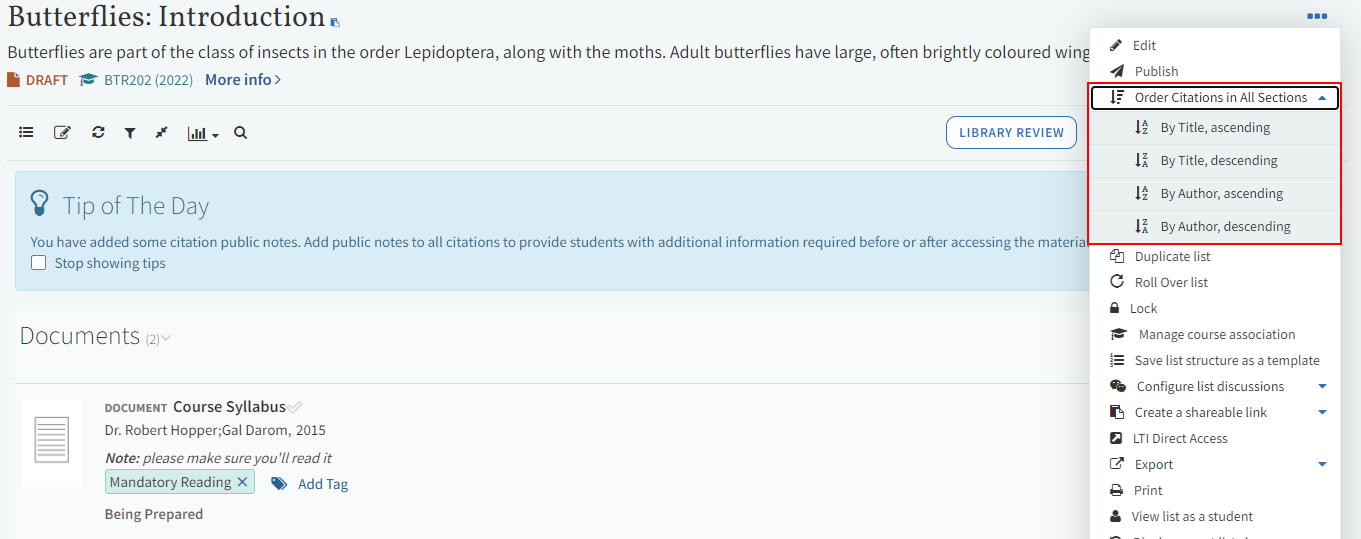
To order all citations in all sections in a reading list, select Order Citations in All Sections (enable Configuration > Leganto > UI > List Menu > order_citations_in_all_sections) > <sort type> and select OK in the confirmation dialog box. The sort types are by title (ascending or descending) or by author (ascending or descending).


Purchasing Citations
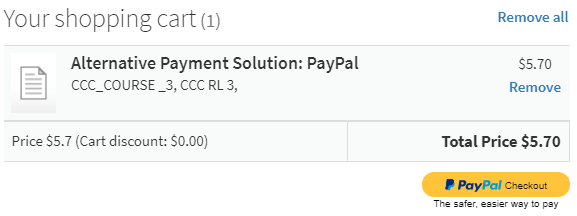
In US institutions, when the institution is integrated with the Copyright Clearance Center and non-funded licenses are enabled, students can purchase non-funded citations using PayPal. The student sees the option to purchase the resource.

Sending a Citation to the Library for Fulfillment
Select Send to Library (Configuration > Leganto > Citation Menu > send_to_library) in the citation menu to notify the library that the citation is ready for processing.
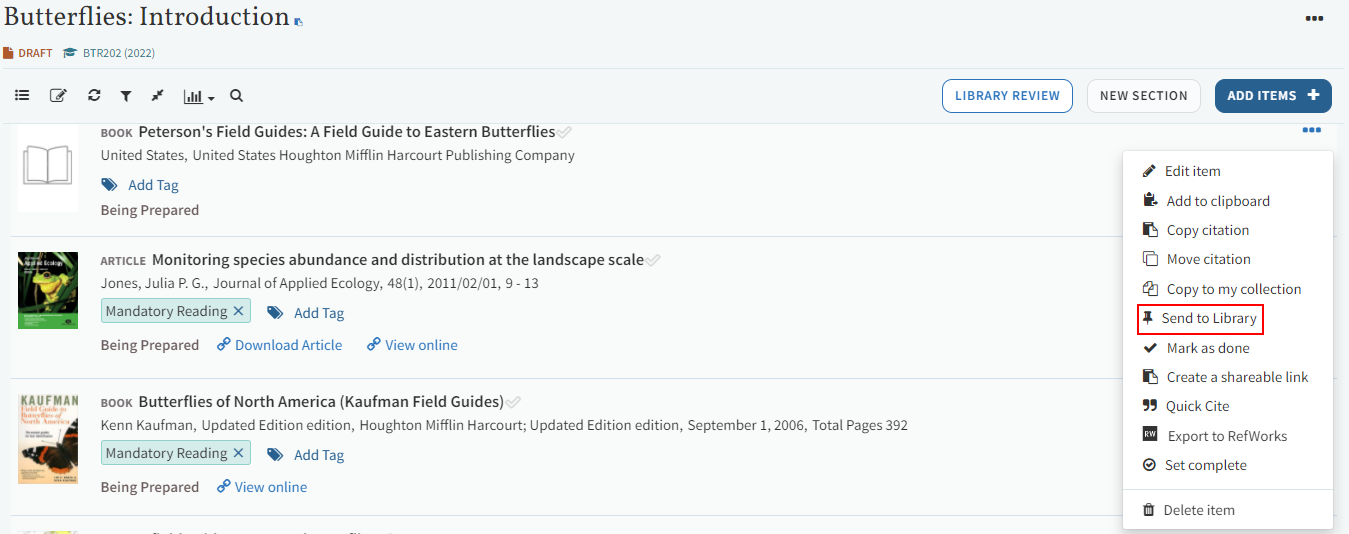
After sending the citation to the library, the option becomes disabled. When the library has fulfilled the citation, they will mark it with status Complete. They can ask you questions using the library discussion pane on the citation details page.
A librarian can select Set complete directly in the citation menu to mark the citation as Complete. This option is not available to instructors.
Viewing a Citation
Brief information about a citation is available on the reading list page.
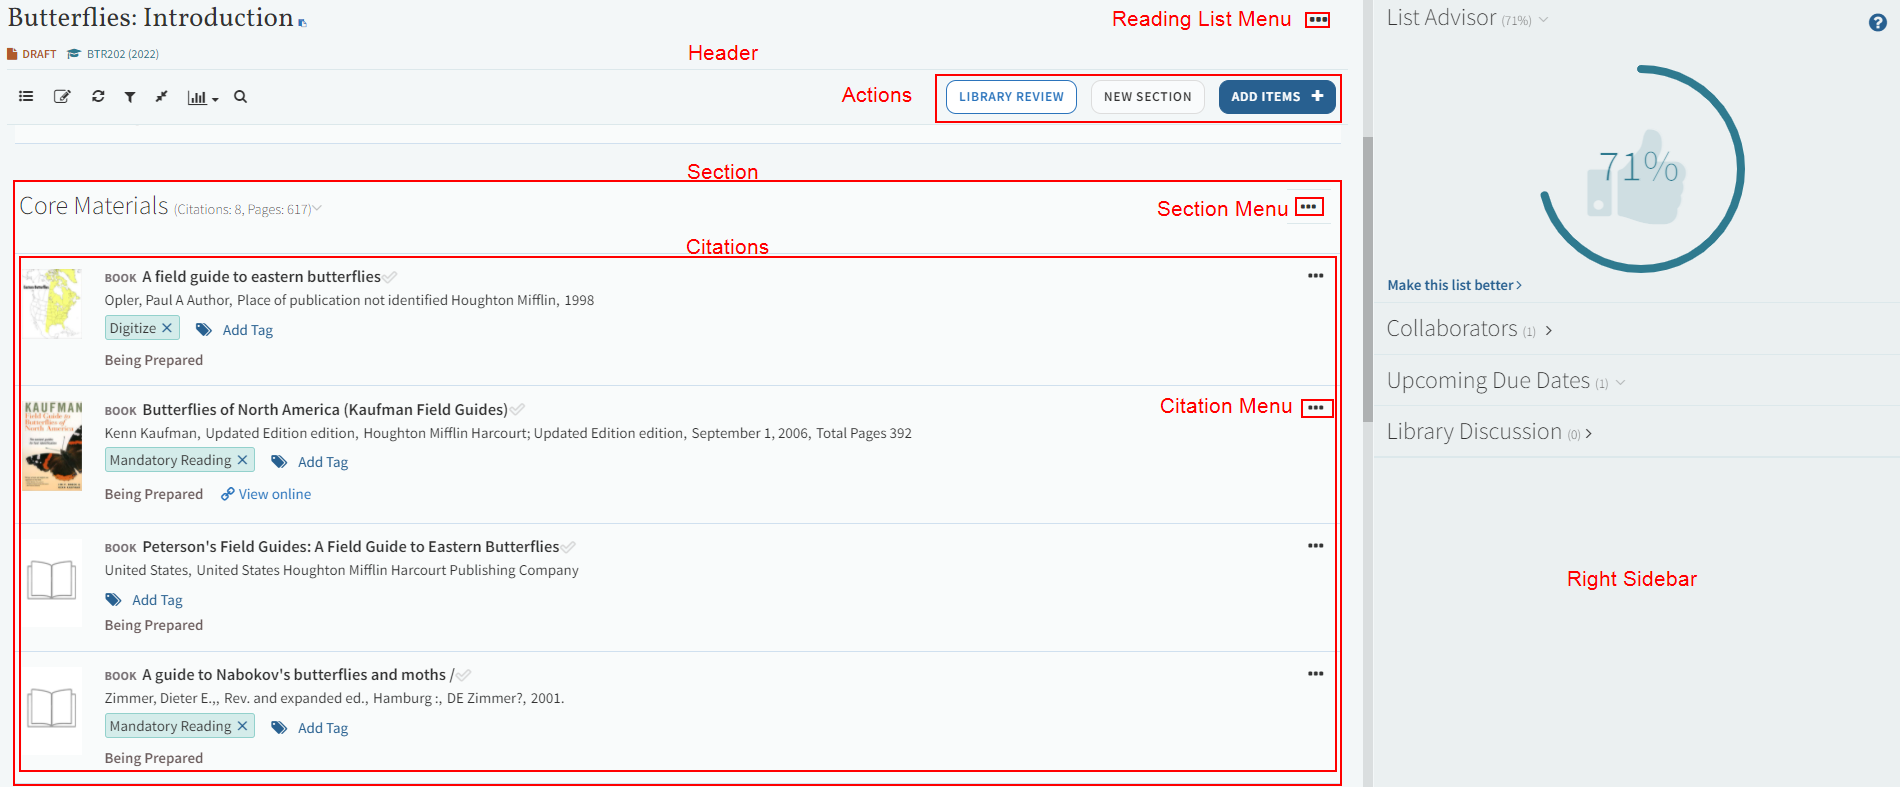
Different fields appear in the rows, depending on the material type (and your library's configuration), but the field generally include title and author, due date, public note, tags, and availability information or a link to the resource, as well as other information.
To view and edit all citation and resource fields, see Editing a Citation.
To view complete citation details, select the citation title or anywhere in the citation that is not otherwise a link. The citation details page appears.
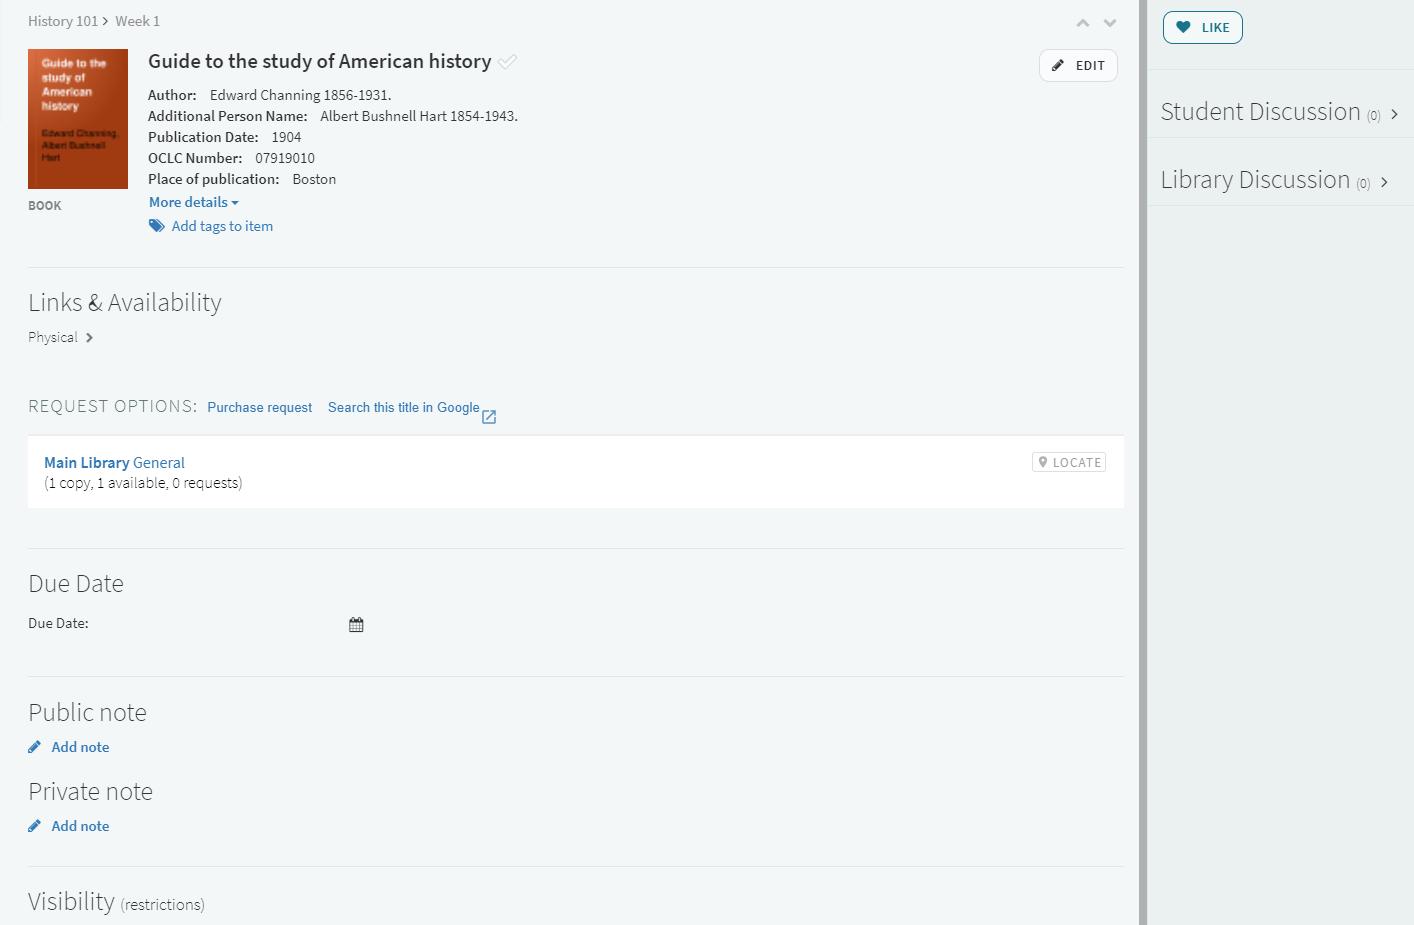
- Citation details appear at the top of the page; select More details to view additional fields. You can use this section to add tags (see Managing Citation Tags) and to edit the citation (see Editing a Citation).
When enabled by your library, the total pages for a citation appear. When the total number of pages is entered manually, it appears as usual, for example, 11. When the total number of pages is calculated from the start and end page, it appears in parentheses, for example: (10). When both numbers are available, they appear with the manually added number, followed by the calculated number in parentheses, for example, 11 (10).
- Links & Availability - Links to electronic resources and/or physical availability information. See Managing a Citation's Electronic Links and Physical Availability.
- Additional Services - When enabled by your library, additional services related to the citation, such as Google preview and any others configured by your library, appear here.
- Due Date - See Managing a Citation's Due Date.
- Public Note / Private Note - See Adding a Note to a Citation.
- CLA - For UK institutions, when enabled by your library, CLA information about the citation appears here. This information informs you of the rights you have to photocopy, scan, or otherwise digitize the citation's resource.
- Visibility - See Managing Visibility Dates for Citation and/or Materials.
- Appears on these reading lists - Each entry in this section links to other reading lists that also contain this citation.
- The following pans may appear in the right sidebar:
- The number of times that a student has liked the citation appears at the top of the sidebar.
- Related Items - When enabled by your library, related items (defined in Alma records) appear here, if any.
- Recommendations - When enabled by your library, recommendations of various kinds appear here.
- Other Formats & Editions - When enabled by your library. See Adding a Suggested Citation.
- Student Discussion - You can send messages to the student and the students can send messages to you or each other about the citation. To configure this pane, see Configuring the Reading List/Citation Student Discussion and Discussing the Reading List with Students and the Library.
- Library Discussion - Send and receive messages to/from the library. See Discussing the Citation with the Library.
- Select the contraction icon
 at the bottom of the sidebar to contract or expand the sidebar.
Copyright Issues
- For physical material, such as a book or DVD, if there are enough copies in the library then no copyright issues apply. If there are not enough copies, you can, when enabled by the library, initiate a purchase request for more copies, in which case, again, no copyright issues apply.
- Similarly, if your library already provides access to an electronic resource for all of your students, or the material is freely available on a public website and you are simply linking to the material, no copyright issues apply.
- In all other cases, you are requesting that the library digitize the material so that there are enough copies for your students. You can let the library determine this or supply as much information as you can to help in the process.
- If you believe that the material can be freely copied by the library because it is covered under a Creative Commons license, indicate that when creating or editing the citation.
- When enabled by your library, and when the reading list is associated with a course, you can initiate a specific digitization and/or copyright request with the library. (For a digitization request, there must not already be another open request and the citation must be a physical title with at least one item. For a copyright clearance request, the citation must be an uploaded file, and the copyright must not be already set as self-declared or marked as Creative Commons.) These requests are handled manually or automatically by the library, depending on the library's back-end configurations.
- A copyright request asks the library to clear copies for specific pages and/or chapters. Use this option when you plan to initiate a digitization request or you plan to make copies of the material yourself (such as photocopies) or upload a file.
- A digitization request asks the library to make copies of specific pages and/or chapters.
A copyright approval may be relevant for a specific date range, and the library may require you to enter a date range when making the request. In this case, students cannot access the material before and after the range, regardless of the visibility settings of the material, citation, section, and/or reading list. A warning notice may appear when accessing the material and during the final days before the last date (according to your library's configuration).
- In the UK, copyright clearance is ultimately handled by the UK's Digital Content Store (DCS) which in turn uses the Copyright Licensing Agency (CLA). When enabled by your library, and when available for the citation, CLA information appears on the citation details page, indicating allowable procedures for the material. CLA information is available only if enough information is provided about the citation, such as ISBN.
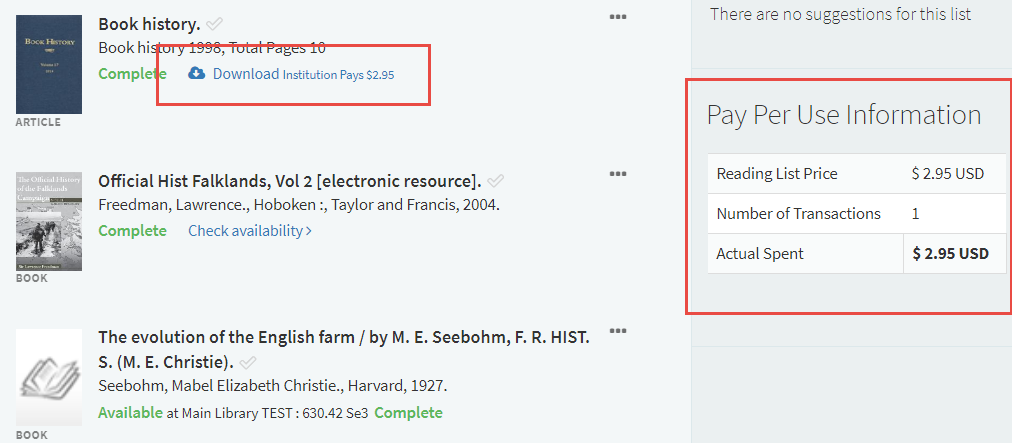
- In the US, your institution may use the Copyright Clearance Center to clear and purchase digitized materials on a pay-per-use basis. As an instructor, you see the cost per use in the citation, as well as the total cost for the reading list (the sum total of all pay-per-use fees in the reading list) and how many transactions, have already occurred. A student simply sees the download link, similar to any other uploaded material.
 Pay-Per-Use in Leganto, Instructor
The institution is charged only once for all accesses to the same resource by a single student, no matter how many times the student accesses that resource. Instructor accesses to a resource do not count as transactions and the institution is not charged for them.

