
Files Section
Files Section
Add any additional files, as required. You can assign access rights and/or licenses of one or more files. Note that it is also possible to assign access rights and/or licenses at the asset level, instead of for each file; for more information about this option and about access rights and licenses, see the Access Rights and Licenses section.
To configure access rights and licenses, see Configuring Esploro Access Rights and Configuring Esploro Licenses.
Adding a License to One or More Files
Select the files, select Manage license, select the relevant access license to apply to the selected files, and select Set License. You can also manage the license when editing the file information.
Editing File Information
You can edit file information as follows:
-
Select Edit File Information in the row actions list for a file. A pane to edit the file information appears.
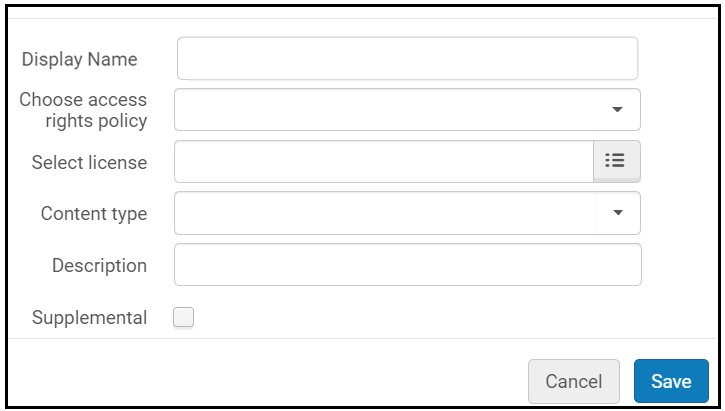 File Information Pane
 - Enter a display name if you want the name of the file displayed on the research portal to be different than the file name.
- Select the access rights policy for the file. See below for additional options that may appear.
- Select the license for the file.
- Optionally select the content type of the file's contents in Content Type. To configure these options, see Configuring Research Asset File and Link Types.
- Enter an optional description.
- Select the Supplemental checkbox to indicate that the file is supplemental, which prevents these files from being taken into consideration when determining the open access status of the asset. When this checkbox is selected, an icon
 appears next to the file.
 - Select Save.
Adding an Access Rights Policy to One or More Files
You can add an access rights policy to one or more files as follows:
- Select the files and select Manage access rights in the table actions list.
- Select the relevant access right policy to apply to the selected files. After selecting the policy, you may see additional fields to complete:
- Open – The file is immediately available.
- Open with Embargo – The file will be available after an embargo period. Select the end date for the embargo, or select a relative time period for the embargo, starting from the publication date. The date that the embargo expires is displayed in the Embargo Expiry Date column to help calculate the open access indicator and to help you determine until when the embargo is in force.
- Restricted – The file is visible to associated researchers but not available, except by request. Enter a reason for the restriction.
- Closed – The file is not available to researchers. Enter a reason for the restriction.
- Locally defined – Select a local access policy and enter a reason.
- Select Set Access Rights.
You can also manage the access rights when editing the file information.
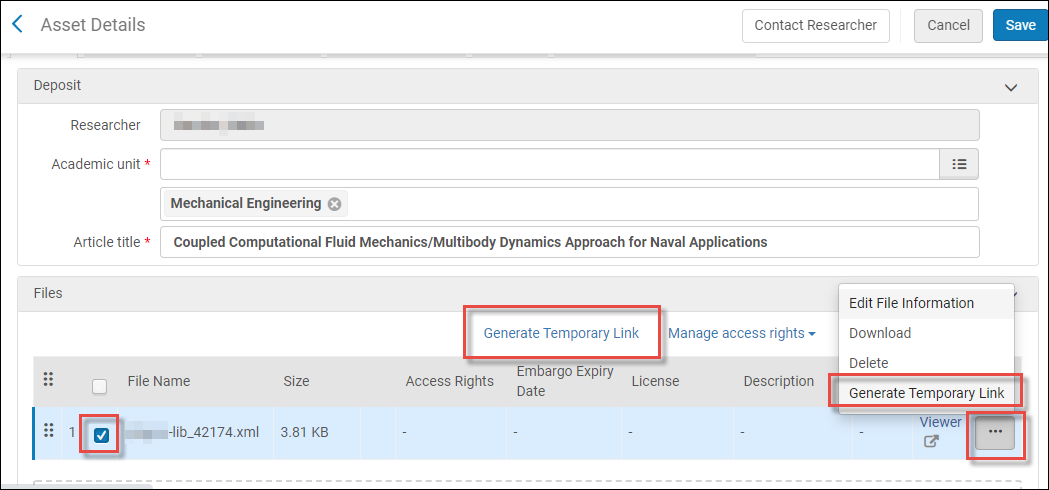
Generating a Temporary Link to a File
Repository managers can generate a temporary link to an access-restricted file, which grants access to the file for a certain period of time to the requester.
To create a temporary link, in the Asset Details > Files tab, select a file(s) and select Generate Temporary Link, or select the ellipsis menu of an individual file and select Generate Temporary Link. Then choose an expiry date and select Generate.
For a video showing how to generate a temporary access link to a file see here.
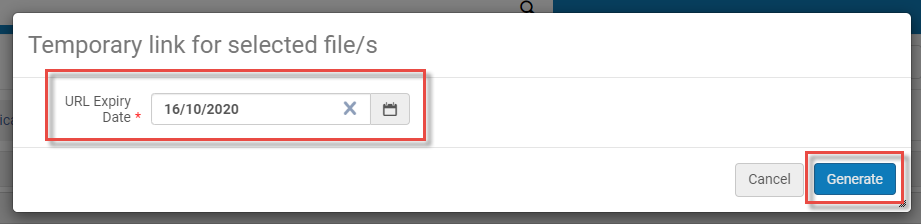
When the link is generated, it appears in a pop-up. If more than one file was selected, the link will be to a zip file containing the links to the individual files.
For a video showing how to generate a temporary link to restricted files see here.