Configuring Asset Details
This page describes how to configure asset details.For working with research assets see here. For configuring research deposits see here. For configuring the research information hub see here.
For a video on customizing the research asset form see here.
Configuring Asset Attachment Types
You can configure which attachment types (description) to choose when adding an attachment to an asset on the asset's attachment tab. You can configure this in the Asset Attachment Description configurations from the Asset Attachment Description code table (Configuration Menu > Repository > Asset Details > Attachment Types).

Configuring the Asset Note Types
You can configure the types of notes, such that notes added to an asset will categorized by type in the asset's Internal Notes tab, using the Notes Type code table (Configuration Menu > Repository > Asset Details > Note Types).
For more information about code tables, see Code Tables.

Configuring the Asset Fields Display on the Viewer
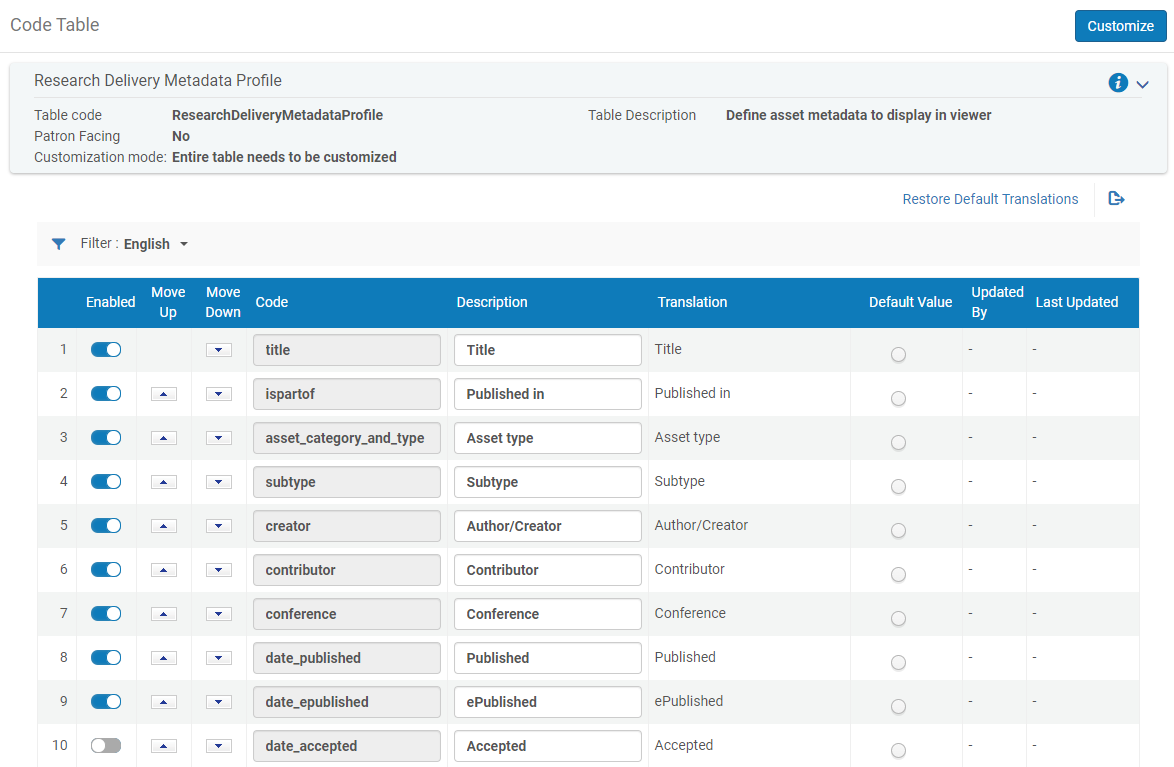
Configuring Research Asset File and Link Types
You can configure the types of files and/or links that can be associated with research assets on the Asset File and Link Types List page (Configuration Menu > Repository > Asset Details > File and Link Types). For example, you can enable or disable labeling an upload or a link as a ReadMe file.

You can add, activate/deactivate, edit, or delete types on this page.
- On the Asset File and Link Types List page, select Add Link Type and enter or select (all fields are mandatory):
- Code – A unique code.
- Name – A unique name to appear in the drop-down list.
- Applicability – Whether the type can be selected for files, links, or both.
- Asset Categories/Types – Select the categories for which this type is available. Select All for all categories. Note that all types appear on the generic form.
- Select Add Row.
Configuring Asset to Asset Relationships
You can configure the asset to asset relationships that are available to connect assets to one another (in the Relationships section) using the Asset to Asset Relationship List page (Configuration > Repository > Asset Details > Asset to Asset Relationship).
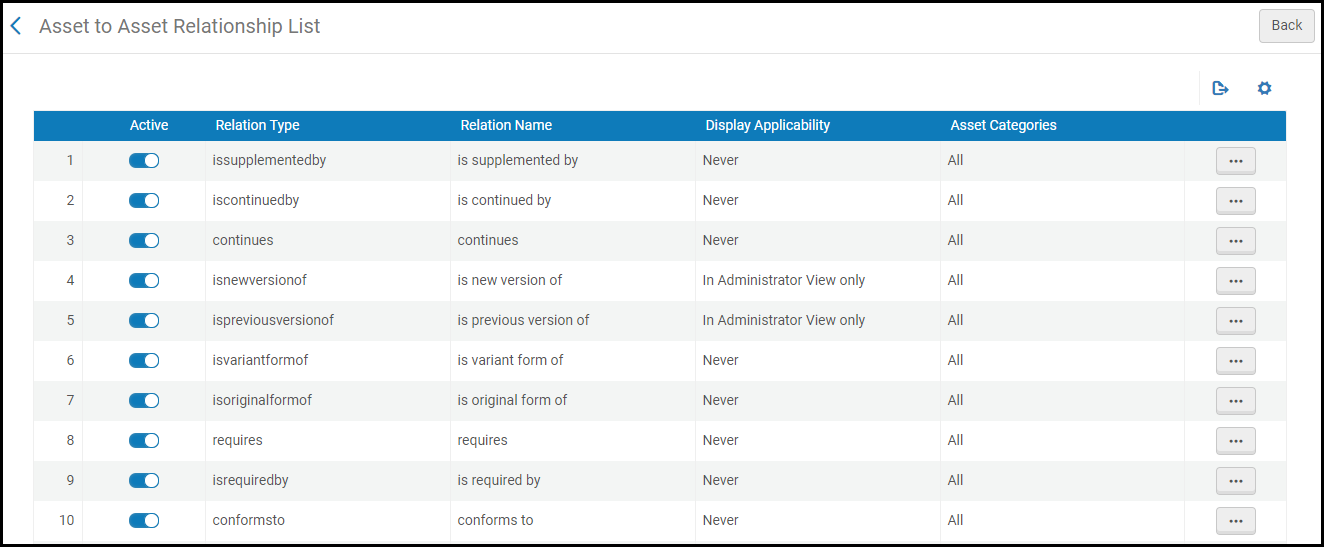
On this page you can activate or deactivate a relationship, or you can edit a relationship.
- Select Edit in the row actions list. The Edit Relation pane appears. You cannot edit the relation type.
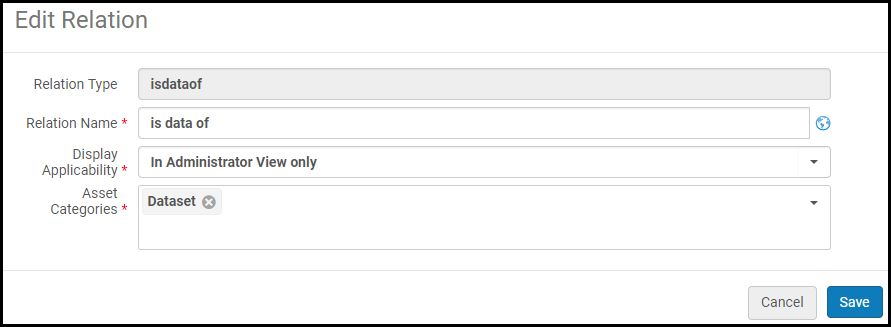 Edit Relation Pane
 - Optionally edit the relation name.
- In Display Applicability, select In Administrator View only to display the relationship when adding/editing an asset, or select Never to hide the relationship.
- Select one or more asset categories/types for which this relationship can be added, or select All to enable adding this relationship to any asset category. If you remove a category, existing assets with this relationship continue to have the relationship until you remove them. Note that all relationships appear on the generic form.
- When you are done, select Save.
Configuring Local Asset Fields
You can define up to fifteen free text fields that will be added to every asset in the Local Field Names page (Configuration Menu > Repository > Asset Additional Fields). Use these fields to enable additional information not available in any of the other sections. You can enable or disable each field. To edit the field label (name), select Edit in the row actions list for that field.
For a video showing how to manage local asset fields see here.
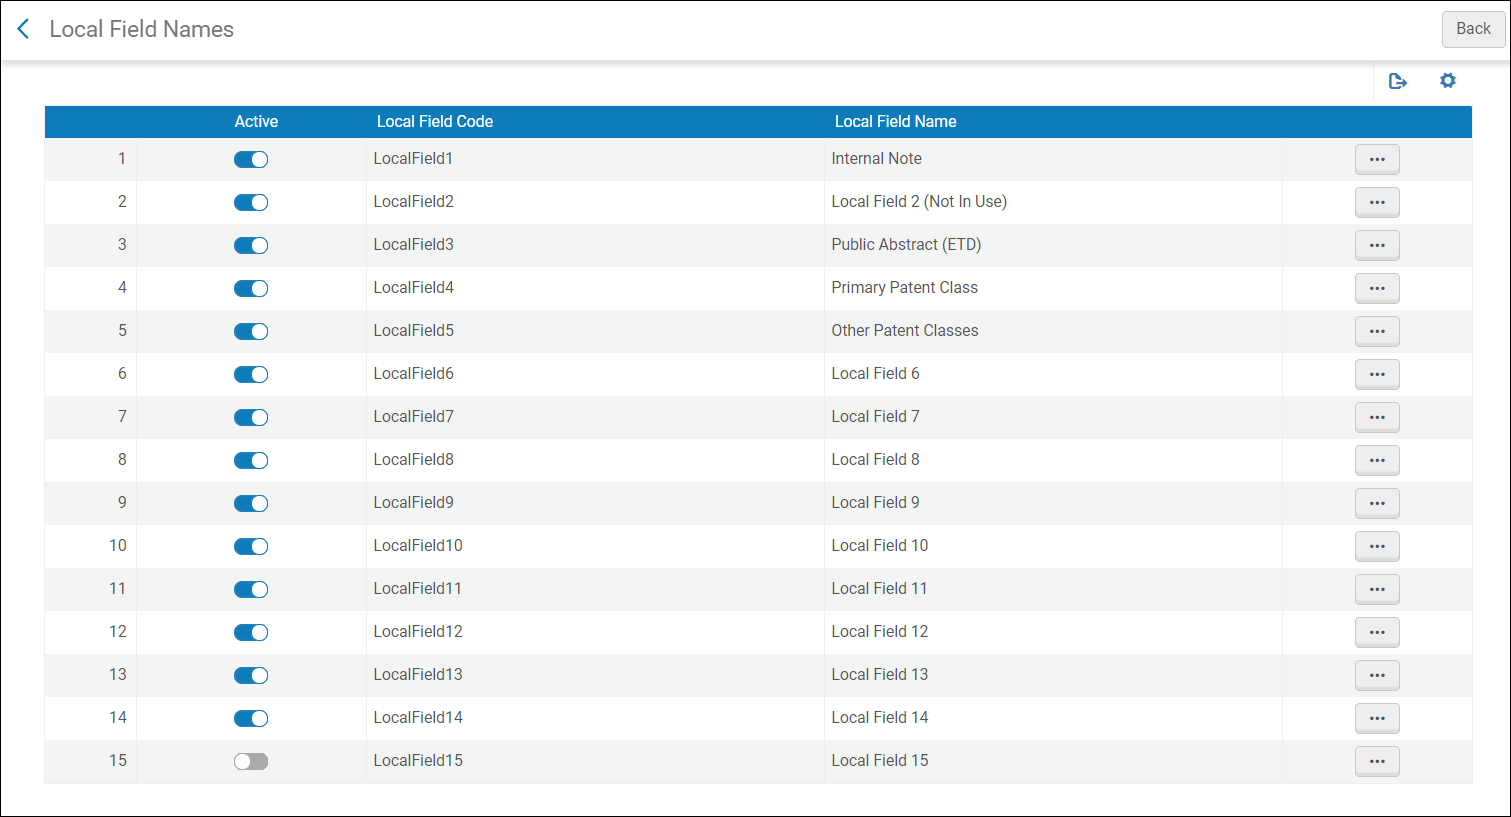
See here for a video showing how to work with local fields.
Configuring Additional Identifiers
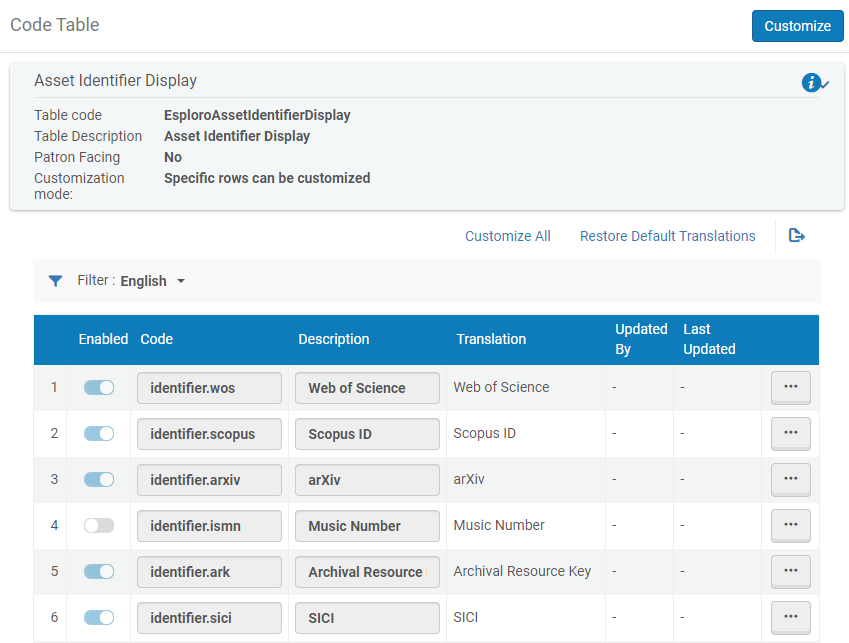
Configuring DOI Agencies
For more information about DOIs in Esploro, see Digital Object Identifier (DOI) Registration.
For a video showing how to create a DOI see here.
You can enable or disable integration with DOI registration agencies on the DOI Configuration page (Configuration Menu > Repository > Integrations > DOI Integration).

A DOI contains a prefix that is assigned to your institution by the agency and a suffix, The suffix can have its own prefix that is unique for each asset category. The rest of the suffix is a unique number representing the asset. You can select the number of digits in the number and starting number for your assets.
For example, if the prefix assigned to your institution is 10.ABC, and you configure your suffix's starting number to be 1, your suffix padding to be 8, your suffix prefix label to be data, then the first DOI that Esploro generates is 10.ABC/data.00000001.
Currently, Esploro can integrate with Crossref and DataCite. You can enable or disable integration with an agency and you can edit a configuration.
In principle DOIs should be registered for unique material - not material published by publishers. Since Esploro is not a publishing platform there should be no need to register DOIs for the following types. Note that for author accepted manuscripts and preprints the "Posted Content" asset category types should be used.
- publication.journalArticle
- publication.magazineArticle
- publication.newspaperArticle
- publication.newsletterArticle
- publication.journalIssue
- publication.bookChapter
- publication.bookReview
- publication.conferenceProceeding
- publication.dictionaryEntry
- publication.encyclopediaEntry
- publication.translation
- publication.annotation
- publication.bibliography
- publication.letter
- publication.technicalDocumentation
- publication.editorial
- publication.abstract
- Select Edit in the row actions list. The agency's integration details page appears.
- Edit the fields on the page:
When set to No and the Update DOI Registration Agency - Research Assets job runs, Esploro sends to the DOI registration agency only changes to non-migrated assets that were registered with the DOI registration agency.
- Registration Agency (read only)
- Crossref registration name (Crossref only, mandatory) – The name of the account manager as registered in Crossref.
- Repository name (Crossref only, mandatory) – A name that you would like to call your repository. Crossref uses this name in its interface as the database in which to hold datasets. This name is only used for dataset deposits.
- Email (Crossref only, mandatory) – An email address to which to send updates about the status of registration requests sent to Crossref. With DataCite, Esploro uses an API. As a result, Esploro displays the status of the registration immediately on the page after the request is made. With Crossref, Esploro sends the request using a less immediate interface. If there is a quick response, Esploro displays the result on the page. Otherwise, Crossref sends updates on the status of the request to the email address that you enter in this field.
- Asset Categories/Types (mandatory) – The asset categories/types for which you enable this agency. You can select multiple categories or types, or select All to enable the agency for all categories or types.
- DOI prefix (mandatory) – The prefix assigned to your institution by the agency. This should start with 10.
- Account ID (mandatory) – Your institution's repository ID as registered in the agency.
- Account password (mandatory) – Your institution's repository password as registered in the agency.
- Suffix starting number (mandatory) – The first suffix number to use when creating DOIs for your institution with this agency. Enter digits only. If a DOI with this suffix number already exists, Esploro will use the first available number larger than this number that is not already in use. A value of 0 cannot be used as the suffix starting number. A value of 0 cannot be used as the suffix starting number.
- Padding – The length, in digits, of the suffix, including the automatically generated sequence number. Any unused digits in the suffix are replaced with zeroes. Enter a single digit only (between 1 and 9).
- Use environment – Select whether to actually register the DOIs with the agency (Production) or whether you are testing the profile (Test) using the agency's test environment. You cannot migrate DOIs (see below) in a production environment when this profile points to the test environment.
-
Update DOIs of migrated assets – When set to Yes and the Update DOI Registration Agency - Research Assets job runs, the job includes changes to all assets that were registered with the DOI registration agency, including migrated assets that hold DOIs that were registered by your institution. For these assets, the job updates the DOI registration agencies with these assets' metadata and also updates these assets' URLs in the agencies to resolve back to Esploro. Note that these changes cannot be undone.
- Allow researchers to reserve DOIs – Enable/disable researchers to reserve DOIs on their own by selecting Yes or No on the Allow researchers to reserve DOIs radio button.
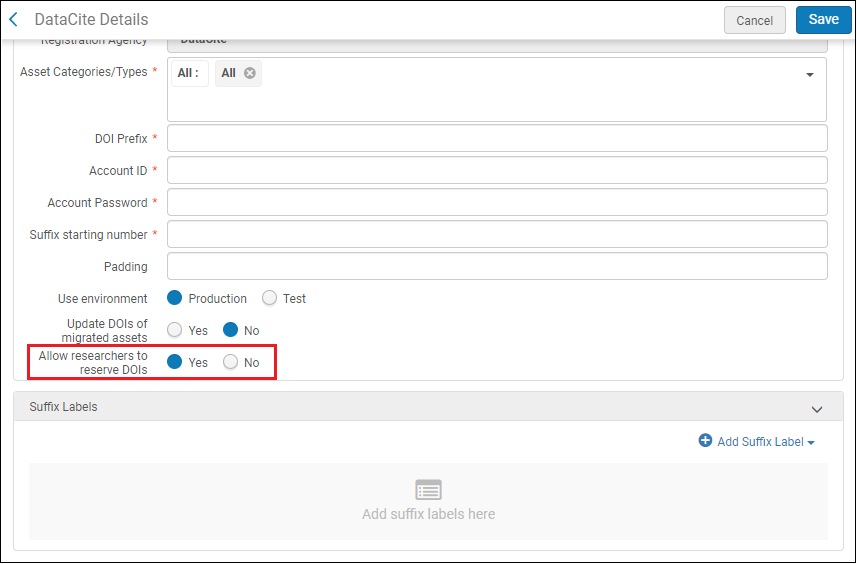 Allow Researchers to Reserve DOIs
For example, if the prefix assigned to your institution is 10.ABC, and you configure your suffix's starting number to be 1, your suffix padding to be 8, and your suffix prefix label for this asset category to be data (not yet developed by Ex Libris; coming soon), then the first DOI that Esploro generates for assets of this category is 10.ABC/data.00000001.
- For each category, or for groups of categories, enter an optional suffix label (a prefix for the suffix). For each label:
- Select one or more asset categories/types.
- Enter the suffix label using any of the following characters: a-z A-Z 0-9 . - _ ; ( ) /
You can add, edit, and delete labels.
- When you are done editing, select Save.
For DataCite customers: Your DataCite account settings include options to restrict which URLs your DOIs are allowed to point to. Please make sure that all of your repository domains and subdomains are included in the domain settings within your DataCite repository account. For more information, see https://support.datacite.org/docs/update-repository-settings#domains.
The API error returned if the DOI URL is domain is not in the allowed list of domains is 422 Unprocessable Entity. The URL is not allowed by repository domain settings.
Configuring Handle Server Integration
You configure the Handle server integration from the Handle Server Integration page (Configuration > Repository > Integrations > Handle Server Integration).
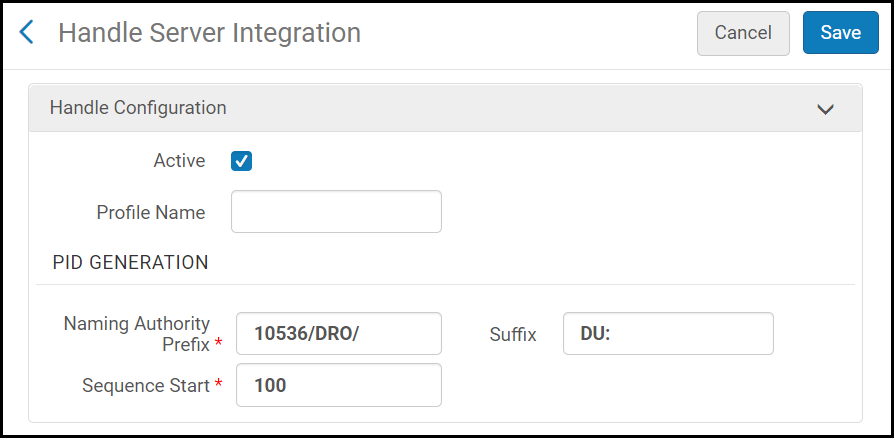
- Select the Active checkbox to activate the integration.
- In the Profile Name field, enter a profile name.
- In the Naming Authority Prefix field, enter the naming authority prefix as assigned to you by the Handle System.
- In the Suffix field, enter a suffix to be added to the handle identifier.
Esploro does not automatically add characters such as a slash or colon, so if you want the output to be: http://hdl.handle.net/10536/DRO/DU:30028653, the prefix should be: 10536/DRO/ and the suffix: DU:.
- In the Sequence Start field, enter a number from which the handle identifiers should start.
- Select Save.
The handle server integration is configured.
Configuring Date Types
You can configure the date types appearing for each asset category when creating or editing an asset from that category (Configuration Menu > Repository > Asset Details > Date Type Mapping). For more information about mapping tables, see Mapping Tables.
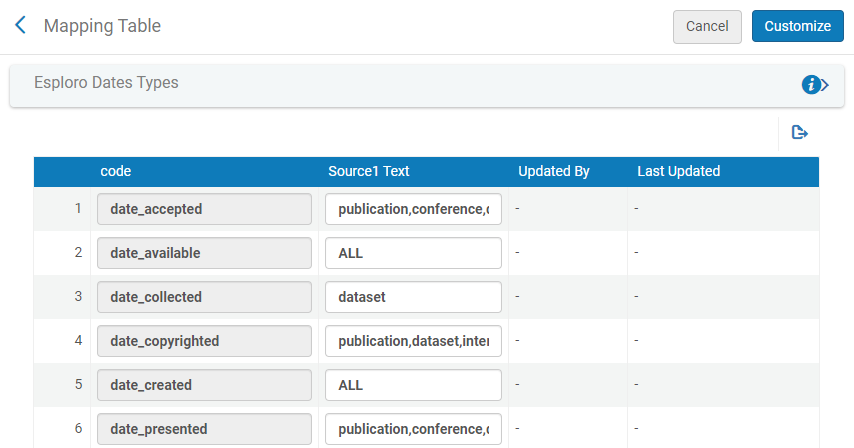
- On the Esploro Dates Types mapping table, on a row corresponding to a date type that you want to configure, in the Source1 Text field, type one or more of the following categories. Note that multiple categories must be separated by a comma and with no spaces:
- ALL
- conference
- creativeWork
- dataset
- etd
- etdexternal
- interactiveResource
- other
- patent
- postedContent
- publication
- software
- Click Save.
Configuring Creator/Contributor Types
You can configure the list of creator/contributor roles that appears when adding or editing a creator or contributor to a research asset or deposit. The creator/contributor types can be configured for use with specific types of assets or with all asset types.

You can also map the creator/contributor types defined in your system to the types used in DataCite, MARC, DDF-MXD (Danish Research Database Metadata Exchange Format for Documents), and Crossref. Esploro uses these mappings to convert asset metadata in its database records to the required formats of these external systems before exporting the information to them.
Managing the List of Creator/Contributor Types
You can create and manage creator/contributor types on the Creator/Contributor Type Labels code table (Configuration Menu > Repository > Asset Details > Creator/Contributor Type Labels). For more information about code tables, see Code Tables.

- On the Creator/Contributor Type Labels code table (Configuration Menu > Repository > Asset Details > Creator/Contributor Type Labels), add, edit, delete, enable, or disable creator/contributor types, as required. You can select creator/contributor types in drop-down lists in the next step. You can also change the order of the types in the drop-down lists. Many creator/contributor types appear out-of-the-box.
- When you are done, select Save.
Mapping Creator/Contributor Types for External Systems
In the Creator/Contributor Type Mapping mapping table (Configuration Menu > Repository > Asset Details > Creator/Contributor Type Mapping), the codes of creator/contributor types defined in the Contributor Type Labels code table (see above) can appear with their mapping settings. You can map each code as follows:
- Map the creator/contributor types to specific asset types. In this way, you can limit the availability of individual creator/contributor types to certain asset types. When an administrator is adding or editing creators or contributors for an asset of one of those types, the options available are controlled by this setting.
- Map the creator/contributor types to those used in external systems.
For more information about mapping tables, see Mapping Tables.

- On the Creator/Contributor Type Mapping table (Configuration Menu > Repository > Asset Details > Creator/Contributor Type Mapping), add, edit, delete, enable, or disable rows. If you add a row, ensure that a row with the same code does not already exist. When editing a row, modify the following settings as required:
- Creator/Contributor code – The contributor type. You can't edit this field. If you must edit this field, delete the row and create a new one.
- Asset types – Enter one or more of the following values, separated by commas (values are case-sensitive):
- ALL – The contributor type appears for all asset categories/types. If you enter this value, all other values are ignored.
- generic – The contributor type appears for all asset types when a specific form for that type is not defined.
- Any category code listed in Research Asset Categories and Types.
- DataCite Mapping – Select the DataCite field that maps to this creator/contributor type.
- MARC mapping – Enter the MARC field that maps to this creator/contributor type.
- DDF_MXD mapping – Enter the Danish Research Database Metadata Exchange Format for Documents field that maps to this creator/contributor type.
- Crossref Mapping – Select the Crossref field that maps to this creator/contributor type.
- When you are done, select Save.
Configuring ETDs
Configuring ETD Project Types
For ETD deposits/assets, you can configure the types of ETDs that can be deposited (dissertation, capstone, and so forth) on the Project Types code table (Configuration > Repository > ETDs > ETD Project Types). For more information about code tables, see Code Tables.

You can add, edit, or delete rows. When adding, enter the code and name of the type.
Configuring ETD Degrees
For ETD deposits/assets, you can configure the degrees that can be associated with ETDs on the ETD Degree Names mapping table (Configuration > Repository > ETDs > ETD Degree Names). For more information about mapping tables, see Mapping Tables.
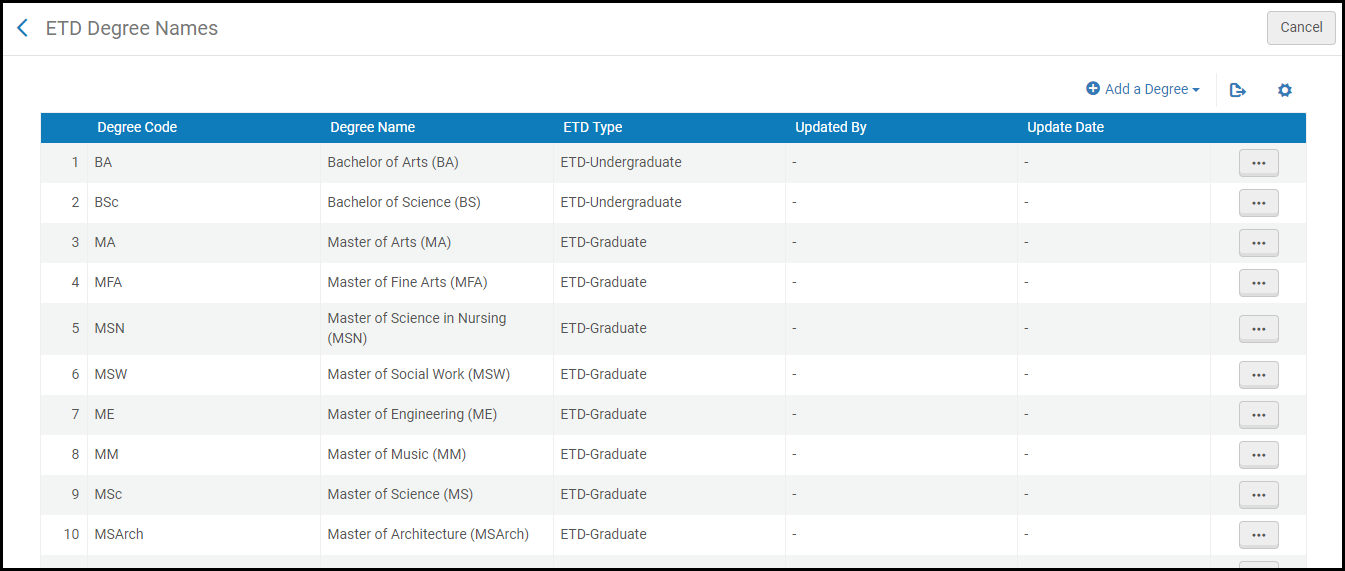
You can add, edit, or delete rows. When adding, enter the code and name of the degree, and select the degree level (undergraduate, graduate, or doctoral).
Configuring ETD Degree Programs
For ETD deposits/assets, you can configure the degree programs that can be selected when adding or editing the ETD on the ETD Degree Program Codes code table (Configuration > Repository > ETDs > ETD Degree Program Codes). For more information about code tables, see Code Tables.

Select Add Row to add additional programs. You can edit the program names, reorder, disable, or enable the programs.
To delete a programs, select Delete in the row actions list.
Configuring Esploro Asset Subtypes
For research assets, you can configure Esploro asset subtypes from the Esploro Subtypes Mapping code table (Configuration > Repository > Asset Details > Esploro Subtypes). Asset subtypes are optional properties that can be assigned to many types of assets in the Asset details section of the asset record. For each subtype, the following parameters must be defined:
- Subtype Code – A code by which the subtype is to be identified in the system, used by the loader when assets are imported or exported (see Working with Research Assets)
- Subtype Name – The name of the subtype as it is to appear in the asset record
- Asset Categories – The categories of assets for which the subtype is to be available (multiple categories appear in the table separated by commas)
For information about working with code tables, see Code Tables.

Configuring Patent Statuses
For research assets, you can configure the patent status from the Patent Status code table (Configuration > Repository > Asset Details > Patent Statuses). For more information about code tables, see Code Tables.


