
The Cleanup Procedures Tool
This functionality is not relevant to to Primo VE.
The Cleanup Procedures page (see Cleanup Procedures Page) allows users with administrative permissions at the installation and institution levels to access the following cleanup tools:
Removing BE Log Files
This tool allows you to delete BE log files if they are older than a specified number of days.
To remove older BE log files:
-
Click Primo Utilities on the Back Office home page.The Primo Utilities page opens.
-
Click Cleanup Procedures.The Cleanup Procedures page opens.
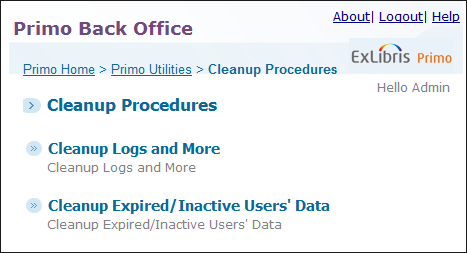 Cleanup Procedures Page
 -
Click Cleanup Logs and More.The Cleanup Logs and More page opens.
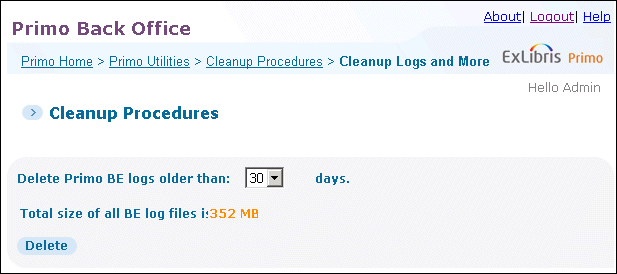 Cleanup Logs and More - BE Log Files Option
Log files are rotated automatically for quota considerations. In addition, our cloud logs are stored on temporary storage and are cleared when processes are restarted. If you are local customer, you can use the cleanup logs job to make sure that no log history is kept. For privacy consideration, user data in the log files is also removed.
-
Specify the age of the log files that you want delete by selecting the number of days in the Delete Primo BE logs older than drop-down list.
-
Click Delete.
Removing Harvested Files
This tool allows you to delete harvested files if they are older than a specified number of days.
To remove older harvested files:
-
Click Primo Utilities on the Back Office home page.The Primo Utilities page opens.
-
Click Cleanup Procedures.The Cleanup Procedures page opens.Cleanup Procedures Page
-
Click Cleanup Logs and More.The Cleanup Logs and More page opens.
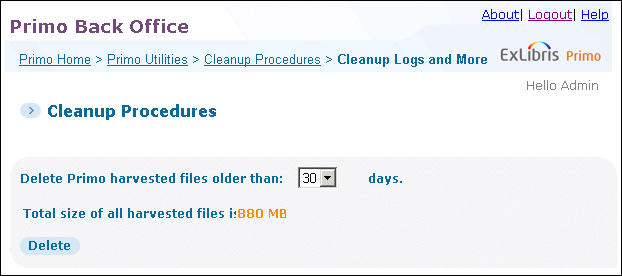 Cleanup Logs and More - Harvested Files Option
 -
Specify the age of the harvested files that you want delete by selecting the number of days in the Delete Primo Harvested files older than drop-down list.
-
Click Delete.
Removing Pipe Source Files
This tool allows you to delete source files for pipes if they are older than a specified number of days.
To remove older harvested files:
-
Click Primo Utilities on the Back Office home page.The Primo Utilities page opens.
-
Click Cleanup Procedures.The Cleanup Procedures page opens.Cleanup Procedures Page
-
Click Cleanup Logs and More.The Cleanup Logs and More page opens.
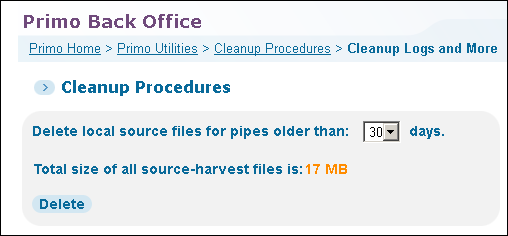 Cleanup Logs and More - Pipe Source Files Option
 -
Specify the age of the pipe source files that you want delete by selecting the number of days in the Delete local source files for pipes older than drop-down list.
-
Click Delete.
Removing Data from the S_SEARCH_SUMMARIES Table
This tool allows you to delete data from the S_SEARCH_SUMMARIES Oracle table if the data was saved prior to a specified date.
To remove older data from the S_SEARCH_SUMMARIES table:
-
Click Primo Utilities on the Back Office home page.The Primo Utilities page opens.
-
Click Cleanup Procedures.The Cleanup Procedures page opens.Cleanup Procedures Page
-
Click Cleanup Logs and More.The Cleanup Logs and More page opens.
 Cleanup Logs and More - S_SEARCH_SUMMARIES Table Option
 -
Specify a date in the Delete Data from S_SEARCH_SUMMARIES DB Table, older than field. If you would like to search for a date, click
 .
. -
Click Delete.
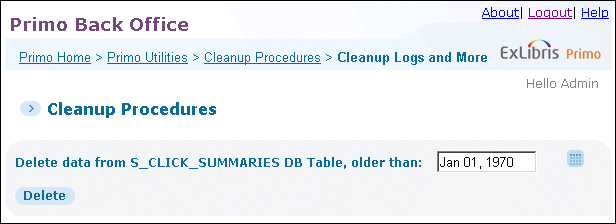
Removing Data from the S_CLICK_SUMMARIES Table
This tool allows you to delete data from the S_CLICK_SUMMARIES Oracle table if the data was saved prior to a specified date.
To remove older data from the S_CLICK_SUMMARIES table:
-
Click Primo Utilities on the Back Office home page.The Primo Utilities page opens.
-
Click Cleanup Procedures.The Cleanup Procedures page opens.Cleanup Procedures Page
-
Click Cleanup Logs and More.The Cleanup Logs and More page opens.
 Cleanup Logs and More - S_CLICK_SUMMARIES Table Option
 -
Specify a date in the Delete Data from S_CLICK_SUMMARIES DB Table, older than field. If you would like to search for a date, click
 .
. -
Click Delete.
Cleaning Up User Data
Primo allows you to remove user data (such as e-Shelf, preferences, and alerts) for expired or inactive users using the following methods: input file or inactivity date.
User IDs stored in Primo are case-sensitive and may not have the same case as the IDs stored on your ILS/LMS.
Using an Input File to Remove Expired Users’ Data
This tool allows you to delete users’ data based on an input file, which must have a .txt extension (such as input.txt).
Each user ID must be placed on separate line in the input file. No spaces or tabs are permitted before or after the user ID. For example:
hshrader
sgoodman
jpinkman
wwhite
To use an input file to remove expired users’ data:
-
Click Primo Utilities on the Back Office home page.The Primo Utilities page opens.
-
Click Cleanup Procedures.The Cleanup Procedures page opens.Cleanup Procedures Page
-
Click Cleanup Expired/Inactive Users’ Data.The Cleanup Expired/Inactive Users’ Data page opens.
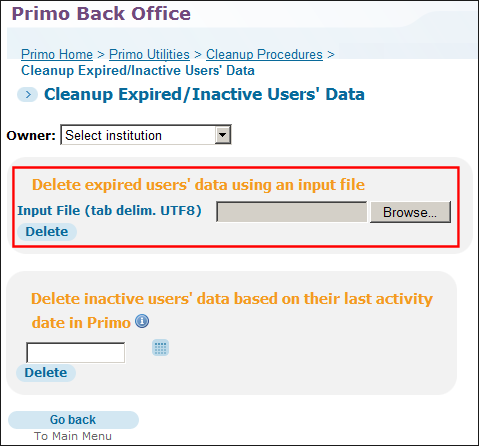 Cleanup Expired Users’ Data - Input File Method
 -
Select the name of the institution from the Owner drop-down list. For institution-level staff users, your institution will already be selected.
-
Specify the name of the input file in the Delete expired users’ using an input file field. If you would like to browse for a file name, click Browse.
-
Click Delete.
Using an Inactivity Date to Remove Expired Users’ Data
This tool allows you to delete users’ data based on a specified inactivity date. If the date of a user’s last action (such as an update to the e-Shelf, tags, reviews, preferences, and saved searches) in Primo occurred prior to the specified date, the user’s data is removed from the system.
After an upgrade to Primo version 4.5, sign-ins are also tracked for inactivity.
To use an inactivity date to remove expired users’ data:
-
Click Primo Utilities on the Back Office home page.The Primo Utilities page opens.
-
Click Cleanup Procedures.The Cleanup Procedures page opens.Cleanup Procedures Page
-
Click Cleanup Expired/Inactive Users’ Data.The Cleanup Expired/Inactive Users’ Data page opens.
 Cleanup Expired Users’ Data - Inactivity Date Method
 -
Select the name of the institution from the Owner drop-down list. For institution-level staff users, your institution will already be selected.
-
Specify a date in the Delete inactive users’ data based on their last activity date in Primo field. If you would like to use the Date Wizard, click
 .
. -
Click Delete.