ExLibris

Knowledge Assistant

BETA
 
  • Subscribe by RSS
  • Back
    Primo
    Ex Libris Knowledge Center
    1. Search site
      Go back to previous article
      1. Sign in
        • Sign in
        • Forgot password
    1. Home
    2. Primo
    3. Product Documentation
    4. Primo
    5. Back Office Guide
    6. Configuring Primo Institutions and Libraries
    7. Loading the DEI File

    Loading the DEI File

    1. Last updated
    2. Save as PDF
    3. Share
      1. Share
      2. Tweet
      3. Share
    1. Available Options
    2. Annotating Subjects
    3. Exact Scope 
    4. Managing the List of Terms

    This page is not applicable to Primo VE environments. For Primo VE configuration, see Configuring the DEI Exclude List for Primo VE.

    Return to menu

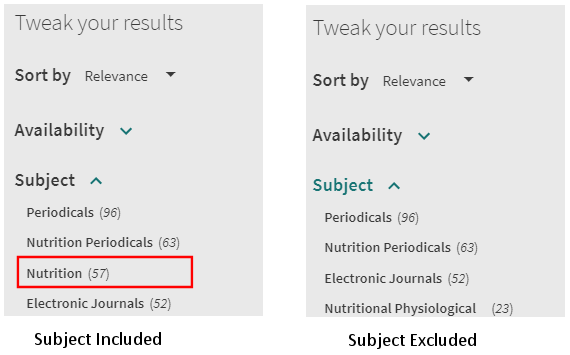
    To support Diversity, Equity, and Inclusion (DEI), the DEI - List of terms to exclude from Heading page enables you to create a list of problematic terms – words or phrases – that require special handling if they are found in the Subject fields of resources. The handling specified for each term is implemented in both the full and brief displays of resource records, as well as in the facets of search results. This functionality applies to both local and CDI records.

    Available Options

    The following options are available for handling DEI terms:

    • Remove – Remove the term entirely from subjects and facets
    • Replace – Replace the term with a different term in resource records, and optionally add a note beside the new term whenever it appears in a record's list of subjects. (The original term is not removed from or replaced in the facets.)
    • None – Add a note beside the term whenever it appears in subjects or facets

    The terms specified are not case-sensitive, but otherwise must match the terms found in the Subject fields exactly in order for the modification to be implemented. However, for the Remove and None options, you can choose the scope of the modification, namely, whether the term found in the Subject field must match the configured term exactly, or can be part of a phrase. In the latter case, if the term is included in a phrase, the entire phrase is removed or annotated. For example, if you configure a rule that removes the word immigration, and specify the Part of Phrase scope, not only would the subject immigration be hidden, the subject emigration and immigration would also be hidden. 

    In the following example, three DEI rules were applied:

    1. Remove the term immigration, with the Part of Phrase scope.
    2. Replace the term immigrants with international job seekers, and add a note.
    3. Replace the term immigrants -- New York (State) -- New York with international job seekers -- New York (State) -- New York, and add a note.

    In the following example, these settings modified the display of a number of terms in a record:

    1. Because of the first rule, the term Immigrants was changed to International job seekers and an information icon (Info icon.) was added beside the term.
    2. Because of the second rule, the term Immigrants -- New York (State) -- New York was changed to International job seekers -- New York (State) -- New York and an information icon (Info icon.) was added beside the term.
    3. Because of the third rule, the terms New York (N.Y.) -- Emigration and immigration and Emigration and immigration were removed.

    Subject list before DEI adjustments are implemented.

    List of Subjects Without DEI Adjustments

    Subject list with DEI adjustments implemented, "immigrants" removed and ""immigration" replaced.

    List of Subjects with DEI Adjustments Implemented

    Annotating Subjects

    When you choose Replace or None, you can also add information for patrons about the modification. When you do so, an Information icon (Info icon.) appears beside the term in the record. When the patron hovers over or selects the icon, a pop-up appears, displaying the message you configured for the term. The message can contain HTML, including links. For the None option, the specified annotation also appears beside the term in the facets.

    Selecting an Info icon for a subject that was annotated through DEI, with the info pop-up displayed.

    Selecting an Information Icon to See the Message 

    Exact Scope 

    In the following example, the word nutrition is excluded with the scope set to Exact. Subjects containing only the word nutrition are not displayed, while subjects that contain the word nutrition as part of a phrase (such as nutrition periodicals) continue to be displayed.

    PVE_DEI_Example2.png

    Facet Example

    Managing the List of Terms

    The list of terms to modify for DEI purposes must be uploaded to the system in a TXT file. Each line in the file must define a single rule for a single term, as follows:

    • Remove - Exact Scope – Enter the term in a single line without any special characters. For example:
      nutrition
    • Remove - Part of Phrase Scope – Add two at signs – @@ – before the term that should be removed. For example:
      @@immigration
    • Replace without an info message (DEI sensitive icon) – Enter the term to replace followed by two equals signs, and then enter the replacement term. For example:
      businessmen==merchants
    • Replace and add an info message (DEI sensitive icon) – Enter the term to replace followed by two equals signs, then enter the replacement term, and then enter the text of the message in double parentheses. For example:
      stewardess==flight attendant((Sensitive term was replaced; see <a href="https://www.ourorg.edu/dei-policies">DEI Policies</a>.))
    • None - Exact Scope, with an info message (DEI sensitive icon) – Enter the term to annotate, followed by the text of the message in double parentheses. For example:
      mailmen((Note about sensitive term; see <a href="https://www.ourorg.edu/dei-policies">DEI Policies"</a>.))
    • None - Part of Phrase Scope, with an info message (DEI sensitive icon) – Add two at signs – @@ – before the term that should be annotated, followed by the text of the message in double parentheses. For example:
      @@immigrants((Note about sensitive term; see <a href="https://www.ourorg.edu/dei-policies">DEI Policies</a>.))

    nutrition
    @@immigration
    businessmen==merchants
    stewardess==flight attendant((Due to DEI policy, this item includes references to <i>stewardesses</i>. For more information, see <a href="https://www.ourorg.edu/dei-policies">DEI Policies</a>.))
    mailmen((Although this term may be offensive to some users, it has been left in the system, in accordance with organizational policy. For more information, see <a href="https://www.ourorg.edu/dei-policies">DEI Policies</a>.))
    @@immigrants((Although this term may be offensive to some users, it has been left in the system, in accordance with organizational policy. For more information, see <a href="https://www.ourorg.edu/dei-policies">>DEI Policies</a>.))

    Sample DEI File

    The TXT file must adhere to the following restrictions:

    • UTF-8 encoding

    • At most 20k lines

    • Maximum file size: 200k

     
    To create or update the DEI file:
    1. In the Institutions List page (Primo Home > Ongoing Configuration Wizards > Institution Wizard), select Edit for your institution.

      Primo_Input_DEI_File_Inst_Wizard.png

      Edit Institution Page
    2. In the DEI - List of terms to exclude from Subject Heading section, select Download to download the hideTermsFile.txt file, which is empty initially. It is recommended that you download the file and add new offensive terms/phrases to ensure that you do not overwrite terms that may have been entered previously.

    3. Edit the file as explained above, and then save your changes. You may rename it, but it must have a .txt suffix.

    4. In the DEI - List of terms to exclude from Subject Heading section, select Choose File and then browse for and select your DEI file.

    5. Select Load. The DEI rules defined in the file are uploaded to the Back End, and a confirmation message, "File was uploaded successfully." appears.

    6. Select Deploy. The DEI rules are implemented in the Front End.

    View article in the Exlibris Knowledge Center
    1. Back to top
      • Loading IPs
      • Configuring Staff Users and User Groups
    • Was this article helpful?

    Recommended articles

    1. Article type
      Topic
      Content Type
      Documentation
      Language
      English
      Product
      Primo
    2. Tags
      1. Back Office Guide
      2. Configuring Primo Institutions and Libraries
      3. contype:docum
      4. Prod:Primo
    1. © Copyright 2026 Ex Libris Knowledge Center
    2. Powered by CXone Expert ®
    • Term of Use
    • Privacy Policy
    • Contact Us
    2025 Ex Libris. All rights reserved