Configuring RTA for III Millennium
The III Millennium adaptor is intended for use by customers who either have the III Millennium software installed on any of their servers or have access to a III Millennium server via a URL. Primo bases its design on the MAJAX Javascript API that Innovative Interfaces, Inc. provides to Millennium customers to retrieve holding statuses for user-defined Web pages. For more information on MAJAX, see the http://libx.org/majax/index.html Web site.
How the III Millennium Adaptor Works
The III Millennium adaptor works by capturing availability information from the III Millennium screen that displays availability. The following is an example of such a call

Example III Millennium Display
The information that III Millennium displays in each column can be configured within III Millennium and may be different for each Primo customer. The Primo III Millennium adaptor uses only the responses that are returned in the Location and Status columns to determine the availability status.
In order for the III Millennium adaptor to translate the responses returned from the ILS, the customer must define the values that may return in the following columns:
- Status – Map these values to an RTA status value that Primo understands: Available, Un-Available, and Check Holdings.With SP 3.1.1, the Un-Available status will be replaced by a due date if there is one.
- Location – Map the locations to a Primo location, which includes the following values:
- Institution – as stored in the PNX display/availlibrary field in subfield I ($$I)
- Library – as stored in the PNX display/availlibrary field in subfield L ($$L)
- Sub-Location – as stored in the PNX display/availlibrary field in subfield 1 ($$1)
-
The Primo III Millennium adaptor performs the following actions for every record the system passes to it:
- Extracts the Millennium record ID.
- Retrieves the holdings from the III Millennium ILS.
- For each location returned from the ILS, the adaptor translates the location to the institution/library/sub-location value in Primo and updates the status if the record holds an availability value for the location defined in Primo.
Setting up RTA in Primo for III Millennium
To configure RTA for III Millennium:
- Define the statuses in the III Millennium RTA Statuses mapping table. For more information, see Mapping RTA Statuses.
- Define the locations in the III Millennium RTA Locations mapping table. For more information, see Mapping RTA Locations.
- If you want to display the due date in the search results, see the following sections:
- Make sure the source system has been defined properly for the data source. For more information, see Defining the Source System.
- Make sure that the control/addsrcrecordid field is defined in the normalization rules. For more information, see Defining the Additional Source Record ID in the PNX.
- Select the RTA method (use normalization_rules only) and configure the Real-Time Availability (using normalization rules) mapping table. For more information, see Selecting and Configuring the RTA Mapping Method.Because the III Millennium adaptor uses an infrastructure that is common to all RTA adaptors, you are required to define all of the RTA mapping method parameters even though the system does not use some of them for mapping.
- Enable the III adaptor in the RTA Adaptors mapping table. For more information, see Enabling the RTA Adaptor.
- For each institution, define the RTA base_url in the Institution wizard. For more information, see Defining the RTA Base URL.
- Use the Views wizard to activate RTA per view and to configure whether RTA should be invoked for both the brief and full result pages or only the full results page. For more information, see Activating RTA per View.
- Deploy the changes to the Front End user interface. For more information, see Deploying Your Changes.
Mapping RTA Statuses
The III Millennium RTA Statuses mapping table maps the statuses that display in the III Millennium ILS to the values that display in the Primo Front End.
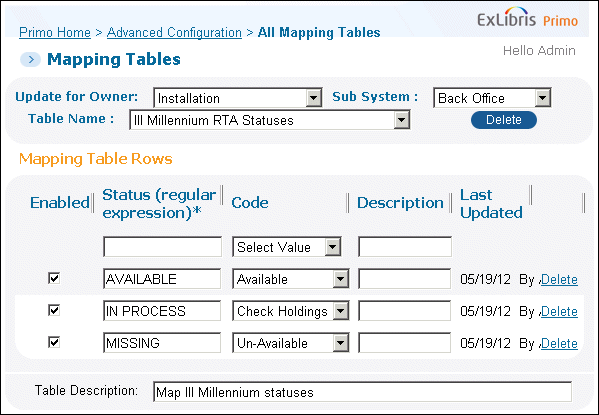
Configuring RTA Statuses (III Millennium Statuses)
For each status that displays in the III Millennium response, specify the following fields to create a new mapping row:
- Enabled – Select this field to enable the mapping row.
- Status – Specify a value or regular expression that matches an availability status in the III Millennium response. The system uses this regular expression to map entries in the response to the statuses specified in the Code field.
- Code – Select the availability status to display in Primo from the drop-down list. The valid availability statuses are Available, Un-Available, and Check Holdings.With SP 3.1.1, you can display the due date instead of the Un-Available status. For more information, see Mapping Due Dates.
- Description – This field contains an optional description of the mapping entry.
Mapping Due Dates
In addition to the availability statuses, the III Millennium RTA Statuses mapping table allows you to map the due date from the III Millennium response so that it can be displayed instead of the Un-Available status in Primo’s results.
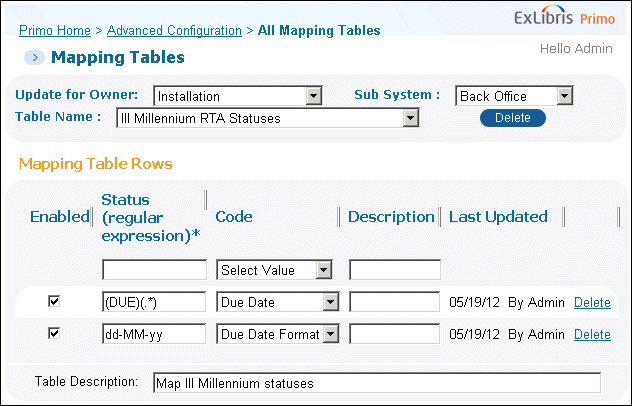
Configuring Due Dates (III Millennium Statuses)
To extract the due date from the III Millennium response, you must create two mapping rows:
- A row that uses a regular expression to find responses that contain a due date. This regular expression must contain two groups that are enclosed with parentheses, such as (DUE) (.*). The first group is used to match the text label, and the second group is used to extract the date.For Example:If the due dates in the III Millennium responses display as follows:DUE 01-01-2011You can define the mapping row as follows to find the word DUE (as shown in the first group) and extract the date (as shown in the second group):

- A row that indicates the format of the dates displayed in the III Millennium responses. To specify the format, you must specify a date pattern (such as yyyyMMdd) that uses the following reserved characters:
- y – Indicates the year. If the number of pattern letters is two, the year is truncated to two digits. Otherwise, it is interpreted as a number:
- yyyyy – 01991
- yyyy – 1991
- yy – 91
-
- M – Indicates the month. If the number of pattern letters is three or more, the month is interpreted as text. Otherwise, it is interpreted as a number:
- MMMM – August
- MMM – Aug
- MM – 08
-
- d – Indicates the day. The number of pattern letters is the minimum number of digits, and shorter numbers are zero-padded to this amount:
- dd – 07
- d – 7
Text in date patterns can be quoted using single quotes (') to prevent them from being interpreted by the system. All non-reserved characters are simply copied into the output string by the system.For Example:If the format of the dates in the III Millennium responses display as follows:DUE 01-01-2011You can define this mapping row as follows to specify the format of the date in the second group: After you have mapped the due date to a code, you can configure how the code displays in the results. For more information, see Displaying Due Dates.
 -
-
Mapping RTA Locations
The III Millennium RTA Locations mapping table maps the locations that display in the III Millennium ILS to the institution, library, and sub-location defined in Primo.
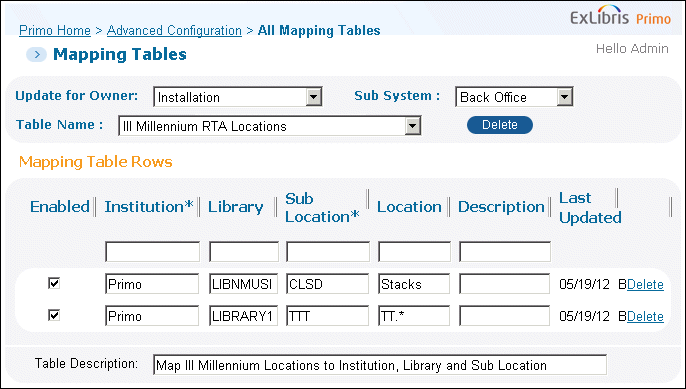
III Millennium RTA Locations Mapping Table
After making changes to this mapping table, you must also deploy the following options on the Primo Home > Deploy All page: Adaptors Mapping Tables, RTA Configuration, and RTA Normalization Rules.
For each location in the III Millennium ILS, specify the following fields to create a new mapping row:
| Field | Description |
|---|---|
| Enabled | Select this field to enable the mapping row. |
| Institution | Specify the institution defined in Primo. |
| Library | Specify the library defined in Primo. |
| Sub Location | Specify the sub-location defined in Primo. |
| Location | Specify a value or regular expression that matches a location defined in the III Millennium ILS. In the preceding figure, the first mapping row matches locations that contain only the letters Stack (case-sensitive). The second mapping row matches locations that start with the letters TT (case-sensitive). If the adaptor finds a match, it maps the III Millennium location to the Primo location, which includes the Institution, Library, and Sub-Location fields. If the ILS location contains a special character (such as a parenthesis, dot, or square bracket), it must be escaped with the backslash character. |
| Description | This field contains a description of the mapping entry. The adaptor does not read the mapping table rows in a specific order. |
Displaying Due Dates
With SP 3.1.1, Primo allows you to update the codes that are used to format the display of the due dates and location in the search results.
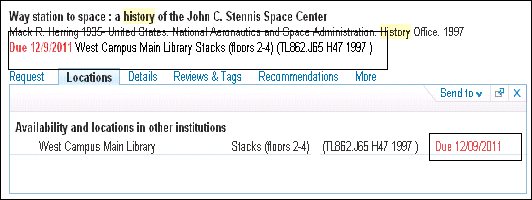
Example Search Results in Primo
Before you can display this information in the results, you must map the due dates in the III Millennium responses. For more information, see Mapping Due Dates.
To configure the codes, update the following code tables:
- Calculated Availability Text – The following codes define the format of the due date and location in the Brief Results:
- default.delivery.code.duedate – Due {2}} {1}}
- default.delivery.class.duedate – getItRed
- default.delivery.gadgetclass.duedate – getItRedThe placeholder {2}} is used for the due date and {1}} is used for the best location.
-
- Getit Tile – The following code defines the format of the due date in the Locations tab:default.fulldisplay.availabilty.due_date – Due {0}}The placeholder {0}} is used for the due date.
Defining the Additional Source Record ID in the PNX
In order for Primo to capture the availability information for the matching record on the source system, you must define the control/addsrcrecordid field in the normalization rules, which can be copied from the control/sourcerecordid field in the PNX record.
The control/addsrcrecordid field must not contain any extra leading or trailing characters. You can use transformation routines to remove them.
In the following PNX example, the control/sourcerecordid field contains a leading period and a trailing x that need to be removed in the normalization rule for the control/addsrcrecordid field:
<record>
<control>
<sourcerecordid>.b0250938x</sourcerecordid>
<sourceid>BU_III</sourceid>
<recordid>BU_III.b0250938x</recordid>
<addsrcrecordid>b0250938</addsrcrecordid>
<sourceformat>MARC21</sourceformat>
<sourcesystem>III</sourcesystem>
</control>
Example Control Section for a III Millennium PNX Record
To add the control/addsrcrecordid field:
- On the Primo Home > Advanced Configuration > Full Normalization Rule Configuration page, click Edit in the row that contains your normalization rules set.The Manage Normalization Rules page opens:
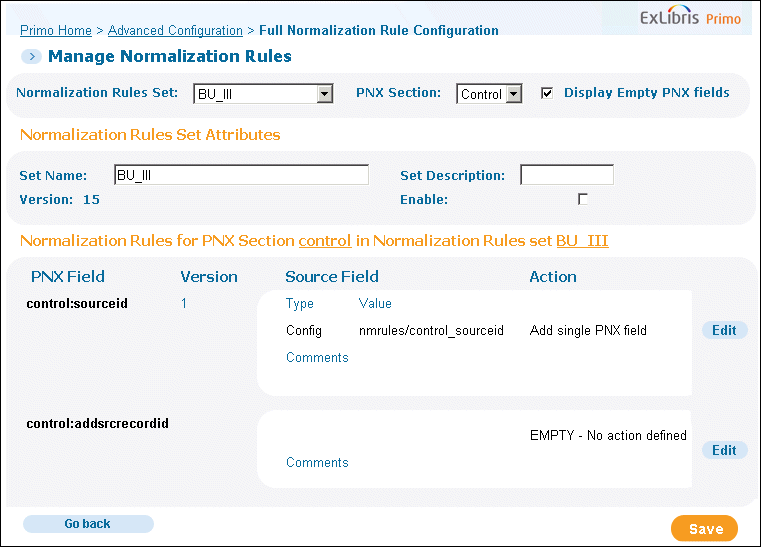 Manage Normalization Rules Page
 - Select the Display empty PNX fields check box.
- Click Edit in the row containing the control:addsrcrecordid field.The Normalization Set Editor page opens:
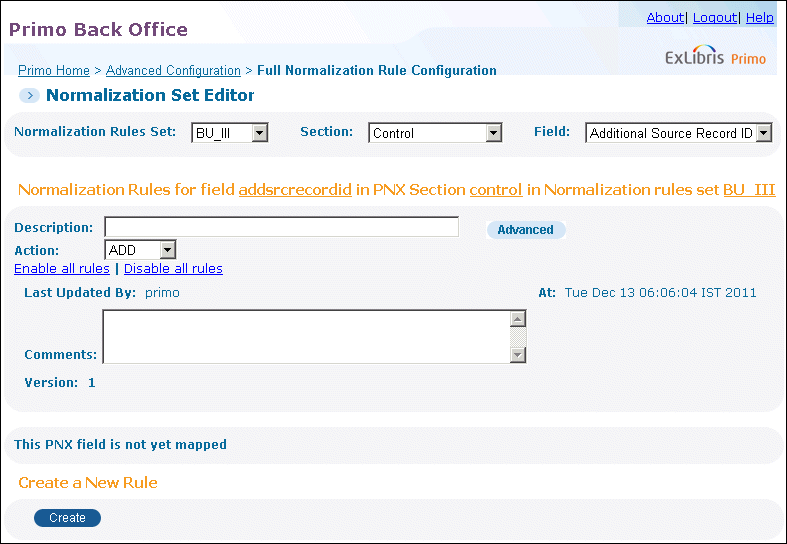 Normalization Set Editor Page
 - Click Create to add a rule for the control/addsrcrecordid field.A new rules section opens:
 New Rules Section
 - Configure the rule as follows:
 Rule Added to Rules SectionIf the contents of the control/sourcerecordid field contains extra leading or trailing characters, you must add transformation routines to remove them.
 - Click Save.To apply this change to the PNX records, you must re-run the pipe. You can use the No harvesting - Update Data Source pipe type to run the pipe without re-harvesting.

