
Voyager Universal Borrowing
Voyager’s Universal Borrowing (UB) feature allows customers to borrow and return materials from any library in their school’s consortium or from any Voyager library with reciprocal borrowing agreements.
To configure Voyager UB in Primo:
-
Use the Institution Wizard (Primo Home > Ongoing Configuration Wizards > Institution Wizard) to create an institution for each Voyager database in the consortium.
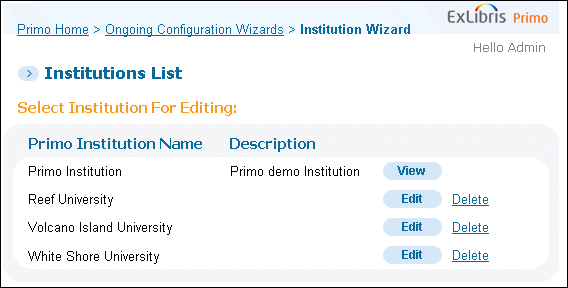 Institutions List Page
 -
Click Edit next to each institution to display the Edit Institution page.
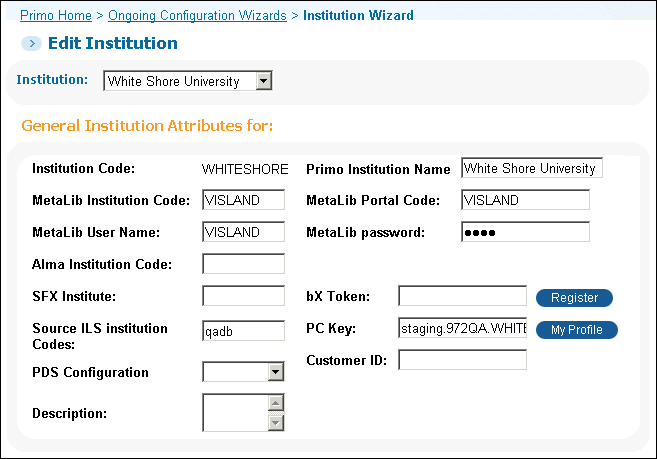 Edit Institution Page (Part 1 of 3)
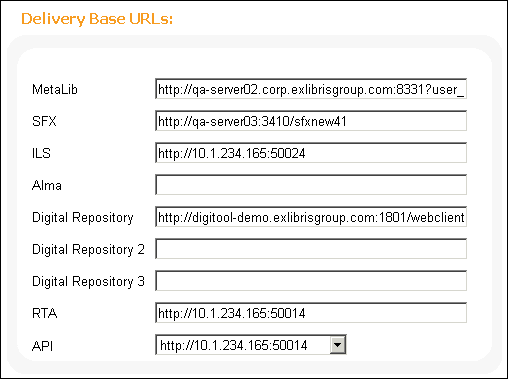 Edit Institution Page (Part 2 of 3)
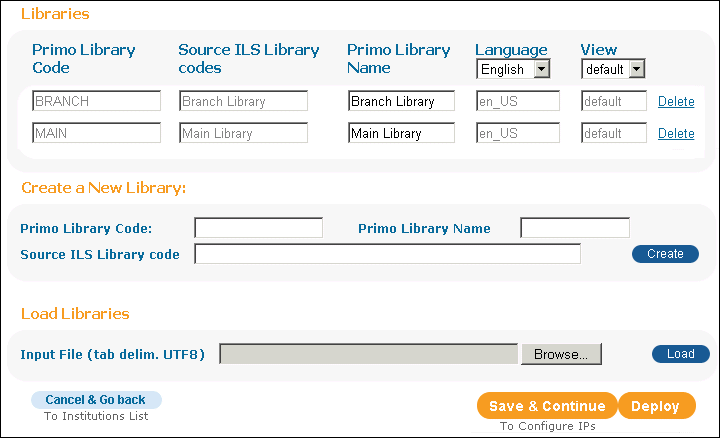 Edit Institution Page (Part 3 of 3)
 -
Include the following fields for each institution:
Institution Attribute Details Field Name Description Institution CodeEnter the Primo institution ID code.Primo Institution NameEnter the name of the institution.Source ILS Institution CodesEnter the ILS data source codes that are mapped to the Primo institution code.RTA URLIf you are using real-time availability, enter the base URL for accessing the institution’s delivery system.ILSEnter the base URL for accessing the institution’s delivery system. -
On the same page, use the following fields to create a library for each Voyager owning library or for each Voyager location code:
Add Library Details Field Name Description Primo Library CodeEnter the Primo library code.Source ILS Library codesEnter the ILS data source codes that are mapped to the library code. This mapping is used by the normalization rules. If there are several codes that need to be mapped to the same library, separate the codes with commas.Primo Library NameEnter the name of the library.LanguageBy default, the Libraries section of this page displays only the en_US language translations for each library. To view translations for another language, select a language from the Language drop-down list at the top of the column. -
Click Save & Continue to save your changes to the institution.
-
Use the Data Sources page (Primo Home > Ongoing Configuration Wizards > Pipe Configuration Wizard > Data Sources Configuration) to add a data source for each Voyager institution.
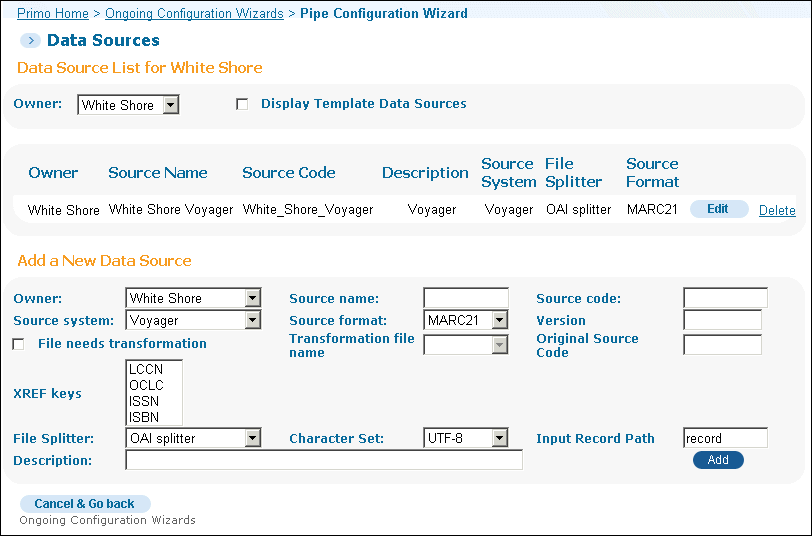 Data Sources Page
 -
Click Edit next to each data source to display the Edit Data Sources page.
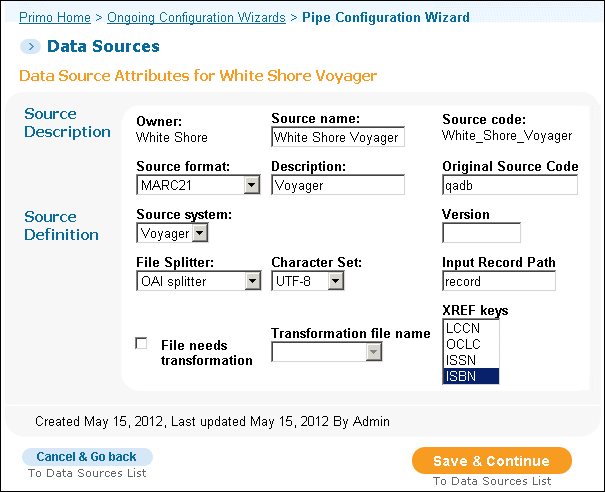 Edit Data Sources Page
 -
Make sure the following fields are included for each data source:
Data Source Fields Field Name Description Source nameEnter the name of the data source.Source codeEnter the data source code, which is used as a prefix in the Primo record ID.Source formatEnter the format of the source data (MARC21).Source systemEnter the source’s data system (Voyager).InstitutionEnter the institution to which the data source belongs.Original Source CodeEnter the Institution ID that is defined in the PrimoExp*.ini files on the Voyager server.This field is required only if you decide to use option A to modify the normalization rules (see the following step). -
From the Normalization Rules Editor (Primo Home > Ongoing Configuration Wizards > Pipe Configuration Wizard > Normalization Rules Configuration > Manage Normalization Rules), use one of the following options to update the normalization rules for Voyager:
Voyager Normalization Rule Changes - Option B PNX Field Create Rules control:
sourcedbandrecordid1) Source: MARC 949 Include aTransformations: Copy As IsAction: OR2) Source: PNX control/sourcerecordidTransformation: Copy As IsTransformation: Add to end of string |Action: Merge None Nonelinks:linktorequestAdd the following rule, but do not enable it if you are using real-time availability:1 Source: Constant $$Tvoyager_ub$$DRequest this item in UBTransformation: Copy As IsIf you enable this rule, make sure that you enable the voyager_ub mapping row in the Templates mapping table (Primo Home > Advanced Configuration > All Mapping Tables > Delivery).Add the following rule, but enable it only if you are using real-time availability:2 Source: Constant $$Tvoyager_ub_rta$$DRequest this item in UBTransformation: Copy As IsIf you enable this rule, make sure that you enable the voyager_ub_rta mapping row in the Templates mapping table (Primo Home > Advanced Configuration > All Mapping Tables > Delivery).-
Option A – Uses the value specified in the Original Source Code field of the Data Source. Add the rules specified in the following table:
Voyager Normalization Rule Changes - Option A PNX Field Create Rules control:
sourcedbandrecordid1 Source: PNX control/originalsourceidTransformations: Copy As IsAction: ADD2 Source: PNX control/sourcerecordidTransformation: Copy As IsAction: Merge | None Nonelinks:linktorequest1 Source: Constant $$Tvoyager_ub$$DRequest this item in UBTransformation: Copy As IsDisable2 Source: Constant $$Tvoyager_ub_rta$$DRequest this item in UBTransformation: Copy As IsEnable -
Option B – Uses the 949 subfield a field from the source record. Add the rules specified in the following table:
-
-
Use the Define Pipe page (Primo Home > Monitor Primo Status > Pipe Monitoring > Define Pipe) page to define pipes for each Voyager institution.
-
In the GetIT! Link 1 Configuration mapping table (Primo Home > Advanced Configuration > All Mapping Tables > Delivery), change the Link Field in PNX field to linktorequest for all rows that have the Delivery Category Code field set to Physical Item or Microform.
-
In the Templates mapping table (Primo Home > Advanced Configuration > All Mapping Tables > Delivery), specify the IP address and port of the PUC database in the following codes:
-
my_library_card_voyager:http://<puc_ip>:<port>vprimo/getMyAccount?pds_handle={{pds_handle}}
-
voyager_backlink:http://<puc_ip>:<port>vprimo/getHoldings?bibId={{control/sourcerecordid}}&pds_handle={{pds_handle}}
If you are using real-time availability, enable the following mapping row:voyager_ub_rta:http://<puc_ip>:<port>vprimo/getHoldings?bibId={{[control/sourcedbandrecordid:avail]}}&unavailablebibID={{[control/sourcedbandrecordid:unavail]}}&pds_handle={{pds_handle}}If you are not using real-time availability, enable the following mapping row:voyager_ub:http://<puc_ip>:<port>vprimo/getHoldings?bibId={{[control/sourcedbandrecordid]}}&pds_handle={{pds_handle}} -
-
Use the PDS Configuration Wizard (Primo Home > Ongoing Configuration Wizards > PDS Configuration Wizard) to configure PDS for each Voyager institution.