
Rapid OAI Holdings -Step 1: Creating the OAI Integration Profile
This page contains the first of three steps in the documentation for setting up the RapidILL OAI Holdings process. An overview of the process in its entirety can be found here.
Setting Up the OAI Integration Profile
Setting up the OAI integration requires a General Administrator role in Alma.
If your institution already has an OAI Repository Definition profile, make sure that you have allowed the necessary IPs (details in step 5 on this page). Then you may move on to Defining Sets.
- Go to: Configuration Menu > General > External Systems > Integration Profiles.
- Click Add Integration Profile.
- Under Integration Type, select OAI Repository Definition. Click Next.
- Select Active. Add a Name, the Admin Email, and a Datestamp of 01/01/2000.
- Allowed IPs: As part of the OAI configuration, you can select whether to expose holdings data to anyone with the link or restrict it only to certain IP addresses. This is done by clicking the Allowed IPs link.
If your OAI Repository Definition profile is already set up, this can be found under the Actions tab.
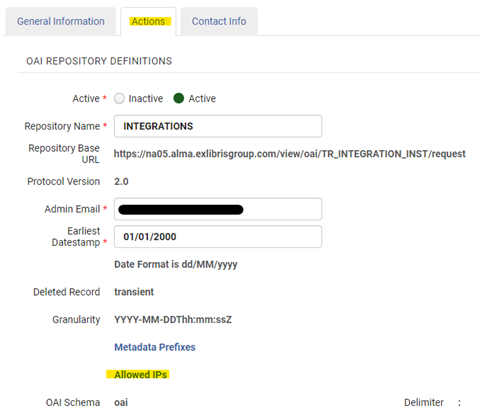 Actions TabIt’s recommended to enable all IPs. To achieve this, enter 1.1.1.1-255.255.255.255 under the IP Match Criteria Tab. If you decide to restrict your OAI to specific IP addresses, it is required to include the following Ex Libris IPs in separate rows:
- 216.147.209.194
- 212.179.71.70
- 54.85.221.162
- Click Customize to save the Allowed IPs, and then save the Integration Profile to finish.
Next step: Defining sets.