
Rapid OAI Holdings - Step 3: Creating Publishing Profiles
|
This page contains the last of three steps in the documentation for setting up the RapidILL OAI Holdings process. An overview of the process in its entirety can be found here.
If a significant portion of your physical titles don’t have items, please see the Holdings Without Items documentation.
Using Out of the Box Publishing Profiles
A publishing profile needs to be created for each set created in Step 2. We strongly recommend using the out of the box publishing profiles, as they are pre-configured with the proper Set Spec and Item/Inventory Enrichment.
These template publishing profiles are available in the Community Zone. To localize the profiles and activate them in your institution, follow these steps:
-
Navigate to Resources > Publishing > Publishing Profiles.
-
Go to the Community tab and search for “EXL” in the description. You’ll find the 8 publishing profiles published by Alma university.
-
For each of the profiles:
-
Create a local copy of each relevant profile using the Copy row action.
-
In the Publishing Profile Details page:
-
In Publishing Parameters section, set Status to active.
-
Set the scheduling parameter to execute the publishing job to run weekly per your preferred schedule. We recommend Friday/Saturday to not interfere with daily operations during the week.
-
In the Content section, select the appropriate set name you defined when creating the sets.
-
-
Save the profile.
-
-
For electronic profiles, please make sure to perform the Additional Configuration Needed for Electronic Publishing Profiles described below.
Using Other Publishing Profiles
We strongly recommend using the out of the box publishing profiles, as they are pre-configured with the correct Set Spec and Item/Inventory Enrichment. However, if you don’t wish to use the out of the box publishing profile, please make sure these guidelines are followed in addition to those mentioned in the previous section:
- Content Type = Bibliographic.
- The Set Spec field should be filled in the following template template (ideally this would be identical to the name of the set you defined):
- Print Sets: Rapid_[branch if relevant]_[Holding Type]_[Holding Format]_[Lendable Status]
Example: Rapid_ILLUV_Books_Print_LendableInternationalThe appropriate lendable status (LendableInternational / LendableCountry / LocalOnly) must be included in the Set Spec exactly. Rapid looks for this string to determine the lendable status of a set. - Electronic Sets: Rapid_[branch if relevant]_[Holding Type]_[Holding Format]
Example: Rapid_ILLUV_Books_Electronic
- Print Sets: Rapid_[branch if relevant]_[Holding Type]_[Holding Format]_[Lendable Status]
- Publish on = Bibliographic level.
- Publishing Protocol = OAI.
- The Data Enrichment tab should be filled as such:
Format Description Example Screenshot Print Under the Physical Items Enrichment section, check “Add Items Information”.
Repeatable field = 954
Description subfield = m
Current library subfield = q
Current location subfield = r
Call number subfield = t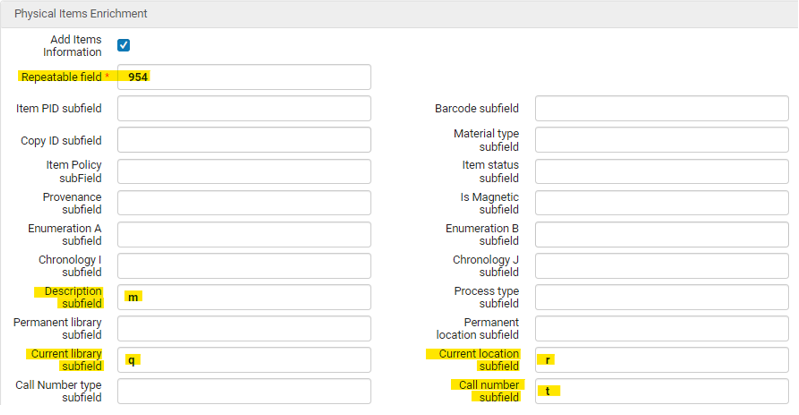
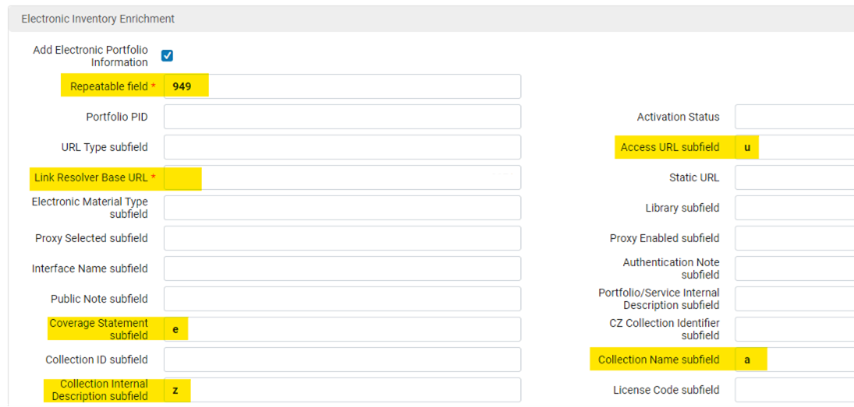
Electronic Under the Electronic Inventory Enrichment section, check “Add Electronic Portfolio Information”.
Repeatable field = 949
Access URL subfield = u
Link Resolver Base URL – see below.
Coverage Statement subfield = e
Collection Name subfield = a
Collection Internal Description subfield = z
 You may add other enrichments using characters other than those mentioned here, but they will not be processed by RapidILL.
Additional Configuration Needed for Electronic Publishing Profiles
For electronic inventory profiles, in the Data Enrichment tab, find the Link Resolver Base URL field. This field will need to be filled differently for Primo and PrimoVE customers:
-
For Primo, use the following format and insert your institution’s information where indicated:
https://[Primo server host:port]/openurl/[Primo_institution_code]/[Primo_view_code]?
For example: http://demo.alma.exlibrisgroup.com:1701/openurl/EXLDEV1_INST/Alma2? -
For PrimoVE, use the following format:
https://[Primo_domain]/discovery/openurl?institution=[Alma_institution_code]&vid=[Primo_view_code]&
For example: https://na02.alma.exlibrisgroup.com/discovery/openurl?institution=EXLDEV1_INST&vid=EXLDEV1_INST:Alma& - For Summon, use the following format:
https://[Alma Base URL]/openurl/[Alma Institution Code]/[Services Page Code]?
For example: https://na01.alma.exlibrisgroup.com/openurl/01MY_INST/01MY_INST:Services?
Your PrimoVE View Code can be found under Configuration Menu > Discovery > Display Configuration > Configure Views.
Do not change other values in the data enrichment tab. They are important for correct processing in RapidILL.
Scheduling the Publishing Profiles
After a publishing profile is created, the publishing job is scheduled to run incrementally once a week.
- The first time the set is published, it must be published fully:Go to Alma Configuration > Resources > Publishing > Publishing Profiles.
- Under the institution tab, search for the Rapid profiles. Make sure the Publishing Profile Type is set to All.
- Select Republish from the row action.
- Select the Rebuild Entire Index option and Run Now.
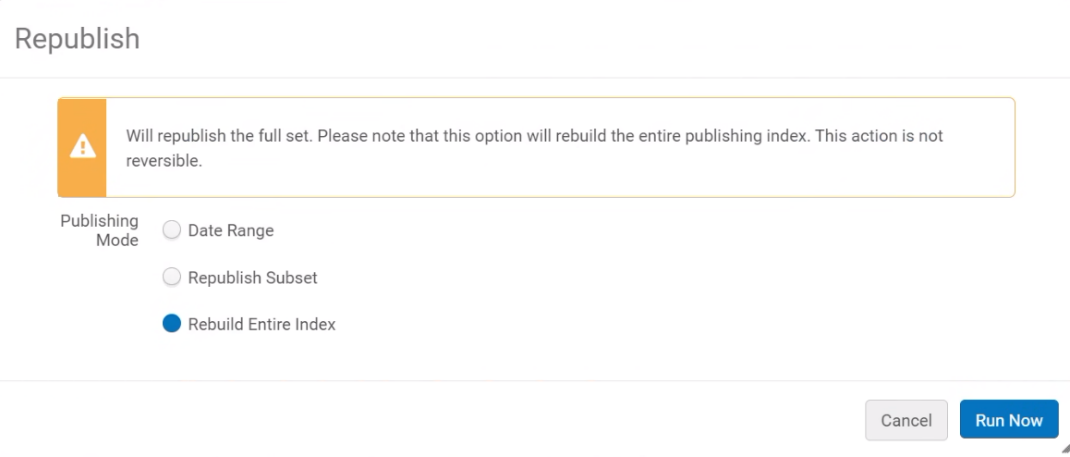 Republish profile after scheduling
Testing Your Sets
To confirm your sets were published correctly in OAI, you can use your OAI base URL (found in your OAI integration profile under the actions tab, see Step 1). Then, you may add commands (or verbs) to the end of the OAI base URL to see what you published.
Your OAI base URL should look like this: https://[Alma URL]/view/oai/[Institution Code]/request
For example: https://na02.alma.exlibrisgroup.com/view/oai/EXLDEV1_INST/request
To perform these tests, your IP address must be defined in the OAI integration profile under the Allowed IPs link in the Action tab.
| Description | Addition to OAI base URL | Example | What to Check |
|---|---|---|---|
|
A list of the sets published to OAI
|
?verb=ListSets
|
|
|
|
The first few hundred records in a published set
|
?verb=ListRecords&metadataPrefix=marc21&set=SETSPEC
(Replace “SETSPEC” with the relevant SetSpec.)
|
|
|
|
A specific record
|
?verb=GetRecord&metadataPrefix=marc21&identifier=oai:alma.INST_CODE:MMSID
(Replace “INST_CODE” with your institution code, and “MMSID” with the relevant MMSID).
|
|
Additional OAI Setup Options
While the above instructions cover most institution's needs, there have been a few repeated cases that may be useful during setup.
-
Possible Alma OAI Errors - if you do come across an OAI error, see our OAI error guide. Feel free to ask our team for help at any time by opening a ticket.
-
If you’d like to include holdings from your NZ in your Rapid holdings, all you need to do is repeat the OAI process in your NZ environment. Please note that all SetSpecs must be unique for each Rapid site, so you can simply add “NZ” to the SetSpecs in the publishing profile to differentiate them from the IZ sets.
Starting the RapidILL Holdings Process
When you have finished scheduling publishing profiles, please let the RapidILL team know by creating a ticket. We will then configure RapidILL accordingly and process the data. Follow up on your holdings by checking the Holding Status Page.
Entries are only displayed after data has been updated into RapidILL.