My Profile
The My Profile area is where you can manage a number of settings related to your institution's Rapid configuration, including:
- Your institution name
- Rapid password
- Time zone setting for borrowing and lending request timestamps
- Delivery preferences
- Contact information
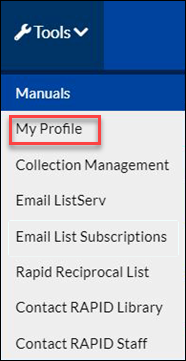
To edit your profile, select My Profile from the Settings drop-down menu at the top of the Rapid page.

My Profile Link
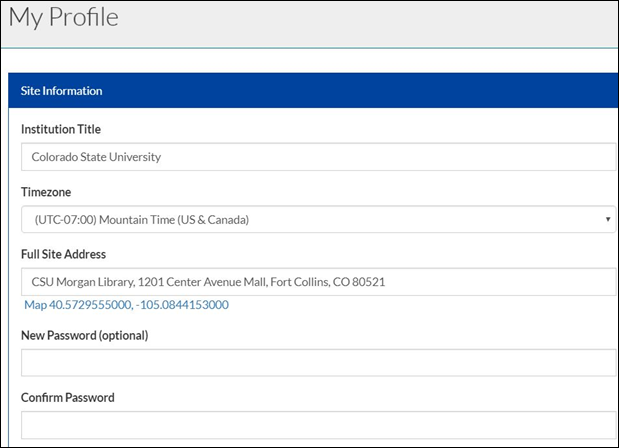
The following page appears:

My Profile
Editing Site Information
In the Site information area, you can edit your institution name and password:
- From the Institution Title field, you can change the name of your institution as it appears on the public Rapid Website.
- From the Password fields, you can set your institution password. If you change your password, make sure you update settings in your local ILL management tools if they interact with Rapid.
Editing Associated Branches
In the Edit Associated Branches area, you can perform changes such as changing your delivery settings, and adding, deleting, and resorting ILL contact information.

Edit Associated Branches Screen
To edit associated branches:
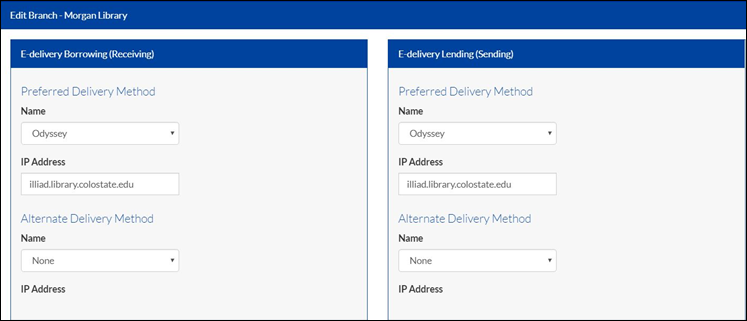
- Click the name of the library branch that you want to edit. The Edit Branch information page opens.

Edit Branch Information
The Primary Client Application can be Article Exchange, Odyssey or RapidX depending on the method by which you prefer to receive your Rapid articles.
Add or change your primary client address by entering the IP address, if required, and selecting Save.
The Secondary Client Application is for sites using more than one receipt system.


This is not typical. Check with the Rapid staff if you have questions or would like to add a secondary client.

Rapid Staff Contact Information
The Branch Address field is where libraries participating in RapidR-Returnables set their shipping address.

Associated Contacts Screen
From the Associated Contacts box, you can perform the following functions:
- To edit any department contact information, click the pencil icon at the end of the row.
- To delete an entry, click on the trash can icon at the end of the row.
- To re-order the contact, click the arrow at the beginning of the row and drag the contact to the appropriate position.
- To add new department contact information, click + New Contact.
When you select + New Contact, the Add Contact screen is displayed:

Contact Information
Add department contact details and select Save. Please refrain from saving personal contact details. This allows other institutions to contact your department even after there is staff turnover.
Refresh the page and verify that the information is correct and that the information want it in the list. This information is now listed under your site on the Contact Rapid Library page.
The first contact listed is treated as the primary contact for that branch and it is shared with external systems for any correspondence. If you have multiple contacts, please ensure they are ordered accordingly.

