
Rapido Import Profiles
To configure the Rapido Import Profile you must have the following role:
- General System Administrator
- Repository Administrator
When Rapido is used by a library that does not use Alma as its library system, Rapido can be set to harvest inventory information from the ILS. Harvesting inventory information from the ILS to Rapido is required for a number of purposes:
- Rapido uses its knowledge of the library’s inventory in order to create request offers for other Rapido members that discover a record that is owned by the library.
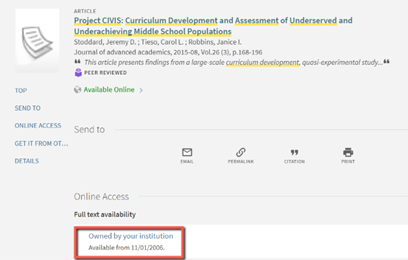
- The Rapido discovery exposes the local inventory and provides links to locally owned electronic resources.
 Rapido discovery
 - The Rapido discovery may apply Display Logic Rules to hide offers when a library patron discovers a locally owned resource.
 Locally owned resource
The integration is configured in the Rapido/ILS integration profile (Resources > Manage Import Profiles).
Only user with a General System Administrator role can create new profiles. User with a Repository Administrator role can only view exiting profiles.
Select Add New Profile. You are presented with two profile options:
- Rapido Physical – This profile is used to harvest bibliographic and holdings information from the ILS.
- Rapido Electronic – This profile is used to harvest electronic inventory.

Rapido Physical
General Profile Information
This section describes how to enter general profile information on the Import Profile Details - Profile Details page.

Access this page as part of the wizard when creating an import profile or by selecting the Profile Details tab when editing an import profile.
On the Import Profile Details - Profile Details page, enter the following information. Fields not relevant to certain profile types are noted below.
| Field | Description |
|---|---|
| Profile Details | |
|
Profile name (required) |
The profile's name. This name appears in the list of import profiles and also appears at the top of the page. |
|
Profile description |
A free text description of the profile that shows on the list of import profiles. |
|
Originating system (required) |
Read Only. The name of the Rapido institution |
|
Import Protocol |
The protocol used to retrieve the file containing the records. The options are: o FTP – Retrieve by FTP. You must enter fields under Import Processing and FTP Information (see below). o Upload File/s – Upload the file from a local or network drive. o OAI (Repository and Authority profiles only) – Retrieve using OAI. You must define additional fields associated with the OAI server (see below). Note that if you change the Import Protocol for an existing import profile, the schedule options are removed from the profile but not removed from the Scheduled tab on the Monitor Jobs page. Use the following work around to address this: o Edit the import profile and put back the scheduling option o Set the scheduler status to inactive and save o Change the import profile to upload |
|
Physical source format |
The file format of the import file. The available options are: o Binary o Delimited Text File. § Comma – This option is for CSV files that contain comma-separated values. § Tab – This option is for TSV files that contain tab-separated values. The Delimited Text File option is available when FTP or Upload File/s is the selected import protocol. o Excel This option is available when FTP or Upload File/s is the selected import protocol o XML o OAI XML (OAI import protocol only) When selecting the OAI import protocol, this is set automatically to OAI XML and cannot be changed. See below for more information on CSV and Excel file formatting. |
|
Source format |
The format of the records in the file (when available for your institution): o MARC21 Bibliographic o CNMARC Bibliographic o DANMARC Bibliographic o KORMARC Bibliographic o OAI MARC21 Bibliographic o UNIMARC Bibliographic o CSV — Comma-separated values (if you selected CSV for physical source format) |
|
Target format |
The format in which to save the records in Alma. Read only value set to MARC21 Bibliographic |
|
Status |
The default is Active. Select Inactive if you do not want the import profile to be available for use at this time. When set to inactive, attempting to run an import job fails immediately. |
|
A file name pattern (such as *.xml) filters out records that do not conform to the pattern you specify. Use this when the FTP directory contains additional files that should not be imported. This field supports regular expressions, with slight modifications: o A period . matches only a period (as if you had entered \\.). o An asterisk * matches zero or more characters of any type (as if you had entered .*). Otherwise, use regular expressions. Ensure that the regular expression you use exactly matches only the files that you want to import. For example: The following retrieves all files ending in .xml: .xml$ The following retrieves all files containing the string yLk: yLk The following retrieves all files beginning with YLK: ^YLK The following retrieves all files beginning with YLK followed by a space: ^YLK\s The following retrieves any file that contains at least one of the following words (without the quotes): “harry” or “potter” or “rowling”: \b(harry|potter|rowling)\b The following retrieves any file that contains all of the following words : harry and potter and rowling: (?=*?\bharry\b)(?=*?\bpotter\b)(?=*?\browling\b) Configuration options to import ZIP files using FTP: o Physical source format = Binary, File name patterns = empty - tries to import all files formats as mentioned above - the job is Completed with Errors, profile configured to handle binary files and received another 'illegal' file's formats. o Physical source format = Binary, File name patterns = .zip/.zip$ - makes the split job's stage (find and present the files to import), but will still Fail since the zip files will be extracted and we will have .mrc files that not match to the File name patterns definition. o Physical source format = Binary, File name patterns = *.zip|.mrc* - will be Completed Successfully since the job will pass the split stage successfully and filter out the files that should not be imported (txt / xlsx), and also will manage to match the 'mrc' file with the File name pattern. |
|
|
Scheduling Appears if you selected FTP as the import protocol. See below for OAI scheduling. |
|
|
Files to import |
Select All for all files found in the FTP location. Select New to select only those files that have not yet been imported. |
|
Scheduler status |
Whether the scheduling is active or inactive. |
|
Scheduler |
Select one of the scheduling options from the drop-down list. Times depend on your time zone and the server you are using. If a scheduled job is started and a previous instance of the job is still running, the This instance of the job is skipped since previous instance of the job is still running message appears in the job report. If you manually run an import job and a previous instance of the job is still running, the Job did not run – a dependent job is already in process message appears. |
|
Email Notifications |
Which users and email addresses receive email notifications when the publishing profile completes. Opens the Email Notifications for Scheduled Jobs page. You can choose whether to send the notifications for successful jobs and/or jobs that contain errors. |
|
Scheduling Appears only if you selected OAI as the Import Protocol. When the profile is scheduled, a Metadata Import job appears in the list of scheduled jobs. |
|
|
Files to import |
Select All for all files found in the FTP location. Select New to select only those files that have not yet been imported. |
|
Scheduler |
Schedule this import job. Times depend on your time zone and the server you are using. Note that scheduling logic was implemented to ensure that not more than one scheduled job of the same profile runs at the same time. If a scheduled job is started and a previous instance of the job is still running, the This instance of the job is skipped since previous instance of the job is still running message appears in the job report. If you manually run an import job and a previous instance of the job is still running, the Job did not run – a dependent job is already in process message appears. If you run an import job via API and a previous instance of the job is still running, the same error message appears in the response. |
|
Email Notifications |
Which users and email addresses receive email notifications when the publishing profile completes. Opens the Email Notifications for Scheduled Jobs page. You can choose whether to send the notifications for successful jobs and/or jobs that contain errors. |
|
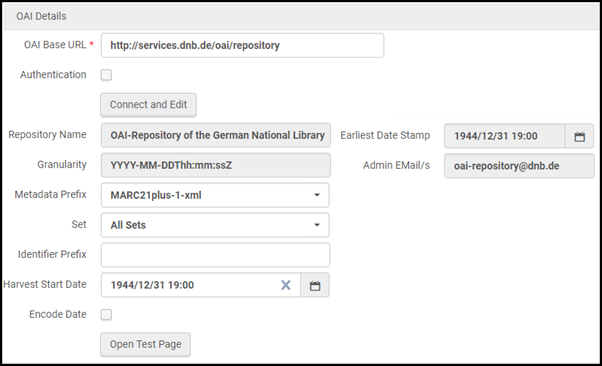
OAI Details Appears only if you selected OAI as the Import Protocol. |
|
|
OAI Base URL |
The OAI provider’s URL, which OAI harvesters can use to load metadata. After you have entered a valid URL, select Connect and Edit to display the associated fields. If you configured a default OAI Base URL, it appears here. |
|
Authentication |
Whether the OAI server requires you to enter a user name and password. |
|
Username |
The user name if authentication is required to access the server. |
|
Password |
The password if authentication is required to access the server. |
|
Connect and Edit
|
Select to refresh the page with the associated OAI fields after entering the base URL of the server and authentication information if necessary.
The following fields appear after you select Connect and Edit.
 OAI Details Section After Connect and Edit
|
|
Repository Name
|
From the OAI provider, populated by Alma.
|
|
Earliest Date Stamp
|
The earliest that data exists in the OAI provider records, populated by Alma.
|
|
Admin's E-Mail
|
OAI provider admin's email, populated by Alma.
|
|
Metadata Prefix
|
The available MD prefixes from the OAI provider, populated by Alma. If you configured a default metadata prefix, it appears here.
|
|
Set
|
OAI repository available sets, populated by Alma.
|
|
Identifier Prefix
|
The Identifier Prefix is the shared prefix that appears before the actual unique record identifier when harvesting by the identifier.
|
|
Harvest Start Date
|
When submitting a new import job and after the job completes successfully, the Harvest Start Date is updated automatically with the job’s ending time.
|
|
Encode Date
|
Whether the repository supports encoding dates.
|
|
Open Test Page
|
Select to test the OAI connection and flow.
|
Testing OAI Import Protocol Flow
If you are using OAI as your import protocol, you can run a test check from the OAI Details section of your import profile.
- In the OAI Details section, select Connect and Edit after entering the base URL and the authentication information (if necessary) for the OAI server.
- Specify any additional fields that you want to test in the OAI Details section and then select Open Test Page. The OAI Test dialog box is displayed.
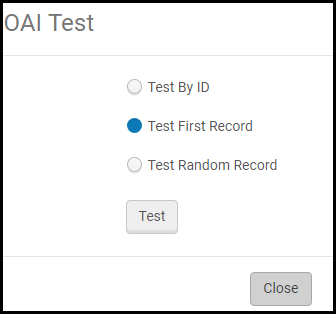 OAI Test dialog box
- Select one of the following options to specify the test record to use:
- Test by ID – Enter a full record identifier and harvest this record.
- Test First Record – Harvest the first record in the set.
- Test Random Record – Harvest a random record in the set.
The options Test First Record and Test Random Record are dependent on the date configured in the Harvest Start Date field. If no modifications were made to the first/random record after the Harvest Start Date, the test does not yield any results.
- Select Test.
The results include the following fields:
- Record Identifier
- Status – Whether the process passed successfully. If the flow failed, an error appears in the Status field.
- Source Record – Original record that was harvested
- Marc Record – The bibliographic record received after converting to MARC 21 format
 Test Page
- Select one of the following options to specify the test record to use:
Importing Records with CSV or Excel Files
Bibliographic records may be imported using CSV (comma-separated values) or Excel files. Properly formatted CSV and Excel files may be imported using the Repository, New Order, or Update Inventory import profiles configured with the appropriate import options.
When provided, the import should include fixed position field content such as the LDR or MARC 21 008 content.
Repeating fields with the same subfields and indicators cannot be imported. When the import process encounters multiple columns with the same tag, indicators, and subfields in the input file, a single field is created with multiple instances of the repeated subfields. For example, when the input file has a single row with three columns that contain 245$a, 245$b, and 245$b, the following record is created: 245$a main title $b subtitle 1 $b subtitle 2.
There is a limitation size of 20 MB on imported CSV or Excel files.
Formatting CSV or Excel Files for Importing Records
The header row (the first row) of your CSV or Excel file needs to identify the content for each column or comma-separated field of information and the indicators to be created. Each column or field header needs to contain the following information:
- Field (tag) number
This can be any MARC 21 or other metadata standard number except Dublin Core.
This also includes fixed position fields such as the LDR and MARC 21 008.
- First and second indicators
Specify indicators in the following manner:
245$a where no indicators are specified
2451 $a where a null value is to be created for the second indicator
245 1$a where a null value is to be created for the first indicator
24510$a where both indicators are specified
- Subfield
For an Excel file example, select the following link:
- Excel File Example
See the illustration below for a CSV file example.
 CSV file example
The file header row is read from left to right by the loader and the relevant tags are created.
Physical Mapping
This section describes how to enter import profile inventory information on the Import Profile Details Physical Mappings page.
Access the Inventory Information portion of the profile wizard or select the Inventory Information tab when editing an import profile.
| Permanent Location | |
|---|---|
|
Library
|
|
|
Location |
|
| Map library/location |
Select to map the library location. If you select this option, you must enter Location Mapping in the Mapping tab after you save the inventory information.
The Source value displays the value (from the input file) of the subfield as defined in Inventory Information > Permanent Location > Location field. Location is where the institution locations are grouped by the libraries.
|


Rapido Electronic
Defining Lendability Status of Collections
- General System Administrator
- Repository Administrator
Using the Resource Sharing > Inventory > Collections Lendability menu, you can define the lendability of your electronic collections, i.e. whether electronic resources that belong to these collections are lendable or not. Your electronic inventory that belongs to a lendable collection is used by Rapido for creating digital offers to remote Rapido borrowers, and you may receive lending requests for them.
Populate collection names in the Code column and their lendability status in the Description column, as below:
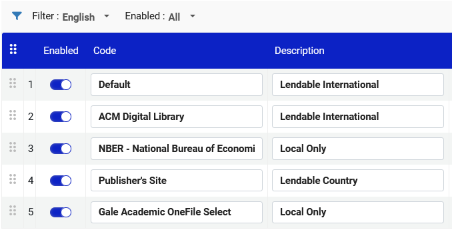
The collection names must match the values in the package_name of your KBART file.

Possible lendability statuses are:
- Lendable Country
- Lendable International
- Local Only
It is also possible to update Rapido with the Lendability status of the packages by supplying this information in the second sheet of the imported KBART file (see KBART Files). The package names should be listed in the A column of the sheet, and the proper Lendability status in column B.

General Profile Information
This section describes how to enter general profile information on the Import Profile Details - Profile Details page.

- Choose the Electronic Collection if you are loading inventory of a single type, e.g. only lendable international inventory or only local inventory.
You may leave the field empty and use files with mixed inventory, e.g. some that is lendable international and some that is local inventory only. In that case, the loader refers to the Collections Lendability configuration to automatically determine each portfolio’s lendability status.
 Select Loading Policy
 - Select the Material Type that is being imported – e-journals or e-books. Note that a separate import profile needs to be configured if both material types need to be imported. Each profile can import only one material type.
- Select one of the following Loading Policy Types in the Select Loading Policy section:
- Complete – Loads a complete set of portfolios, overwriting any existing portfolios. The following options are available when this is selected:
- Add local portfolios – A new local portfolio record is created and added to the electronic collection.
- Update portfolios – Update existing local portfolios with the information listed in the KBART file for the matching portfolios when this option is selected.
- Delete portfolios – Select this option to indicate that:
- If portfolios are in an electronic collection and not in the KBART file, they will be deleted.
This differs from how Alma processes the Excel or KBART file contents when the Delete option for the Incremental loading policy type is selected (see the description below).
The Delete portfolios option provides the following additional options to enable you to specify how you want to handle bibliographic records when deleting portfolios results in bibliographic records without inventory:
- Delete bibliographic record(s)
- Suppress bibliographic record(s)
- Do nothing
- Complete – Loads a complete set of portfolios, overwriting any existing portfolios. The following options are available when this is selected:
- Incremental – Loads a file that includes only the incremental changes to the portfolio list of a specific electronic collection. With this option, you can load only the portfolios that have been updated since the last load.
When you choose Incremental, the page refreshes to display the following incremental options:
- Add New – This option adds new portfolios to existing collections
- Update – This option updates the details of all electronic collection portfolios that are listed in the file.
- Delete – When this option is selected, any portfolios that are in the KBART file that match the portfolios in the electronic collection are deleted from the repository.
This differs from the Delete portfolios option under the Complete loading policy type (see the description above).
The Delete option provides the following additional options to enable you to specify how you want to handle bibliographic records when deleting portfolios results in bibliographic records without inventory:
- Delete bibliographic record(s)
- Suppress bibliographic record(s)
- Do nothing
- Target format - The format in which to save the records in Alma. Read only value set to MARC21 Bibliographic
- Status - The default is Active. Select Inactive if you do not want the import profile to be available for use at this time. When set to inactive, attempting to run an import job fails immediately.
- Originating system - Read Only. The name of the Rapido institution
- Import Protocol – The protocol used to retrieve the file containing the records. The options are:
- FTP – Retrieve by FTP. You must enter fields under Import Processing and FTP Information.
- Upload File/s – Upload the file from a local or network drive.
- OAI (Repository and Authority profiles only) – Retrieve using OAI. You must define additional fields associated with the OAI server.
If you change the Import Protocol for an existing import profile, the schedule options are removed from the profile but not removed from the Scheduled tab on the Monitor Jobs page. Use the following work around to address this:
- Edit the import profile and put back the scheduling option
- Set the scheduler status to inactive and save
- Change the import profile to upload
KBART Files
The Loader supports the KBART format, which is used in institutions around the world for electronic resource exchange with vendors. To learn more about the KBART format, see here.
The types of KBART formats that are supported are *.tsv, *.txt, *.xls, and *.xlsx.
The KBART file must not exceed 65,000 rows. If the files exceeds this length, you must break it to multiple files and load each separately.
FTP Information
FTP Information appears only if you selected FTP as the Import Protocol, and selected the Other FTP Site option.
If you selected the Select from Configured FTP option then a drop down of selectable FTP sites displays, requiring you to select one. The list is derived from the FTP locations that have been defined using the General > External Systems > S/FTP definitions menu.
|
Description |
A description of the FTP submission format that is defined in this section. |
|
Server/Port |
The IP address and port of the FTP server sending or receiving the files. |
|
User name/Password |
The username and password for logging on to the server that is sending or receiving the files. |
|
Input directory / Is full path |
The path of the submission format’s input directory. If this is an absolute path, select Is full path checkbox and preface your path with the / sign. If this is a relative path, leave Is full path clear and start the path at your current directory. |
|
Max. number of files |
Not in use. Accept the default value. |
|
Max file size/Size type |
Not in use. Accept the default value. |
|
FTP server secured |
Whether to use a secure FTP transfer (SFTP) |
|
FTP passive mode |
Whether to use FTP passive mode, or not. This depends on the setting in your FTP server. |
|
Test Connection |
Select to run a test of the FTP connection. The test includes attempts to upload, modify, and delete a fictitious record in the input directory. If the FTP connection is successful, the test lists the files that are found in the specified input directory on the ftp server. |
Importing Records Using an Import Profile
To run the Rapido Import Profile you must have the following role:
- General System Administrator
You can import records (run an import profile) on the Import Profiles page, which can be reached using the Resources > Manage Import Profiles menu:
Select Run from the row actions list to run a profile.
Importing Multiple Records
- On an Import Profiles page, select Run in the row actions list. The Start New Import page appears.
 Start New Import page
 - If Upload File/s is selected as the File Upload Method in the import profile:
- Select Select File and locate and select the file you want to import in the File field.
- It is suggested that you limit your file size to a maximum of 10 MB. For files imported using the FTP File Upload Method, this limitation does not apply.
- The import process accepts ZIP files, MRC files, or XML files, but not tar.gz files.
- To use a label for the file to help identify the contents, enter a label in the Label field.
- Enter any notes for the import in the Notes field.
- Select Add. The file is loaded.
- General information about the file, including the size of the file, appears in the Files List area. You can edit the note or delete the file using the row actions.
- Add any additional import files by repeating the steps above.
- Select Select File and locate and select the file you want to import in the File field.
- Select Submit. A job to import the file is submitted.
Available Actions on the Import Profile Page
You can do the following actions on the Resources > Manage Import Profiles page.
- Edit an import profile — Select Edit from the row actions list. See the sections below for descriptions of each tab.
- View an import profile — Select View from the row actions list.
- Copy an import profile — Select Copy from the row actions list. When you copy a community-contributed import profile, it becomes a local import profile for your institution.
- View an import profile's job history — Select Job History from the row actions list.
- Run an import profile — Select Run Import from the row actions list.
- Contribute an import profile.
- Delete an import profile — Select Delete from the row actions list.
- Only inactive import profiles can be deleted.
- Once you use an import profile, it cannot be deleted because its job history remains (and cannot be deleted).