
Depositing SIPs in CSV Structure
Depositing SIPs in CSV Structure
Producer Agents whose libraries have configured a CSV submission template can submit content that conforms to the template specifications.
Files can be loaded one by one or as multiple files.
CSV limits:
- metadata delivered to a CSV file
- metadata follows the CSV template created by library staff
- object delivery to one ZIP file
The CSV file comes from the staff user and can be generated from the Content Structure form.
In the generated CSV, the columns names are created with the object type as part of the name (for example, IE.Title, File.File Name).
| Object Type | Title | Alternative Title | Preservation Type | Usage Type | Revision Number | File Mime Type | File Name | File Label |
|---|---|---|---|---|---|---|---|---|
| SIP | CSV Load | |||||||
| IE | test 1 | test11 | ||||||
| Representation | PRESERVATION MASTER | VIEW | 1 | |||||
| FILE | image/jpeg | door1.jpg | door 1 | |||||
| FILE | image/jpeg | door2.jpg | door 2 | |||||
| FILE | image/jpeg | door3.jpg | door 3 |
CSV Format for Structural IEs
Structural IEs differ from content IEs in that structural IEs can contain only relations to other IEs, not representations or files. The CSV for ingesting structural IEs has some unique features.
There are two methods for using a CSV to create the relationships for structural IEs:
There are two methods for using a CSV to create the relationships for structural IEs:
- The CSV metadata contains the relationship data, but the relationships are created by a job after the import of the file.
- The CSV contains the relationship information and the relationship are created when the file is imported. When creating the CSV template for structural IEs, you add the IE level field Structural IE Relationship. The CSV produced with this field in the template contains the flowing IE level fields:
- Parent IE Object Identifier Type – defines the type of identifier used to determine with which IE this IE has a child to parent relationship. Possible values are:
- PID – for matching by an IE PID that exists in Rosetta.
- DC identifier types, as defined in the Content Structure Stream Source code table – for matching by an IE DC identifier of an IE in Rosetta.
- CSV_IE_RELATIONSHIP_IDENTIFIER – For matching by an internal identifier in the CSV of the parent that exists in the CSV with the same value under the CSV IE Relationship Identifier column.
- Parent IE Object Identifier Value – the identifier value of the IE with which this IE has a child to parent relationship
- CSV IE Relationship Identifier – the identifier value of the parent IE to match the value of the Parent IE Object Identifier Value of the child IE in the CSV when the Parent IE Object Identifier Type of the child IE is CSV_IE_RELATIONSHIP_IDENTIFIER, indicating that the parent is located in the CSV.
- Build the structural hierarchy bottom up with the child IE pointing to its parent IE.
- The child IE row must precede the parent IE row in the CSV file.
Submitting Content in CSV Format
- To submit content packaged in the CSV format:
- Log on to your Rosetta Deposit account and choose your Producer.
- Click Continue.
The Deposit Activities page opens. - Click the Add Deposit Activity button.
Step 1 of the deposit wizard opens. Select Type of Material
 - Select the type of CSV material you want to deposit. (Options depend on how your institution or Administrator has set them up.) Click Next.
The Upload Files page opens. For uploading CSV files, there will be a Browse button for your zip file and, below it, a Browse button for your CSV file. - Click the first Browse button and find your zip file on your computer, then select it.
If the deposit includes only structural IEs, a zip file is not mandatory.
The wizard page reloads with the name of your zip file.
- If it has been deemed necessary and thus configured by the staff of your institution, a Generate button appears on the reloaded page (see below). Click this button to generate and download a CSV file with the metadata for your zip file. You can edit the CSV locally, then upload and continue the deposit activity submission. If no such button appears, skip to step 7.
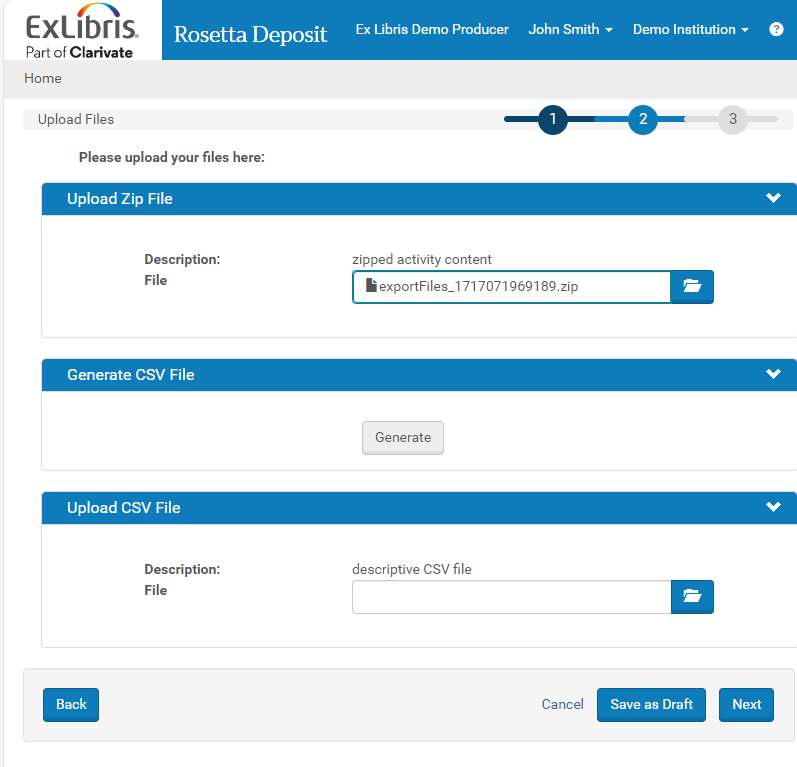 Upload Files Page with Generate CSV File Section
 - Under the Upload File 2 heading, click the Browse button, navigate to your descriptive CSV file and select it, then click Next.
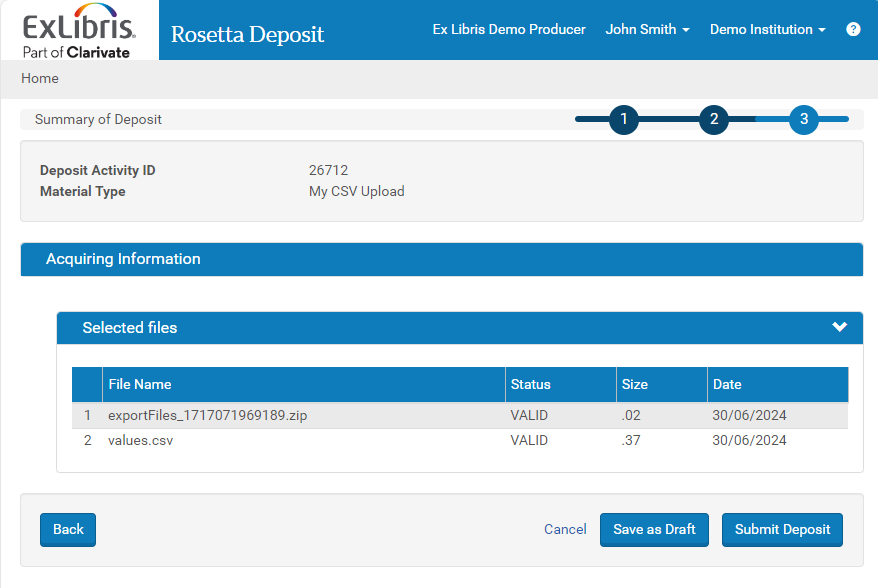 Summary of CSV-Loaded Deposit
 - To save the upload and return to the work at a later time, click the Save as Draft button. To submit the deposit for staff review, click the Submit Deposit button.
The system processes the load according to your selection. If it detects errors and cannot process the data, it displays an error message on the next page.
Collections
It is also possible to create collections and assign IEs to the collections using a CSV material flow.
A CSV deposit with collections can be performed by adding one or more collection rows (object type = COLLECTION) to the CSV file. The collection row should be placed above the IE level and contain all IEs below it (until the next collection row is defined).
CSV deposit with collections requires the following:
- The dc:title attribute must be defined in the CSV mapping table and added to the CSV file. This attribute reflects the collection name, which is a required field. Other dc fields are optional.
- If the collection is a subcollection, a dcterms:isPartOf value must be included in the CSV file. This attribute should contain the full path of the collections leading up to the current collection using a slash as the path separator.
- If any collection defined in this path does not exist, it will be created with minimal metadata.
Typical usage for CSV with collections is to enable auto-generation, which will automatically fill most of the mandatory collection metadata for you. Contact a Negotiator if you have questions regarding enabling this option.
- The first row contains the labels for the mapping and should not be removed.
- Only the comma is supported as a delimiter.
- The CSV file must be encoded in utf-8 (without BOM)
- Text with comma must be encapsulated by double quotes (..., "Surname, Forename", ...)
- Escaping: double quotes must be escaped with backslash (..., "\"The Merry Widow\", \"To Be or Not to Be\" and other movies", ...). A backslash must be escaped with an additional backslash.