
Outlook
|
Overview
Outlook Product Integration integrates campusM with Microsoft Outlook, and allows users to read and send emails directly from campusM. In institutions where the Outlook Product Integration is configured, it is usually one of the most popular tiles on the Home Page.
This Outlook Product Integration replaces Legacy Outlook Product Integration. Legacy Outlook Product Integration will be deprecated at the end of 2026.
User Experience
The following section describes aspects of the user experience.
Logging In to Microsoft
The first time a user selects the Outlook tile, the Microsoft login page appears:
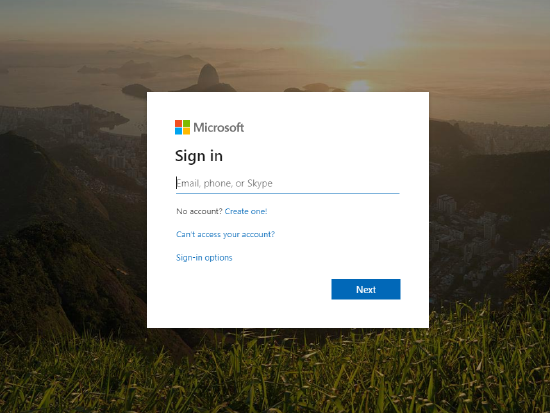
The user enter the institution’s email address and password. After logging in, the user is redirected back to the outlook main screen. There is no need to login again to Microsoft if the user is still logged in to campusM.
Screenshots
| The Live Tile indicates number of unread emails | After selecting the Outlook tile, the user's Inbox appears: | Select the filter icon to display the email boxes: |
 |
 |
 |
| Select an email to open it: | Select Reply to reply to the sender: | Search for emails by entering keywords into the search bar: |
 |
 |
 |
Live Tile
Once the user has logged into the Outlook Product Integration, if the Live Tile is enabled and configured on the Home Page, they will see a counter badge on the tile, with the number of their unread emails.
When the end-user selects the Outlook Live Tile, the behavior depends on the ActionURL configured for the Tile in App Builder. Configure the Outlook Product Integration URL to open the integration inside the app, or a URL to the Outlook app (see Working with App URLs), or Outlook web app. If no ActionURL is configured, selecting the tile has no effect.
For more information, see Configuring Live Tile Linking.
Technical Overview
Prerequisites
The following are the prerequisites for the Outlook product integration:
- Configure an OAuth Integration Profile (App Manager > App Settings> Integration Profile). For more information, see OAuth Integration Profile Configuration.
- Configure a redirect URI in the Azure settings > Authentication section. The Redirect URI should be the following: <App URL>/cmauth/oauth/callback.
For example: https://university.campusm.exlibrisgroup.com/cmauth/oauth/callback - Verify on the Azure side that permissions that are updated in campusM (see OAuth Scope in the Configuration section) are configured in Azure as well (Azure settings > API Permissions section).
- Configure Microsoft Graph API permissions. For more information, see Microsoft Graph API Permissions and campusM Product Integrations.
Authentication
The following is the authentication workflow:
- campusM sends Integration Profile information to Microsoft Login API.
- Microsort send a response with user's access token.
- campusM sends the access token to Microsoft Graph API to get all relevant data for the logged in user.
When a customer implements this Product Integration with a Live Tile that takes the user out of campusM and opens Outlook in an external browser, campusM can only log the user out of the Outlook session if Single Log Out (SLO) is enabled in the customer's Identity Provider (IDP) and configured in campusM. If SLO is not enabled in this way, and a device is shared by multiple users, there is a risk that a campusM user may see the email account of the previous user rather than their own email in the browser. This can occur when user A selects the Outlook tile, reviews their email, and doesn’t log out of the Outlook tab, and then user B logs into campusM from the same device, and selects their Outlook tile in campusM.
Enabling Single Log Out means that when a user logs out of campusM, a logout is initiated across all the users’ sessions on all devices, which prevents sessions from overlapping on shared devices.
For further information on managing token-based authentication and Integration Profiles, see Configuring Integration Profiles.
Configuration
To configure the Outlook Product Integration, first configure an authentication integration profile (subtype OAuth) that you then select in the Product Integration configuration section.
OAuth Integration Profile Configuration
You add and edit integration profiles from App Settings > Integration Profile > Add Integration Profile.
The following table describes the configuration options available on this page. You can find most of the information in your Azure portal; under App registrations, Endpoints and Certificate and Secrets sections.
| Configuration Option | Description |
|---|---|
| Type | Authentication |
| Subtype | OAuth |
| OAuth Client ID | The Application ID that the registration portal assigned your app. |
| OAuth Client Secret | The application secret that you generated for your app in the app registration portal |
| Authorization Endpoint | https://login.microsoftonline.com/{tenant}/oauth2/v2.0/authorize |
| Access Token Endpoint | https://login.microsoftonline.com/{tenant}/oauth2/v2.0/token |
| Token Endpoint Auth | Post |
| OAuth Scope |
A space-separated list of the Microsoft Graph permissions to which you want the user to consent. This can also include OpenID scopes. You need to have at least the following scopes: offline_access user.read mail.read mail.send Mail.ReadWrite If you are using OpenID scopes, the following scopes are recommended for Outlook: openid profile email |
| Logout URL | https://login.microsoftonline.com/{tenant}/oauth2/logout?client_id={OAuth Client ID}&post_logout_redirect_uri={logout url} |
| Extract OAuth Tokens | True |
| Username Mapping | unique_name |
| Mail Mapping | upn |
| First Name Mapping | given_name |
| Last Name Mapping | family_name |
Product Integration Configuration
- Select Product Integrations > Add Product Integration.
-
Select Email. A pop-up appears.
-
Select Outlook. The following page appears:

| Configuration Option | Description | Default value |
|---|---|---|
| Manage Integration | ||
| Enable Product Integration | Select to enable the product integration on the user's campusM app. | |
| Product Integration Description | A description of the product integration for internal use | |
| Screen Title | The title that appears in the top header of the service | |
| Connection | ||
| Integration Profile | The integration profile campusM uses to integrate with Outlook. See the Authentications section above for more information. | |
| Look and Feel | ||
| Main Color | Select a color for the main elements on the page | |
| Live Tile | ||
| Badge Color | The color of the badge indicator | |
| Update Rate | Enter the frequency of updates to the unread count (in minutes) | |
| Text / Labels | ||
| Login heading label | 'Redirecting' | |
| Login message label | This page should automatically redirect you to the login screen. Click the button below to go there now. | |
| Login button label | Login | |
| Retry button label | Retry | |
| No messages label |
The text that appears when fetching an empty folder. Use |
The {{foldername}} folder appears to be empty. |
| Load more label | Load more | |
| Last updated label | Last updated | |
| Sync accessibility label | The text for used for screen readers for the Sync button label. | Sync |
| Error message label | The text for used for screen readers for the error message. | Oops! Something went wrong. |
| Close accessibility label | The text for used for screen readers for the Close button label. | Close |
| Back accessibility label | The text for used for screen readers for the Back button label. | Back |
| Filter accessibility label | The text for used for screen readers for the Filter button label. | Filter |
| Search accessibility label | The text for used for screen readers for the Search button label. | Search |
| No recipients label | Displays when a draft has no recipients. | no recipients |
| No subject label | Displays when an email has no subject. | no subject |
| Delete email confirmation label | Delete this email? | |
| Confirm deletion label | Delete | |
| Cancel label | Cancel | |
| Email deleted label | Email deleted | |
| Draft label | Draft | |
| Save draft confirmation label | Save Draft | |
| Keep editing label | Keep editing | |
| Save draft confirmation | Save | |
| Discard draft confirmation | Discard | |
| Draft saved label | Draft saved | |
| Choose a folder label | Choose a folder | |
| Apply label | Apply | |
| No matches found label | No matches found | |
| Compose email label | Compose email | |
| To label | To | |
| You label | You | |
| Show more accessibility label | Show more | |
| From label | From | |
| CC label | CC | |
| BCC label | BCC | |
| Subject label | Subject | |
| Add message label | Add message | |
| Send label | Send | |
| Invalid email error label | Invalid email address | |
| Email sent confirmation | Email sent | |
| Attachments label | Attachments | |
| Reply label | Reply | |
| Reply all label | Reply all | |
| Open reply options accessibility label | Open reply options | |
| Forward label | Forward | |
|
Import/Export Configuration You can configure product integration and then export it to another campusM environment, for example, from sandbox to production or from preview to production. |
||
| Export | Create a JSON file with all product integration configuration | |
| Import | Use this option in order to load configuration from JSON of an exported product integration | |