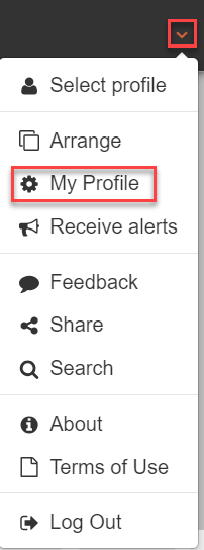
Managing My Profile
Overview
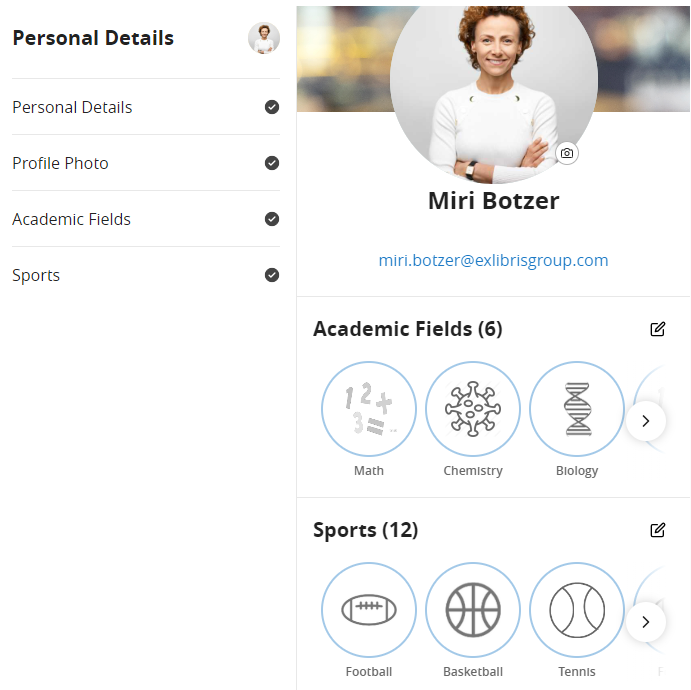
My Profile in the App Manager controls the user information that is displayed when a user selects My Profile in the app. The user information can include the user's name and email address, the institution's name, a picture of the user, and an area in which the user can select types of content they would like to see in their app by selecting tags.
The content options available to the user are divided into categories, such as Academic Fields or Sports, that are configured in the App Manager. Each category contains a number of tags of content types that the user can select if they want to include tiles related to those content types in their apps.
Setting Up My Profile
One or more My Profiles instances may be defined in your system. A default instance of My Profile is provided out of the box, and generally should be enough, because you can control the tags users of different types see by means of roles. However, in some cases, for example when the profile will be displayed in multiple languages, multiple instances of My Profile are needed. You may also find it more convenient to add additional instances with different settings for different categories of users, such as faculty and students.
A My Profile instance is only implemented for users if that instance is assigned to a profile. See Assigning Instances to a User Profile, below, for details.
- In the App Manager, select My Profile > My Profile Configuration. A list of the My Profiles that currently exist in your system appears.
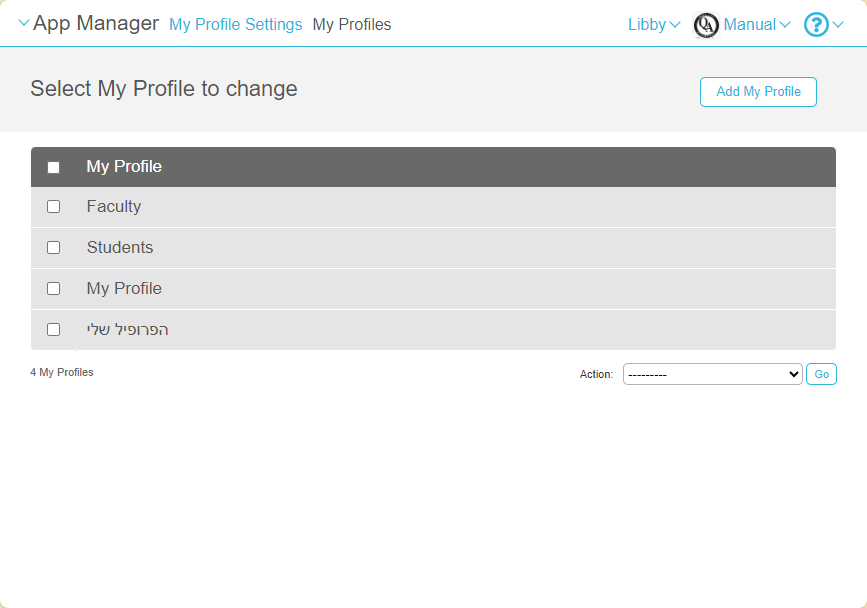
- Select the name of an existing profile, or Add My Profile to add a new My Profile instance. The My Profile configuration page opens for the instance.
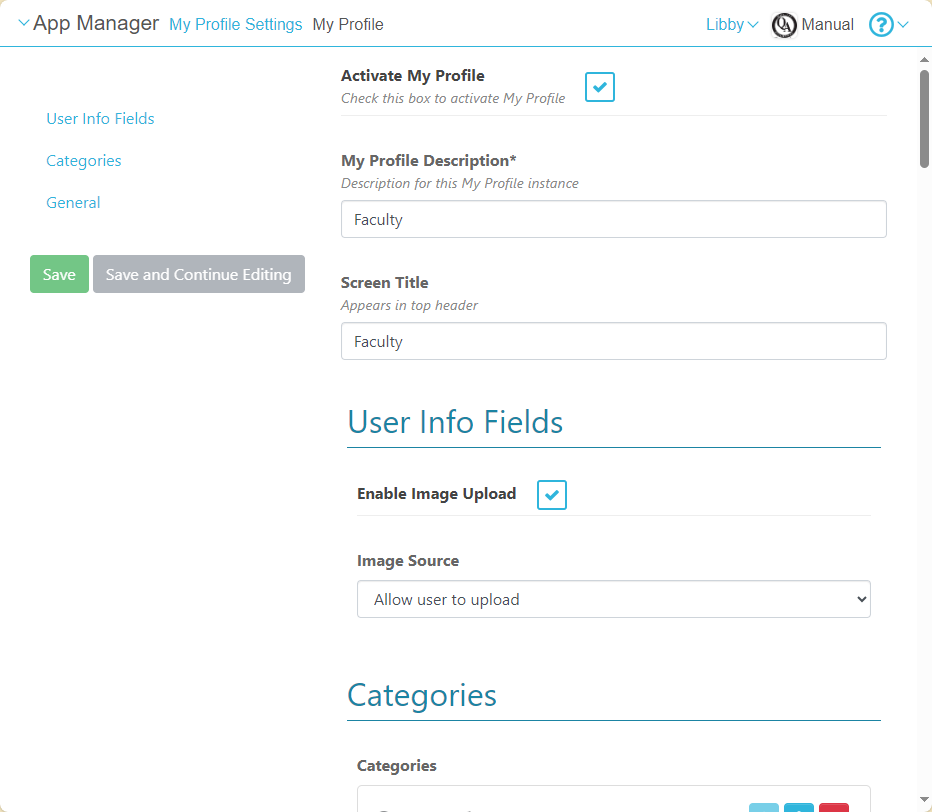
- Select or clear the Activate my Profile checkbox. If this is not selected, the profile will not display.
- Under My Profile Description, enter the name of the My Profile instance to display in the My Profile Settings.
- Under Screen Title, enter the text that should display at the top of the user profile, above the image.
- To make it possible to include an image (of the user) in the app, select the Enable Image Upload checkbox. When you select this option, the Image Source field is added to the page.
- If you selected Enable Image Upload, under Image Source, select one of the following:
- IdP – Import the image from the user's profile in your IdP system.
- Allow user to upload – Enable the user to import a picture for their My Profile. When this option is selected, an upload button (
 ) appears in the image area in the app (see How Users can Update their My Profile Information, below).
- Add categories as required to organize the tags associated with this My Profile instance. See Adding Categories, below, for details.
- If you want to display the institution's name in the user's My Profile page, select Display University Organization Name. When you select this option, the University Organization Name is added to the page.
- If you selected University Organization Name, under University Organization Name, enter the name to display.
- In the Text Labels section, fill in the labels that you want to display to the user for various fields and options. If left blank, the default labels will display.
- Select Save or Save and Continue Editing.
Adding Categories
In the settings of a My Profile instance, if you want to add tags to the user's My Profiles page, you must organize them into categories. That is, you create a category, and then choose which tags to make available under that category. You can add multiple categories to an instance, as required, and you can control which user roles will see each category you create.
You can only add tags that to categories if the tags have already been defined; see Creating and Updating Tags, below.
- In the settings of the instance, under Categories, select Add Category.
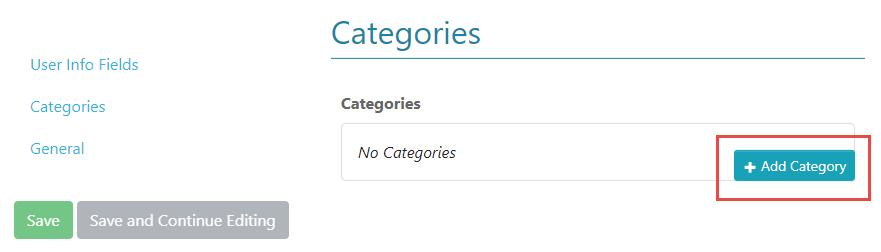
A new category section opens.
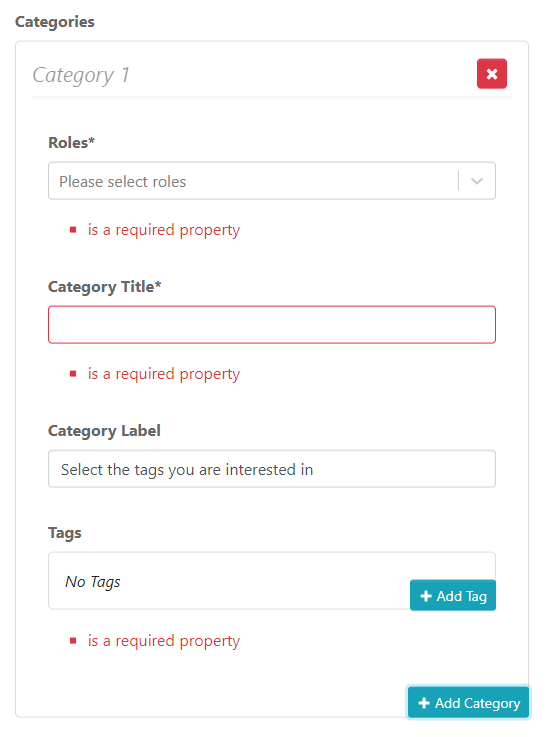
- Under Roles, select one or more roles. The category will only be displayed to users who have at least one of these roles.
- Fill in the Category Title. In the user's app, this displays as the title for the tags in the category.
- Fill in the Category Label. This is a subtitle that displays under the Category Title of the category in the user's app. You may want to include instructions, such as, "Select the tags of the fields that interest you. Tiles related to the field you select appear in your app desktop."
- Under Tags, select Add Tag. A new tag area, such as Tag 1, opens.
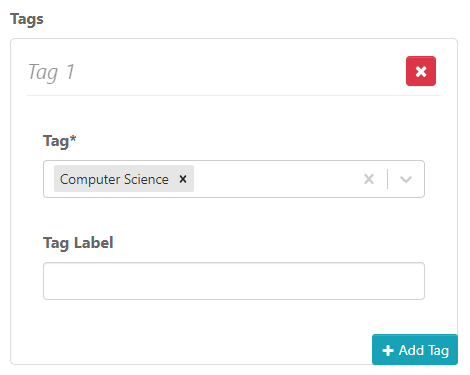
- Under Tag, select one tag to include in this category. Note: Select only one tag.
- If you want to specify a name that should appear for the tag in the user's app, under Tag Label, enter the name. If you leave this field blank, the name that appears in the Tag field is used. (This name is defined in the Field name of the tag; see Creating and Updating Tags, below.)
- If you want to add additional tags to the category, select Add Tag again, and repeat the previous two steps.
- When you have finished adding tags to the category, ad additional categories to the instance, as required.
Creating and Updating Tags
Tags are selected by the user to define their specific areas of interest. In My Profile instances, tags are organized into categories (see Adding Categories, above). Like roles, tags add permissions to users. In a case where a role does not let a user view a menu option and the tag does, the user will be able to view the menu option.
The definition of a tag includes the attachment of an image file. The ideal image has equal length and width, and is not larger than 50KB.
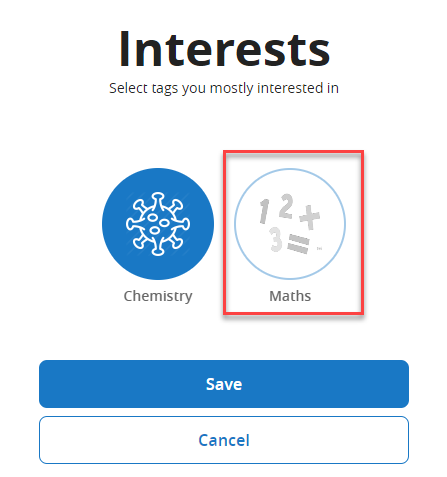
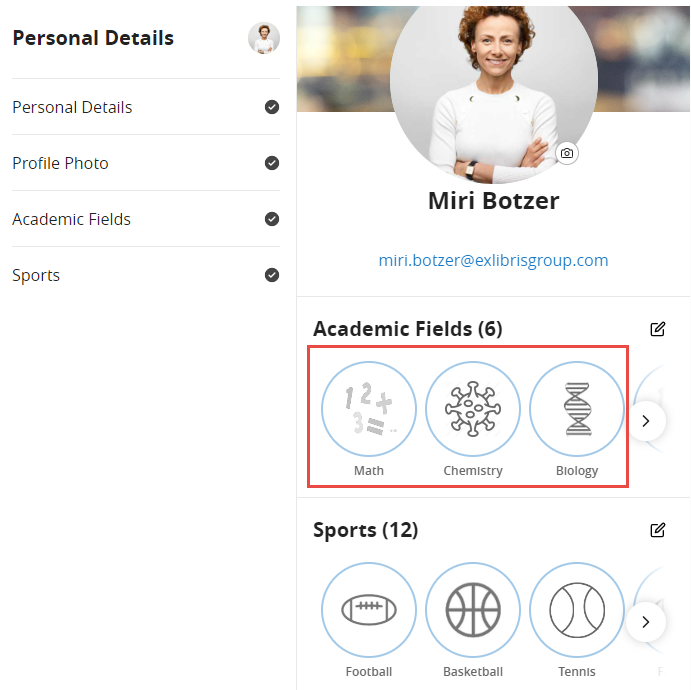
In the example below, there are two tags that were selected by the user, under the Interests category.
- In the App Manager, select My Profile > Tags. A list of the tags that are currently defined in the system opens.
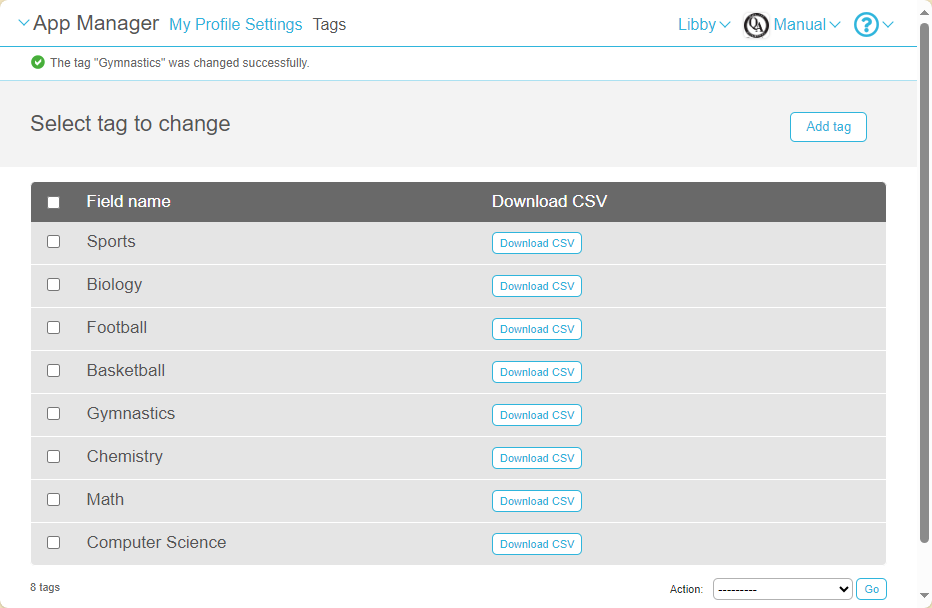
- Select the name of an existing tag to modify its settings, or select Add tag to create a new tag. The tag settings open.
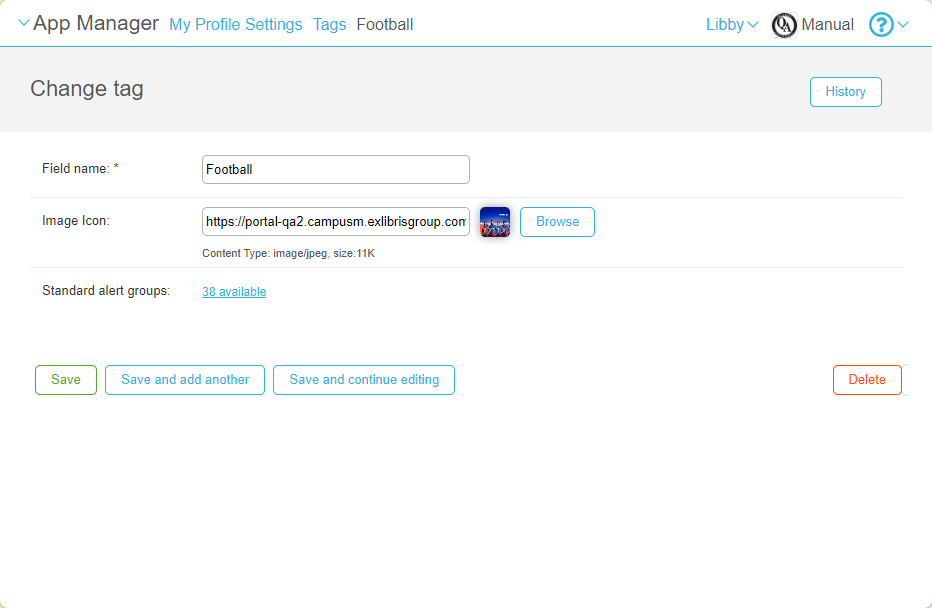
- In the Field name, enter or modify the name for the tag.
- Attach an image for the tag by selecting Browse next to the Image Icon field.
- Under Standard alert groups, you can assign a tag to one or more alert groups. Users who select this tag receive notifications associated with the selected groups. (See also Sending Notifications to End-Users from Notification Center).
- Save the tag by choosing one of the save options.
Linking Tags to Tiles
Once you have created a tag, you can link them to tiles. Any tile that should appear in the end-user app when a user selects a particular tag must be linked to that tag. For example, if a student selects a Biology tag in their My Profiles, and a tile exists for information about lectures in microbiology, you could configure that tile to be linked to the Biology tag. Then, the Microbiology Lectures tile would automatically be added to the student's app when they selected the Biology tag.
Linking of tags to tiles is performed in the App Builder, as explained below. For additional information about working with the App Builder, see The App Manager UI.
- In the App Manager, select My Profile > App Builder.
- In the configuration area on the right, under Menu Options, select the tile you want to link to the tag. The tile's settings open.
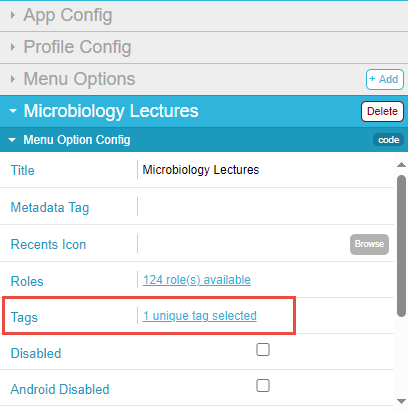
- Under Menu Option Config, under Tags, select the link. The Select Tags dialog box opens.
- Select the tags to link to the tile.
If the tag is available under multiple Profiles/Roles, selecting it under any one of them causes it to be selected under all of them. This is because it is the same tag, regardless of where it appears.
- Select Save & Publish. The tags are linked to the tile.
Assigning Instances of My Profile to a User Profile
An instance of My Profile (see Setting Up My Profile, above) will only display for users if it is assigned to an App Profile.
- In the App Manager, select App Settings.
- Under Enterprise Roles, select App Profiles. A list of existing App Profiles opens.
- Select the relevant App Profile. The profile's settings open.
- Under My profile, select the My Profile instance to assign to the App Profile.
- Save your changes by choosing one of the save options.
The end user needs to logout and login again for the changes to be implemented.
Users with the App Profile that was updated should now be able to see My Profile in their settings. See also, How Users can Update their My Profile Information, below.
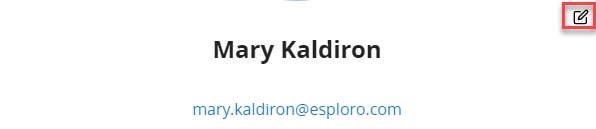
How Users can Update their My Profile Information
Users can update their information by selecting My Profile in the Settings.
For Android users they access their Settings from the three dots on the top right and for iOS from the Settings in the bottom middle of the screen.
Users can update their personal information by selecting the edit icon.
Users need to be logged into a guest profile in order to update the first and last names, email address and password.
They can update the image that displays by selecting the camera icon.
![]()
They can select the edit icon to update their Interests (also called Tags).
![]()
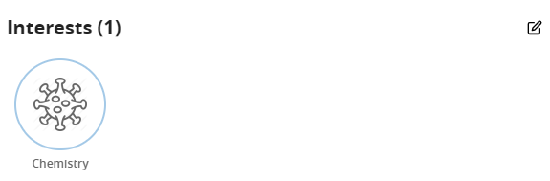
They can remove a tag from the display be deselecting it and selecting Save.