
Adding a Product Integration
This page describes various activities you can perform when managing product integrations.
Configuring Product Integrations
This section describes configuration options common to most product integrations. For information relevant to specific product integrations, see the Product Integrations page.
To use the product integrations, select Product Integrations from the main menu. The list of products you configured appears. To add a product integration instance, click Add Product Integration.
| Configuration Option | Description | Mandatory | Data Type | Default | Example |
|---|---|---|---|---|---|
| Manage Integration | |||||
| Enable Product Integration | Select to enable the product integration on the user's app. | No | Check box | Yes | |
| Product Integration Description | A description of the product integration for internal use | Yes | Description | - | |
| Screen Title |
The title that appears in the top header of the service This is the title that end users see at the top of the PI's page in the app. However, it is not included in searches. Thus, if end users search for this feature by this title, they may not find it. On the other hand, the Title of the tile that opens the PI (configured in App Builder; see Configuring Services) is included in searches. It is therefore recommended that this Screen Title match both the Title of the tile and its label, so that end-users can find the tile by searching. |
No | String | Moodle | |
| Look and Feel | |||||
| Primary Theme Color | Select a color for the main elements on the page | No | Color Picker | #444444 | |
| Secondary Theme Color | Select a color for the secondary elements on the page | No | Color Picker | #6f8ea4 | |
| Text/Labels Edit the labels that the user will see in the product integration. |
|||||
| Live Tile Defines the live tile behavior. |
|||||
| API Configuration This section contains the API details to define the API structure. You can test the API configuration. See Testing API Product Integration Configuration. |
|||||
| URL to retrieve the information | The URL for the Web service. | Yes | |||
| Response Content Type | The web service’s response content type. | No | |||
| Response Object Type | What you expect as the top-level object from the API endpoint. | No | String | Object | |
| URL Query Parameters | The parameters sent as part of the query. | No | For https://someHostName/serviceName?username={user}, the query parameter is username. | ||
| URL Path Parameters | The parameters sent as part of the path. | No | For https://someHostName/serviceName/username, the path parameter is username. | ||
| General Headers | Add (key, value) for additionally needed headers. | No | |||
| Authentication Type | Authentication type against the web service. The options are the following:
|
Drop-down list | |||
| Import/ Export Configuration You can configure product integration and then export it to another campusM environment, for example, from sandbox to production or from preview to production. |
|||||
| Export | Create a JSON file with all product integration configurations. | ||||
| Import | Use this option to load configuration from JSON of an exported product integration. | ||||
Testing Product Integration APIs
For product integrations that require configuring an API, you can test the API configurations by clicking the Test API Connection button. Note that you need to save your configurations before testing the configurations.
After clicking the Test API Connection button, fill in any non-constant parameters.
Click Test to continue. The following is displayed:
- API Request Info – A URL with a configured path and query parameters and headers sent on the request.
- Test Results – the request’s response.
Adding a Product Integration Tile
To create a tile for the product integration instance that you created, select Add > Product Integrations Tile from App Manager > App Builder > Menu Options and select the product integration instance you would like to add. For more information, see Working with the App Builder.
Configuring Live Tile Linking
Some product integrations, such as Primo, use a live tile on the app home page. A live tile can have one of the following linking methods:
- Linking to the full product integration (OTB behavior).
- Linking out to an external website, native application (see Working with App URLs), or any other tile such as a Pocket Guide page, product integration instance, and RSS (see campusM URL Scheme).
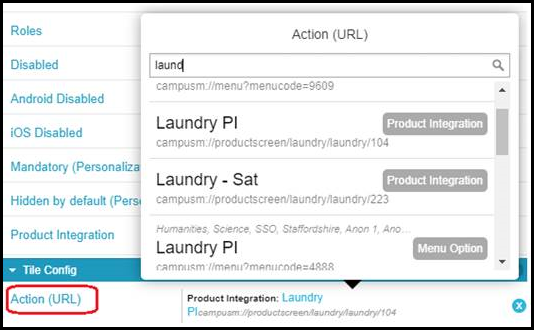
To configure the Live Tile linking:
- From the App Builder, select the tile you want to configure.
- Under the Tile Config section, for the Action URL, enter the element to which you want the live tile to link. By default, Action (URL) contains the URL of the product instatance instance, meaning the full product integration.
 Configuring Live Tile Linking
 - Select Save and Publish.