New UI Customization - Best Practices
If you are working with Primo VE and not Primo, see Primo VE Customization - Best Practices.
Introduction
-
Analyzed search logs
-
Conducted surveys of librarians during workshops
-
Interviewed users at different academic levels and from various countries and disciplines
Additional Resources
-
Learn how to use js directives: https://github.com/ExLibrisGroup/primo-explore-package/tree/master/VIEW_CODE/js
-
All source code used for existing customer widgets: https://github.com/search?utf8=%E2%9C%93&q=primo-explore
-
All feature packages that customers have created: https://www.npmjs.com/search?q=primo-explore&page=2&ranking=optimal
Inspecting Web Elements with Your Browser
Most Web browsers provide developer tools that allow you to inspect the currently-loaded HTML and find specific elements on a page. In most browsers, you can either click F12 or right-click the page and then select the Inspect Element option.
In order to customize the new UI, you should be familiar with the following: CSS, HTML, JavaScript, and AngularJS. Depending on your experience with each of these languages and frameworks, you will be able to perform more complex customizations.
For Alma-Primo configurations, the labels and CSS inside the View It and Get It sections on the Full Display page are controlled by Alma, not Primo. For more details, see Modifying Display Labels and Branding the Delivery Tabs.
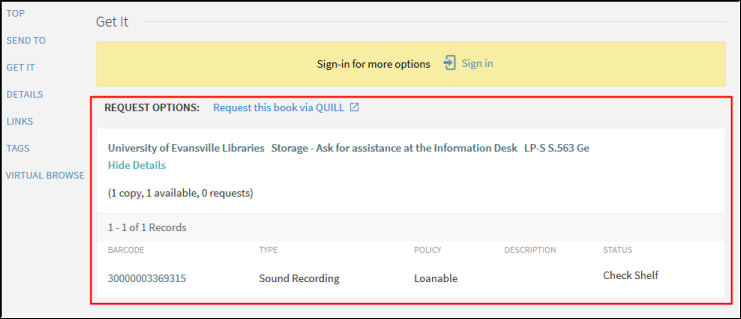
The following procedure shows how to use the browser's inspect tool to locate the code table used to define a label in the new UI.
-
On the page that you want to inspect, press F12.
-
Click the inspect item button (#1) and then click the label (#2) that you want to modify. Each component should highlight as you move the cursor over the item.
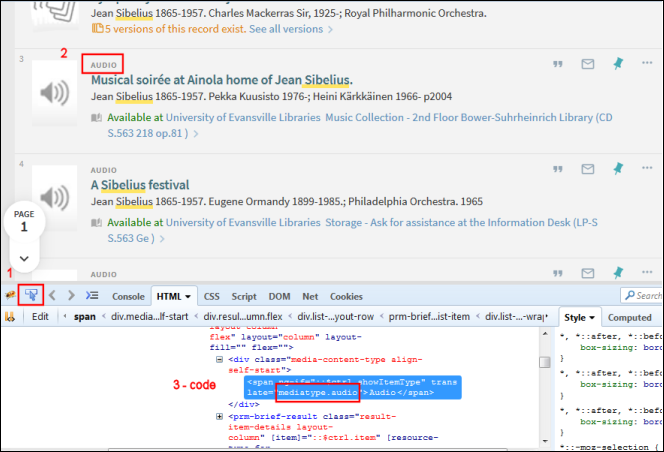 Inspection Brief Results Page
 -
In the HTML tab, you should see the label and its corresponding code (#3). If you do not see a translate parameter, you can instead search for the label’s description on the All Code Tables page.
-
On the All Code Tables page in the Back Office (Primo Home > Advanced Configuration Wizard > All Code Tables), either search for the code or description (the actual display label).
The following figure shows an example of a search for a code:
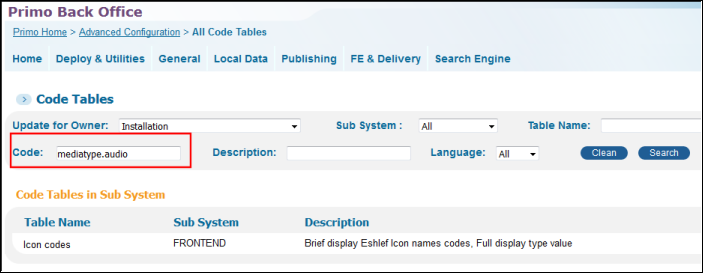 Code Search Example
The following figure shows an example of a search for a code:
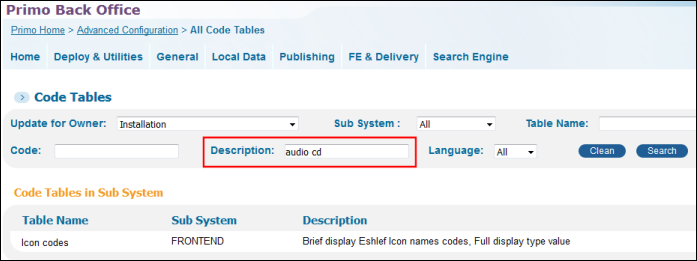 Label Search Example
Using the UI Customization Package Manager
-
css – This folder contains the custom1.css file, which is where you can include your CSS rules. These rules override corresponding rules in the default CSS.
-
img – This folder contains all customized images for the new Primo UI. To ensure that the correct image appears in the Primo UI, ensure you use the same file name as the original.
-
js – This folder contains the custom.js file, which includes your scripts.
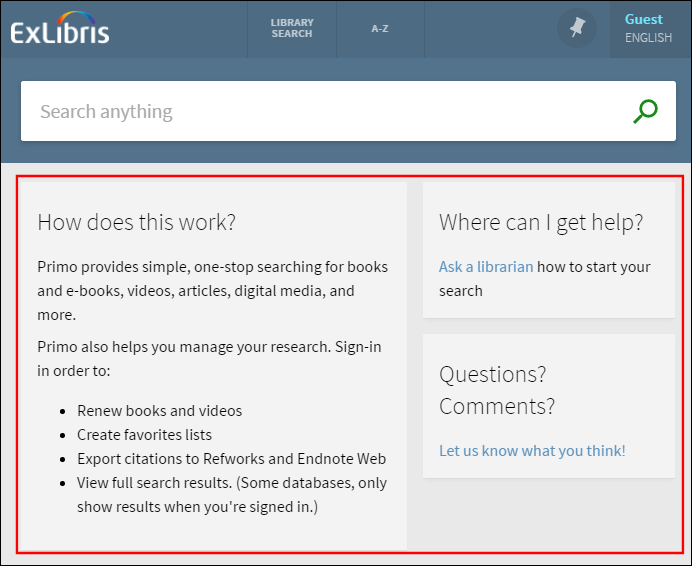
- html – This folder contains all customized HTML files for the new Primo UI. The home_en_US.html file allows you to customize the area of the page below the search box on the Primo Home page. For more information, see Home Page.
-
The system will not use content inside <script> tags.
-
Since this code will be nested inside the main HTML code, it is recommended to wrap this code with a <div> tag (insets of the <html> tag).
-
To support other languages, you can create a new HTML file with the relevant language code and locale. For example: home_fr_FR.html.
-
For details on configuring Alma's View It and Get It services, see Branding the Delivery Tabs.
-
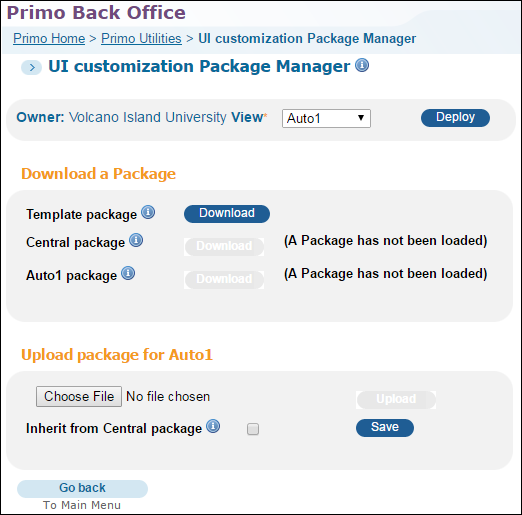
Open the UI Customization Package Manager (Primo Home > Primo Utilities > UI Customization Package Manager).
-
Select the institution (on-premises configurations only) and the view that you want to customize.
-
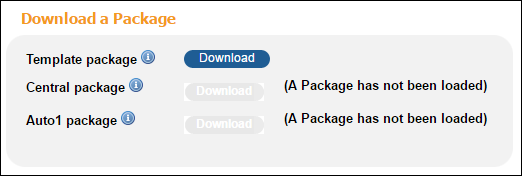
Click Download to download the template package.
-
Unzip the ZIP file.
-
If using the template file, change the name of the root folder to your view’s code.
-
Add your customized images and CSS. You must retain the file structure and names of files that you are overriding. Refer to the following sections for details on how to brand and make simple changes to your view:
-
Zip the Configuration package folder.
For Windows users, we recommend using a compression tool such as 7zip or Winrar instead of Windows Send to > Compress folder to avoid upload errors.
For Mac users, use the following procedure to zip and remove any hidden .DS_Store files:
-
Open the Terminal application under Applications > Utilities.
-
Move to the parent directory of the folder that you want to compress. For example: cd /Users/<user name>/<parent folder>
-
Enter the following command to compress the file: zip –r <target file>.zip <My_View> - x "*.DS_Store"
-
-
Open the UI Customization Package Manager (Primo Home > Primo Utilities > UI Customization Package Manager).
-
Select the institution (on-premises configurations only) and the view that you want to customize.
-
In the Upload package section, click Choose File to select the zipped package that you just created or modified for that view and institution.

-
Click Upload to upload your package to the server.
-
Click Deploy to activate your changes in the Primo UI.

-
Refresh your view in the Web browser and test your changes prior to uploading the changes to the production server.
Image File Customization
-
library-logo.png – Contains the library logo.
-
favicon.ico – Contains the favicon.
-
icon_<resource_type>.png – Contains the image for the specified resource type <resource_type>. For example: icon_audio.png
Customizing the Shortcut Icon for IOS/Android Devices
In addition, you can change the shortcut icon that displays on the Primo home page for IOS and Android devices.
-
Create a 150x150 pixel image for the Primo shortcut and give it the following name: home-screen-icon.png.
-
Edit your customization package and place the new shortcut image file under the img folder.
-
Zip and upload your customization package.
Customizing SVG Icons
Primo enables you to replace icons that are used in various places of the UI (such as those used for resource types in the Resource Types Filter Bar). You can store the SVG ID definitions in the custom-ui.svg file, which is not provided by default and stored under the /img directory of your customization package.
-
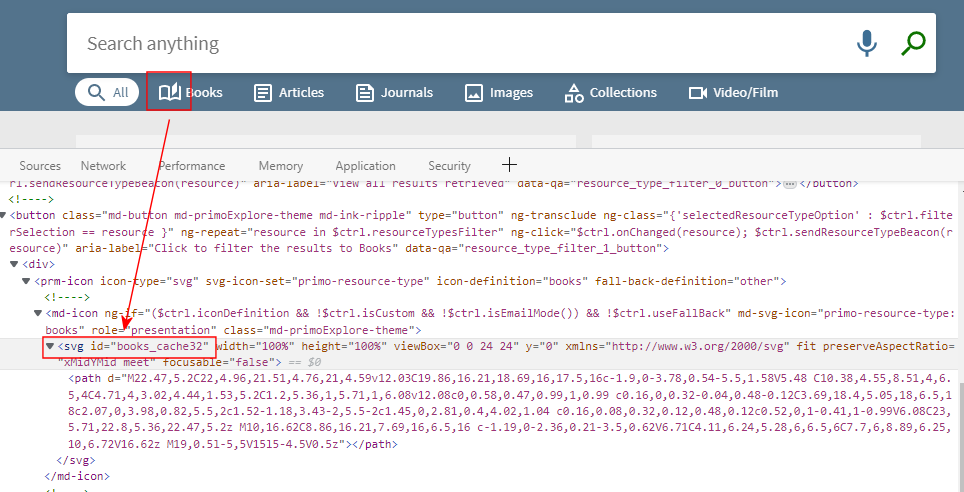
In the browser, inspect the icon that you want to replace and get its SVG ID, which is used later in this procedure.
 Inspect Icon in Browser
Do not include the _cache32 suffix in the SVG ID, only use books.
-
On the UI Customization Package Manager page (Primo Home > Primo Utilities > UI Customization Package Manager), download your view's customization package. If it does not exist, download the template and use it to create your view's customization package.
-
Under the /img folder, edit (if it already exists) or create the custom-ui.svg file (download example with replacement icons for articles and books).
-
Edit the custom-ui.svg file and add the SVG definition of the replacement icon, remembering to change its ID to the ID of the icon that you inspected in step 1. For example:
<svg version="1.0" id="books" xmlns="http://www.w3.org/2000/svg"
width="800.000000pt" height="800.000000pt" viewBox="0 0 800.000000 800.000000"
preserveAspectRatio="xMidYMid meet"><g transform="translate(0.000000,800.000000) scale(0.100000,-0.100000)"
fill="#000000" stroke="none">
<path d="M3885 7649 c-351 -34 -648 -172 -887 -412 -115 -116 -175 -204 -376
-552 -79 -137 -178 -308 -220 -380 -41 -71 -116 -202 -167 -290 -51 -88 -142
-245 -202 -350 -60 -104 -163 -282 -228 -395 -65 -113 -121 -209 -125 -215 -4
-5 -19 -30 -32 -55 -14 -25 -60 -106 -103 -180 -43 -74 -120 -207 -170 -295
-51 -88 -133 -230 -182 -315 -138 -238 -283 -489 -318 -550 -17 -30 -58 -100
-90 -155 -32 -55 -108 -188 -170 -295 -62 -107 -144 -249 -182 -315 -186 -320
-228 -395 -277 -493 -61 -123 -95 -223 -128 -372 -32 -150 -32 -381 0 -530 58
-266 172 -494 344 -686 242 -271 558 -426 945 -464 131 -13 5225 -13 5356 0
204 20 356 61 523 142 397 194 677 560 776 1018 32 151 32 381 -1 530 -49 222
-97 329 -320 715 -74 127 -176 304 -229 395 -52 91 -98 170 -102 175 -4 6 -19
30 -32 55 -14 25 -60 106 -103 180 -175 304 -266 462 -337 585 -42 72 -142
245 -223 385 -81 140 -181 314 -223 385 -41 72 -116 202 -167 290 -51 88 -131
227 -179 309 -47 82 -86 151 -86 153 0 2 -11 20 -23 41 -13 20 -76 127 -139
237 -63 110 -141 245 -173 300 -32 55 -82 141 -110 190 -366 636 -386 666
-531 810 -243 242 -518 368 -883 405 -112 11 -109 11 -226 -1z m350 -674 c207
-69 342 -184 462 -393 28 -48 83 -143 123 -212 40 -69 83 -143 95 -165 13 -22
55 -96 95 -165 79 -136 213 -367 240 -415 18 -32 92 -160 186 -323 31 -53 109
-187 172 -297 63 -110 154 -267 202 -350 47 -82 133 -231 190 -330 57 -99 124
-216 151 -260 26 -44 56 -96 67 -115 10 -19 54 -96 97 -170 43 -74 119 -207
170 -295 157 -273 307 -531 430 -745 378 -652 402 -699 424 -824 15 -82 14
-207 -3 -291 -62 -319 -327 -576 -646 -625 -89 -14 -5301 -14 -5390 0 -370 57
-653 389 -653 765 1 178 31 268 172 513 43 75 88 153 99 172 37 66 205 355
257 445 29 50 61 106 72 125 11 19 70 121 130 225 102 176 197 341 488 845 62
107 138 240 170 295 90 154 305 525 330 570 13 22 56 96 95 165 40 69 114 197
165 285 136 237 379 657 439 760 29 50 81 140 116 200 199 344 231 391 329
469 162 131 305 178 521 172 103 -3 139 -8 205 -31z"/>
<path d="M3859 5387 c-146 -61 -231 -167 -265 -328 -14 -67 -14 -94 0 -289 9
-118 21 -303 26 -410 6 -107 15 -262 21 -345 5 -82 16 -276 24 -430 27 -510
31 -548 58 -608 29 -64 86 -122 147 -150 69 -32 198 -30 265 5 72 38 126 99
155 178 7 20 16 117 21 230 8 202 31 632 49 900 5 85 14 232 20 325 5 94 15
252 21 352 10 157 9 191 -5 261 -28 138 -105 239 -226 296 -55 26 -79 31 -160
34 -82 2 -103 -1 -151 -21z"/>
<path d="M3874 2496 c-95 -31 -197 -123 -248 -223 -9 -18 -21 -65 -28 -106
-37 -243 153 -467 397 -467 86 0 147 18 217 63 111 71 174 172 184 297 16 182
-71 342 -225 418 -48 23 -70 27 -156 29 -63 2 -115 -2 -141 -11z"/>
</g>
</svg>Replacement for Books Icon -
Compress, upload, and save the customization package.
CSS Components and Customizations
Home Page
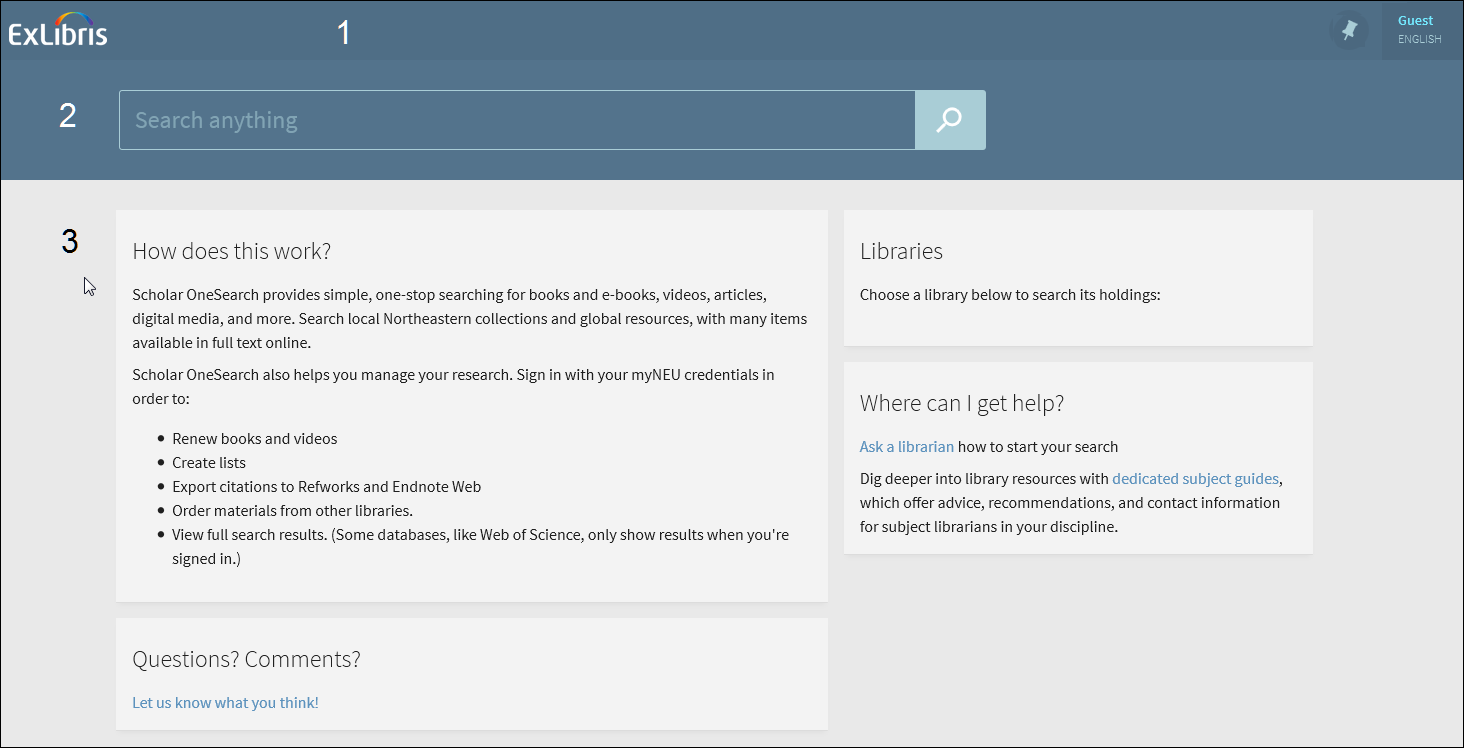
-
.prm-primary-bg.prm-hue1, prm-search-bar.prm-hue1, prm-spinner.prm-hue1.overlay-cover.light-on-dark:after, prm-topbar .top-nav-bar{}
-
.prm-primary-bg, prm-search-bar, prm-spinner.overlay-cover.light-on-dark:after{}
-
view_code/html/home_en_US.html
Brief Results Page
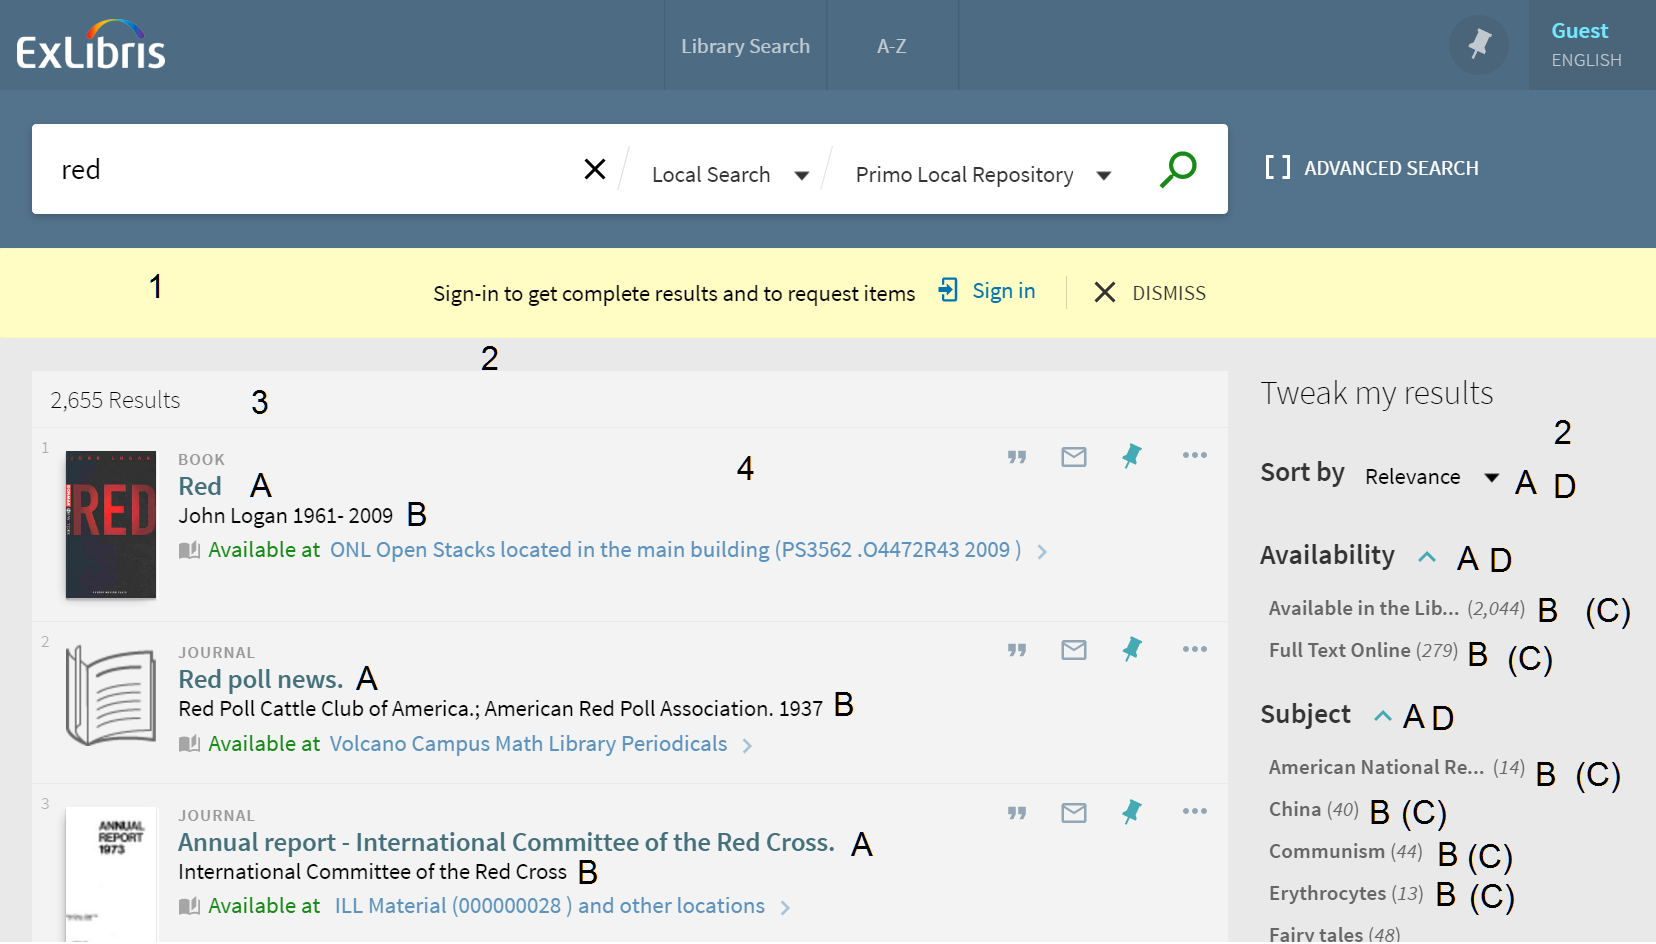
-
.alert-bar{}
-
md-content, md-content.md-primoExplore-theme{}
-
.section-title {}
-
.section-content .md-chips .md-chip strong{}
-
.md-autocomplete-suggestions .suggestion-scope, .text-italic{}
-
.link-alt-color, .section-title prm-icon {}
-
-
prm-search-result-list .results-title {}
 Brief Result Item Components
 -
prm-brief-result-container .list-item-primary-content {}
-
prm-brief-result .item-title{}
-
prm-brief-result .item-detail{}
-
.item-expanded .secondary-content-holder .md-tab:nth-child(2), .item-expanded .secondary-content-holder md-tab-item:nth-child(2){}
-
.item-expanded .secondary-content-holder .md-tab:nth-child(3), .item-expanded .secondary-content-holder md-tab-item:nth-child(3) {}
-
.item-expanded .secondary-content-holder .md-tab:nth-child(4), .item-expanded .secondary-content-holder md-tab-item:nth-child(4) {}
-
.item-expanded .secondary-content-holder .md-tab:nth-child(5), .item-expanded .secondary-content-holder md-tab-item:nth-child(5) {}
-
.item-expanded .secondary-content-holder .md-tab:nth-child(6), .item-expanded .secondary-content-holder md-tab-item:nth-child(6) {}
-
.item-expanded .secondary-content-holder .md-tab:nth-child(7), .item-expanded .secondary-content-holder md-tab-item:nth-child(7) {}
-
.item-expanded .secondary-content-holder .md-tab:nth-child(8), .item-expanded .secondary-content-holder md-tab-item:nth-child(8) {}
-
Hiding the Sign-In Link
Changing the Color of the Versions Link
-
Log on to the Primo Back Office.
-
On the All Code Tables page (Primo Home > Advanced Configuration Wizards > All Code Tables), edit the Results Tile code table under the Front End subsystem.
-
Change the description of the default.nui.frbrversion.found.link code to the following:<font color="green">See all versions</font>
-
Save and deploy your changes.
Full Record Page
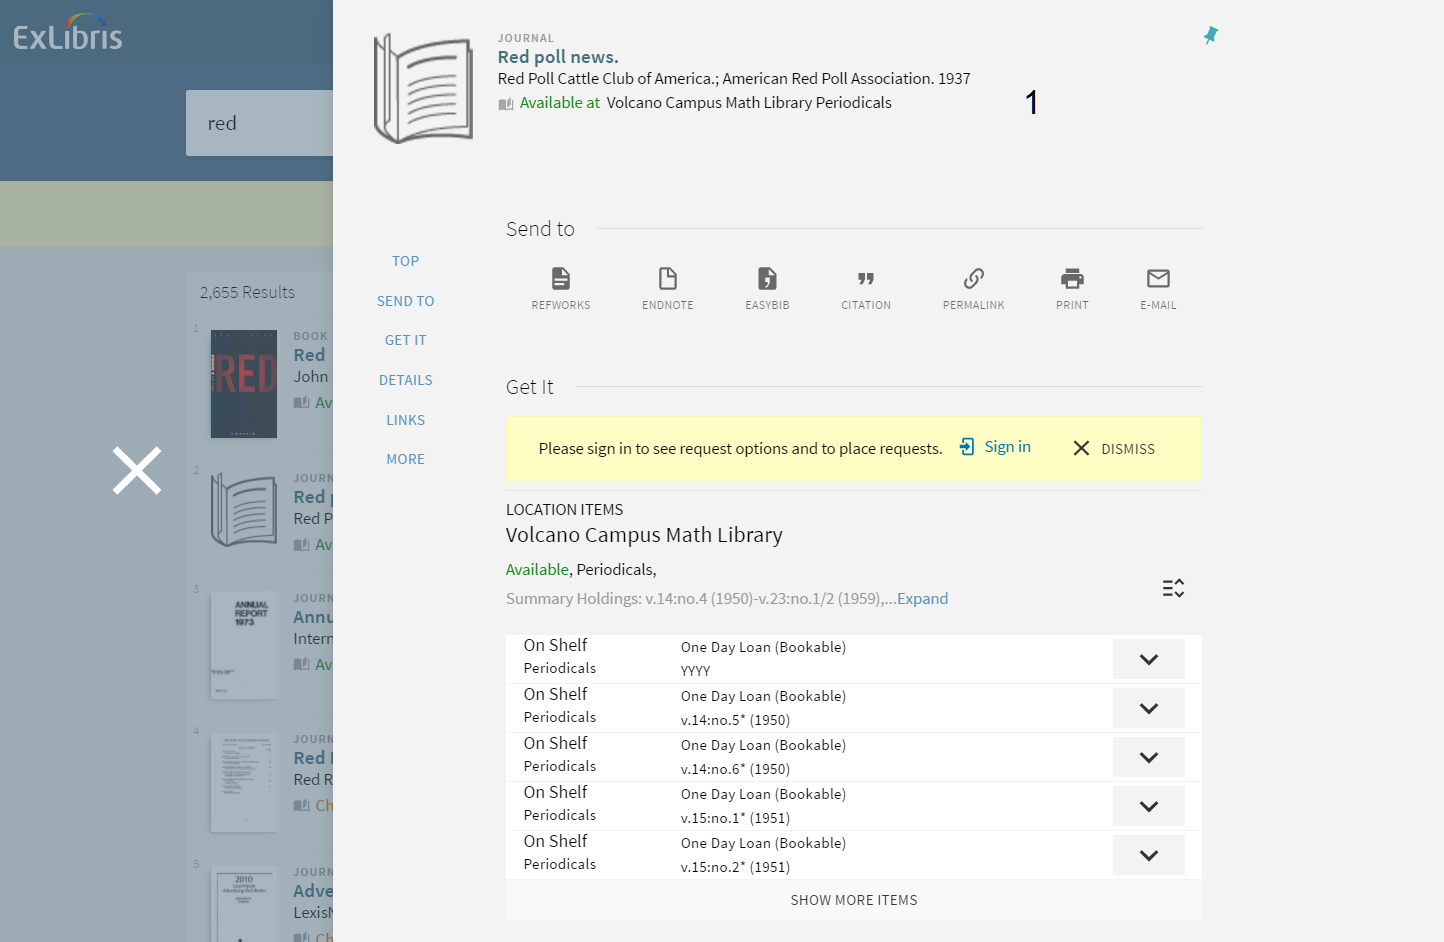
-
prm-full-view prm-brief-result-container{}
Hiding the Virtual Browse Service
Virtual Browse is automatically created, and it is based on the callnumber field in the Browse section of the PNX record.
-
Edit your customization package or create one if you have not already done so. For more information, see Using the UI Customization Package Manager.
-
Add the following lines to your CSS file:
- #virtualBrowse {display:none;}
- button[aria-label="Virtual Browse"]{display:none;}
-
Upload and deploy your modified customization package.
Upper Menu

-
view_code/img/library-logo.png
-
.layout-align-end-center { }
-
prm-topbar .md-button:not(.md-icon-button) {}
Hiding the Language Menu
Disabling Automatic Capitalization of Main Menu Links
Search Bar

-
prm-search-bar{}
-
/* the text color in the search box */input::-webkit-input-placeholder { }input:-moz-placeholder { /* Firefox 18- */}input::-moz-placeholder { /* Firefox 19+ */}input:-ms-input-placeholder {}
-
md-autocomplete-wrap input {}
-
prm-search-bar .simple-search-wrapper .search-actions .md-button {}
-
prm-search-bar .search-switch-buttons .md-button {}
Moving the Facets to the Left Side
My Library Page
Disabling the Institution Panel
For consortia, the option to select an institution was previously provided in a drop-down list at the top of My Library Card and was replaced with the Institution panel on the left side of the page.
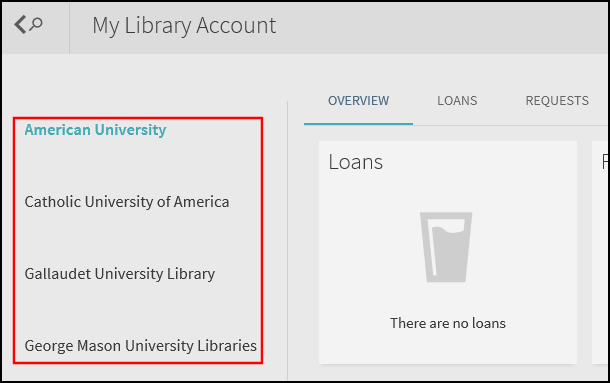
If you prefer the old display, add the following CSS to your customization package:
.institutions-list {display:none;}
prm-linked-user-selector md-input-container {display:block!important;}
Creating a Search Box With Deep Links to the New UI
If you are working with Primo VE, see Creating a Search Box With Deep Links to Primo VE.
-
Create an HTML file and include the following lines, ensuring that you replace the host name, customizable parameters (such as view code), and the fixed parameters (such as bulk size):<html><head><meta http-equiv="Content-Type" content="text/html; charset=UTF-8"><!-- Script that converts the query string into valid parameter --><script type="text/javascript">function searchPrimo() {document.getElementById("primoQuery").value = "any,contains," + document.getElementById("primoQueryTemp").value;document.forms["searchForm"].submit();}</script></head><body><!-- Fill in Highlighted Parameters --><form id="simple" name="searchForm" method="get" target="_self" action="https://<host_name>/primo-explore/search" enctype="application/x-www-form-urlencoded; charset=utf-8" onsubmit="searchPrimo()"><input type="hidden" name="vid" value="<view_code>"><input type="hidden" name="tab" value="<tab_code>"><input type="hidden" name="search_scope" value="<scope_name>"><!-- Fixed parameters --><input type="hidden" name="query" id="primoQuery"><input type="text" id="primoQueryTemp" value="" size="35"><!-- Search Button --><input id="go" title="Search" onclick="searchPrimo()" type="button" value="Search" alt="Search" style="height: 22px; font-size: 12px; font-weight: bold; background: #DE6E17; color: #ffffff; border: 1px solid;"></form></body></html>
Example search query:
https://my-primo.inst.com:1701/primo-explore/search?query=any,contains,herring&tab=primo_central&search_scope=PC&vid=MY_VIEW&lang=en_US&offset=0
The value specified for the tab parameter must all be lowercase even if its definition in the Views Wizard contains any uppercase letters. -
To test the search box, open the HTML file in a browser and perform a search. If you saved the HTML file on a Web server, use the following URL to access the search box:http://<web_server>/<path>/<filename.html>The search box appears as follows:

Creating a Twitter Feed
This procedure creates a link on the home page, which opens your Twitter feed in a new tab.
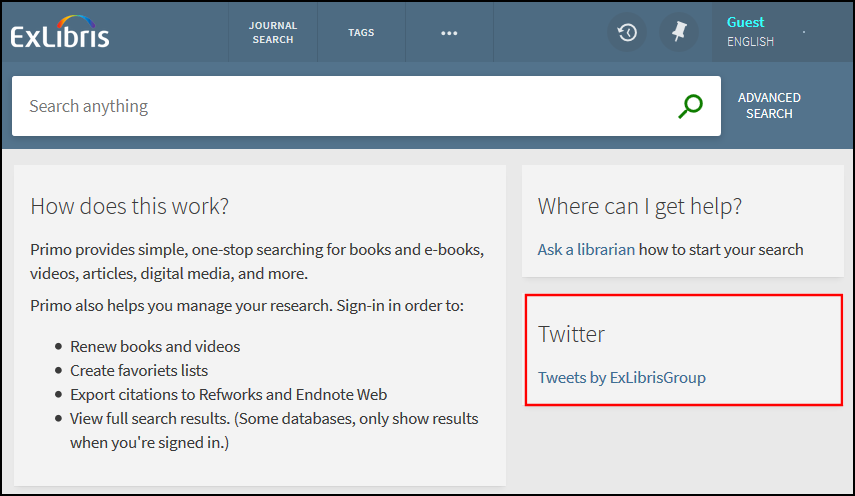
-
Create an HTML link based on your Twitter feed. For details, see https://publish.twitter.com/.
-
Edit the home_en_US.html file and embed the HTML link created in the previous step.
For example:
<div flex-xs flex="40" layout="column">
<md-card class="default-card">
<md-card-title>
<md-card-title-text>
<span class="md-headline">Twitter</span>
</md-card-title-text>
</md-card-title>
<md-card-content><a class="twitter-timeline" href="https://twitter.com/ExLibrisGroup?ref_src=twsrc%5Etfw">Tweets by ExLibrisGroup</a> <script async src="https://platform.twitter.com/widgets.js" charset="utf-8"></script>
</md-card-content>
</md-card>
</div> -
Compress, upload, and deploy your updated customization package. For more information, see Using the UI Customization Package Manager.
Creating a Custom Help Page
Creating and Uploading the Help File
-
Download your view's customization package (see Modifying a View-Level Package).
-
For each language supported, create an HTML help file (using the naming convention mentioned above).
-
Save the files under the html directory of your view's customization package.
-
Compress your view's package and upload it to the server (see Modifying a View-Level Package).
Adding the Help Link to the UI

-
In the Views Wizard (Primo Home > Ongoing Configuration Wizards > Views Wizard), edit your view.
-
Continue to the Tiles Configuration page and edit the Home Page > Main Menu tile.
-
In the Create New Label section, specify the following fields and then click Add:
-
Label – Enter primo_help.If you want to use a help file that is not stored on the Primo Front End server, specify a different Label, such as Help.
-
URL – Leave blank so that the system uses the file that you uploaded with your view's customization package. See Creating and Uploading the Help File.If you want to use a help file that is not stored on the Primo Front server, specify its URL.
-
Link should open in – Specify where the help page will open in the browser. Select either current window or new window/tab.
 Create New Label Section - Main Menu Tile
 -
-
In the Contents of Main Menu Tile section, modify the Label field to change the label that displays in the Main menu of the new UI. This change will update the description for the mainmenu.label.primo_help code in the View Labels code table.
-
Save your changes to the view and deploy your view.
-
If necessary, update the Description column for the following codes in the View Labels code table to modify the label and label description for the help link in the new UI.
-
mainmenu.label.primo_help – Defines the label for the help link in the new UI. You can also update this value by changing the Label field of the Main Menu tile in the Views Wizard.
-
nui.mainmenu.description.primo_help – Defines the description of the help link in the new UI.
-
-
Deploy your changes to the code table.
Disabling Short Permalinks in the New UI
By default, the Send To action Permalink, which displays on both the Brief and Full Display pages, creates a shortened URL that includes the record ID and a key:
For example:
When the URL is entered in a browser, Primo will convert the URL to its full URL and display the record's Full Display page. The following is an example of a long permalink:
This enhancement is enabled by default. To revert to the long format, add the following lines to the CSS file in your customization package:
.__xs prm-permalink .layout-column>.long-permalink, prm-permalink .layout-column>.long-permalink {
display: inherit;
}
.__xs prm-permalink .layout-column>.short-permalink, prm-permalink .layout-column>.short-permalink {
display: none;
}
Customizing the RefWorks Link in the Primo User Area Menu
When the RefWorks code is enabled in the Actions List mapping table, the RefWorks link is enabled by default in the Primo User Area Menu.
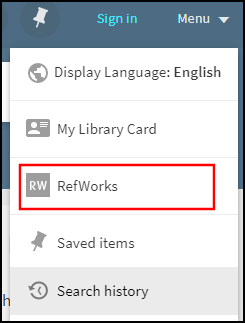
You can perform the following configurations to customize it:
-
Update the eshelf.menu.refworks code in the User Tile Labels code table to modify the link's display label.
-
Hide the link in the Primo User Area menu by setting the following class selectors in your custom CSS file:
.my-refworks-ctm {
display: none;
}
.my-refworks-separator-ctm {
display: none;
}
Configuring the Page Title in the New UI
For accessibility, the page titles include the title of the specific page in Primo and additional information specific to the page's results. For example:
add image
The following table lists the expected title and configuration information for each page:
| Page | Title Format and Code Table Information |
|---|---|
|
Library Search |
Title Format (before search): default.main.title
Title Format (after search): default.main.title – <search term>
Title Format (after selecting record): {{recordTitle}} - {{institutionName}}
Header/Footer Tiles code table – default.main.title: Primo by Ex Libris
|
|
Full Display of Record |
Title Format (after selecting record): {{recordTitle}} - {{institutionName}}
|
|
My Favorites > Saved Records |
Title Format: default.main.title - default.nui.favorites.header - default.nui.favorites.records.tabheader
Header/Footer Tiles code table – default.main.title: Primo by Ex Libris
Favorites Labels code table –
|
|
My Favorites > Search History |
Title Format: default.main.title - default.nui.favorites.header - default.nui.favorites.records.tabheader
Header/Footer Tiles code table – default.main.title: Primo by Ex Libris
Favorites Labels code table –
|
|
My Favorites > Saved Searches |
Title Format: default.main.title - default.nui.favorites.header - default.nui.favorites.records.tabheader
Header/Footer Tiles code table – default.main.title: Primo by Ex Libris
Favorites Labels code table –
|
|
Journal Search |
Title Format (before search): default.nui.mainmenu.label.journalsearch
Title Format (after search): default.nui.mainmenu.label.journalsearch – <search term>
View Labels code table – default.nui.mainmenu.label.journalsearch: Journal Search
|
|
Browse Search |
Title Format (before search): default.nui.mainmenu.label.browse
Title Format (after search): default.nui.mainmenu.label.browse – <search term>
View Labels code table – default.nui.mainmenu.label.browse: Browse
|
|
Tags |
Title Format (before search): default.nui.mainmenu.label.tags
Title Format (after search): default.nui.mainmenu.label.tags – <search term>
Tags Tile code table – default.nui.mainmenu.label.tags: TAGS
|
|
Fetch Items (Citation Linker) |
Title Format: default.nui.mainmenu.label.citationlinker
View Labels code table – default.nui.mainmenu.label.citationlinker: Fetch Item
|
|
Database Search |
Title Format (before search): default.nui.mainmenu.label.databasesearch
Title Format (after search): default.nui.mainmenu.label.databasesearch – <search term>
View Labels code table – default.nui.mainmenu.label.databasesearch: Database Search
|
|
Newspaper Search |
Title Format (before search): default.nui.mainmenu.label.newspapers_search
Title Format (after search): default.nui.mainmenu.label.newspapers_search – <search term>
View Labels code table – default.nui.mainmenu.label.newspapers_search: Newspapers
|
|
Citation Path |
Title Format (after clicking a Cited or Cited by icon): default.nui.citation_trail.link.header - <search term>
Results Tile code table – default.nui.citation_trail.link.header: Your current citation path
|
|
My Library Card > Overview |
Title Format: default.main.title - menu.myaccount.my_library_card - nui.overview.header
Header/Footer Tiles code table – default.main.title: Primo by Ex Libris
User Space Menu code table – default.menu.myaccount.my_library_card: My Library Card
Library Card Labels code table – default.nui.overview.header: Overview
|
|
My Library Card > Loans |
Title Format: default.main.title - menu.myaccount.my_library_card - nui.loans.header
Header/Footer Tiles code table – default.main.title: Primo by Ex Libris
User Space Menu code table – default.menu.myaccount.my_library_card: My Library Card
Library Card Labels code table – default.nui.loans.header: Loans
|
|
My Library Card > Requests |
Title Format: default.main.title - menu.myaccount.my_library_card - nui.requests.header
Header/Footer Tiles code table – default.main.title: Primo by Ex Libris
User Space Menu code table – default.menu.myaccount.my_library_card: My Library Card
Library Card Labels code table – default.nui.requests.header: Requests
|
|
My Library Card > Fines & Fees |
Title Format: default.main.title - menu.myaccount.my_library_card - nui.fines.header
Header/Footer Tiles code table – default.main.title: Primo by Ex Libris
User Space Menu code table – default.menu.myaccount.my_library_card: My Library Card
Library Card Labels code table – default.nui.fines.header: Fine + fees
|
|
My Library Card > Blocks & Messages |
Title Format: default.main.title - menu.myaccount.my_library_card - nui.blocks.header
Header/Footer Tiles code table – default.main.title: Primo by Ex Libris
User Space Menu code table – default.menu.myaccount.my_library_card: My Library Card
Library Card Labels code table – default.nui.blocks.header: Blocks + messages
|
|
My Library Card > Personal Details |
Title Format: default.main.title - menu.myaccount.my_library_card - nui.details.header
Header/Footer Tiles code table – default.main.title: Primo by Ex Libris
User Space Menu code table – default.menu.myaccount.my_library_card: My Library Card
Library Card Labels code table – default.nui.details.header: Personal details
|

