
Integrating a Non-Alma Member's Inventory from a Central System into a Bridge Institution Managed by a Network Zone
For use cases where an Alma Network has non-Alma members that utilize an Aleph central catalog and want the Network Zone inventory to represent all members, the Aleph Bridge Integration profile is designed to integrate the non-Alma member New for January! physical inventory (holdings and items) into bridge members in the Alma Network Zone. See Configuring the Aleph Bridge Integration Profile for more information.
This implementation assumes that the Aleph central catalog can publish the inventory information attached to a bibliographic record, in dedicated fields such as 200, OWN, and Z30. It also assumes that the ADM code that identifies the member is available for each holdings or item record in order to import the inventory to the appropriate bridge member. The inventory from the Aleph central catalog is published to a single FTP location from where the Aleph Bridge Integration profile is able to import and process the files. Note that Alma expects that only the existing inventory of each member will be published each time, and will do a full replace of the New for January! physical inventory that previously existed in the Alma bridge institution with the physical inventory that was published from the Aleph bridge (since electronic inventory will possibly be created directly in the IZ bridge and not in Aleph).
Configuring the Aleph Bridge Integration Profile
In order to integrate a non-Alma member's inventory from a central Aleph system into a bridge institution, an Aleph Bridge Integration profile must be created in the Network Zone. In this use case, the Network Zone manages the process.
- From the Integration Profile List page (Configuration Menu > General > External Systems > Integration Profiles), select Add Integration Profile.
- Enter a Code and Name for the integration profile.
- Select Aleph Bridge Integration from the Integration Type drop-down list.
- Select Next. The next page of the Integration Profile configuration appears.
-
Complete the integration profile using the table below for more information.
Aleph Bridge Integration Profile Field Description Inventory Import Configuration Active
Select Active when you are ready to use this as an active profile.Schedule Select the schedule that you prefer for running the Aleph Bridge Integration profile. You may also choose to run this job manually. See Run for more information. FTP Configuration Select the FTP configuration from the drop-down list that identifies where the published files from the Aleph central catalog are located. External System Prefix
Enter the prefix that identifies the external system of the non-Alma records. In Alma's bibliographic records, this prefix is stored in the 035 field to distinguish it as a non-Alma record.
Aleph Code Type Select whether to map the Alma institution codes to Aleph sub-library codes or to Aleph ADM codes:
- Aleph sub-library code - Use the Aleph sub-library codes to map to the Alma institution codes. This may be used by Aleph customers were "non-Aleph" local items are on the holding record (not the ADM), resulting in a publishing file with holding library instead of ADM library.
Note: If there are many sub-libraries, instead of mapping each sub-library on its own row, you can enter only the first letter of the institution when indicating the Aleph codes. For example, in the below, each sub-library that starts with 'D' is mapped to Alma institution code 'WST'. The mapping is done based on best-match method, meaning that if a an exact code is specified, the system will first look for and map the exact code, and then will map all the other matches.

- Aleph ADM Code - Use the ADM codes to map Aleph library ADM codes to an Alma shadow member institution in the Alma Network Zone. Use this configuration option when there are several Aleph libraries that each have a unique ADM code but are mapped to the same Alma bridge institution.
This table overrides the Network Zone Setup mapping table configured by Ex Libris that maps one external system member code (such as an Aleph institution) to an Alma bridge institution.
To enter the code mapping for libraries:- Select the desired option and then select the Aleph Code to Alma Institution Code button.
- In the table that opens, select Add Row.
- Enter the Sub-library or ADM Code for a library and the Alma Institution Code (configured for the institution by Ex Libris), and select Add Row.
- Repeat for each library that requires a unique code.
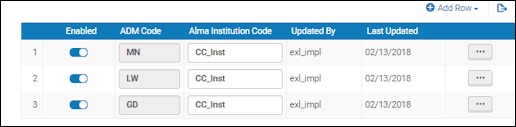
- Select Customize to save your mapping.
Run After you have configured and saved the Aleph Bridge Integration profile, you can return to this profile and use Run to manually run the integration process. Holdings Mapping Holdings Fields Mapping
Select Holdings Fields Mapping to create the holdings mapping from the FTP file(s) source to the Alma target.
On the Mapping Table page that appears, select Add Row, and enter the following information:
- Source Tag
- Source Subfield
- Source settings for the first and second indicator (separated by a comma)
For indicators that are to be left blank, use the hash tag (#). - Target Tag
- Target Subfield
- Target settings for the first and second indicator (separated by a comma)For indicators that are to be left blank, use the hash tag (#).
Select Add Row and repeat the Add Row procedure for each tag that needs to be mapped.
When you are finished adding rows, select Customize.
Item Mapping Since items in Alma are created with a fixed form, the parameters in the Item Mapping section directly correspond to the parameters in Alma's Physical Item Editor. As a result, the only thing that needs to be indicated is the source subfield (from the Aleph central catalog file) for each of the following parameters:
- Material Type subfield
- Item ID subfield
- Library subfield
- Location subfield
- Barcode subfield
- Item policy subfield
- Item Call Number subfield
- Inventory number subfield
- Inventory date subfield
- Description subfield
- Holdings ID subfield
- Institution Code
- Item date subfield (saved to the modification date in Alma)
Default
(material type)
Specify the material type that you want identified as the default in situations where the received item does not have a material type specified.
Material Type Mapping
Select Material Type Mapping and enter the Aleph material type label that will be found in the FTP file(s). When the record is stored in Alma, it will be stored with the corresponding Alma material type identification. Three Aleph Material Type columns are provided for you to enter three different possible material types that may occur in the FTP file(s) for the one Alma material type identified in this mapping table.
- Aleph sub-library code - Use the Aleph sub-library codes to map to the Alma institution codes. This may be used by Aleph customers were "non-Aleph" local items are on the holding record (not the ADM), resulting in a publishing file with holding library instead of ADM library.
- Select Save.
Aleph Bridge Integration Job Report
When you run the Aleph Bridge Integration job, a report is created that contains the following information:
- Institution Name
- Processed holdings/items – Count of processed holdings/items by the import job.
- Failed holdings – Count of holdings failed to import to Alma.
- Failed items – Count of items failed to import to Alma.
- Failed record details – Each failed holdings and/or item record is identified by member code and record ID. An error message is provided for each failed record. Optionally, this event information can be exported to an Excel file.
- Open the Monitor Jobs page (Admin > Monitor Jobs) and select the History tab.
- Select Report from the row actions list for the Aleph Bridge Integration report.
-
Select the Member bar to expand the report results to view the results for each bridge institution (member) in Alma.
 Aleph Bridge Integration Report Results
 -
Select the Failed records row action. The Job Events section appears with links to the details for the holdings and item records that failed and an option to export the job events to an Excel file.
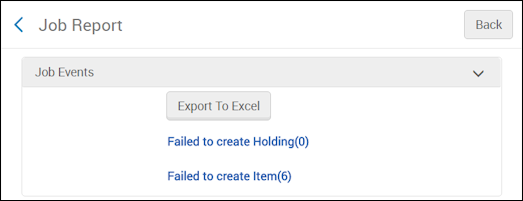 Job Events
 - Select the links to view the record failure details and/or export the event information to an Excel file.
.