
SAML-Based Single Sign-On/Sign-Off
- General System Administrator
Alma supports the SAML 2.0 Web Browser SSO profile. This enables Alma to exchange authentication and authorization information, allowing a user to sign in or out of an external system and be automatically signed in or out of Alma, or vice versa.
Following Alma profile activation and third-party configuration, your institution’s support staff changes the Alma login shortcut to the following URL (see Your Alma Domain Names): https://<Alma domain>/SAML.
For a detailed overview of SAML-based SSO, see https://developers.exlibrisgroup.com/alma/integrations/user-management/authentication/inst_idp/saml.
- On the Integration Profile List page (Configuration Menu > General > External Systems > Integration Profiles), select Add Integration Profile. The first page of the integration profile wizard appears.
- Enter a code and name for the integration profile.
- Select the SAML option from the "Integration Type" dropdown list.
- From the "System dropdown list", select the system to be used for authentication, such as 'Shibboleth'.
-
Select Next. You are taken to the next page.
 SAML Definitions
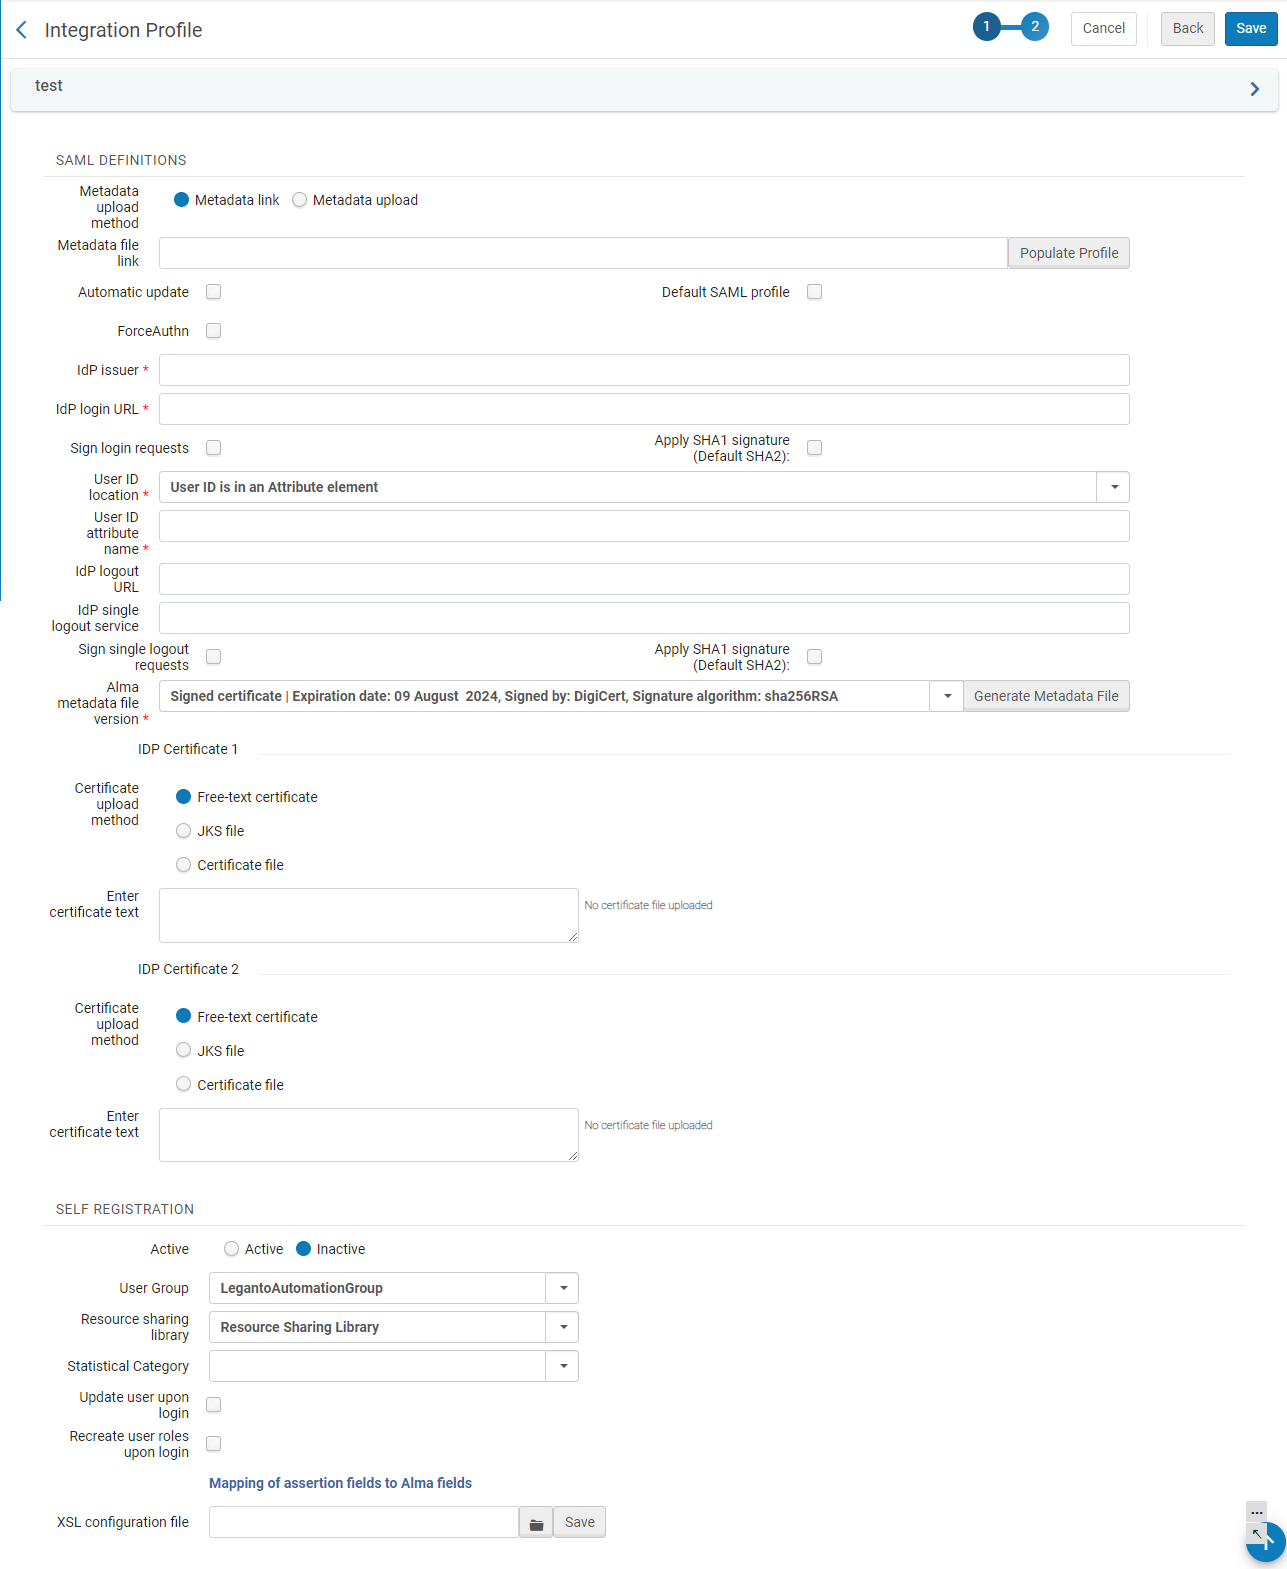
On this page, enter the following information.
SAML Integration Profile page - Action tab Field Description Metadata Upload method
You can populate the profile information from metadata. To do that, select the Metadata Link option and provide the location of the link in the Metadata file link field. To use a metadata upload, select the Metadata upload option and select the file in the Upload IdP metadata file field. Metadata file link
Automatic update Select for Alma to facilitate a rollover process by managing two IdP certificates simultaneously. This enables configuring the Integration profile to fetch the metadata when it is modified by the IdP. Enabling Automatic update will override the information in the Integration Profile every 2 hours in a similar way it is done when clicking on the "Populate Profile" button. It is recommended to test if SSO works well before applying it.
Automatically populating the profile is currently only supported for self-signing IdP certificates. If your IdP uses a chain-of-trust certificate for signing, it is required to upload a JKS file manually.
Default SAML profile
Select to configure this profile as the default.
To use a profile that is not the default, use the /SAML/idpCode/[profile code] suffix in the Alma URL.
ForceAuthN Select to force authentication when Alma authenticates users via SAML. For more information on SAML ForceAuthN, see here.
When this checkbox is not selected, then when Alma authenticates users via SAML, it does so directly through the institutional IdP, thus providing end users with an SSO experience.
IdP Issuer If the profile was not automatically populated with metadata (in the above fields), enter the settings for the IdP issuer, IdP Login URL, User ID Location, User ID Attribute Name, IdP Logout URL, and IdP Single Logout Service, and Sign Single Logout Requests.
For more information on these fields, see https://developers.exlibrisgroup.com/alma/integrations/user-management/authentication/inst_idp/saml.
IdP Login URL IdP ID location User ID attribute name IdP logout URL IdP single logout service Sign single logout requests Apply SHA1 signature (Default SHA2) Select Apply SHA1 signature (Default SHA2) to change the signature of the profile to SHA1 (also called SHA128) signature, in order to sign the logout requests with this signature.
For profiles created after July 2020, the default is SHA2 (also called SHA256), but you can change that to SHA1, if needed.
For profiles existing before SHA2 was introduced in July 2020, the default is SHA1, but you can change that to SHA2, if needed.Alma metadata file version Select an Alma metadata file version. When creating a new profile, two options are available, the self-signed Version 20XX and Signed certificate. When editing an existing profile, three options are available, the self-signed Version 20XX, Signed certificate, and whichever certificate you were using previously. It is important to note the expiration date when choosing a certificate and make sure to replace it prior to that date If you opt to use a previous certificate, Alma continues to accept it, even after the expiration date. If you edit an existing profile and select a new certificate, once you save the profile, the previous certificate becomes unavailable. Before changing your certificate, you must check with your IT department. IdP Certificate 1 / 2 Alma enables holding two certificates simultaneously and tries to authenticate using both certificates. This is useful when a SAML IdP changes their certificate (for security reasons). The certificate needs to be updated on the integration profile. Holding two certificates simultaneously allows the institution to add the new certificate ahead of time, without removing the old certificate until after the IdP has made the switch. Holding only one certificate can cause downtime if the certificate is not updated at the same time on both systems, since then Alma does not trust the response from the IdP that was signed with the "wrong" certificate.
The certificates are cyclic: adding a 3rd certificate removes the 1st certificate, and the new certificate becomes the 2nd). Uploading a second certificate is not mandatory.
For each certificate, in Certificate upload method, select the type of certificate to upload (see https://developers.exlibrisgroup.com/alma/integrations/user-management/authentication/inst_idp/saml). Alma accepts file uploads, free-text certificate entry, or JKS files. If JKS file or Free-text certificate file is selected, a field will be displayed to select the file from the user's file system. If Free-text certificate is selected, a field is displayed to accept the text of the certificate. A note beside the field indicates if a certificate has already been uploaded.
As of January 1, 2017, Alma no longer supports certificates using the MD5withRSA encryption algorithm. For more information, see https://blogs.oracle.com/java-platform-group/entry/strengthening_signatures.
Active When an authenticated SAML user logs in that does not have an existing Alma user, if you want a new Alma user to be automatically created, select Active in the Self Registration section. - Enter the User Group, Resource Sharing Library, and Statistical Category that you want to have assigned to the automatically created user.
- You can also define the mapping of SAML attributes to their corresponding user fields in Alma by selecting the Mapping of assertion fields to Alma fields link.
- Enter the Alma field name in the Code field. Enter the SAML assertion code in the Description.
- Select Customize.
User Group Resource Sharing library Statistical Category Update user upon login Recreate user roles upon login Mapping of assertion fields to Alma fields XSL configuration file - Select Save.
Testing Authentication on SAML Integration Profile
You can test your SAML integration directly from the SAML configuration page. This removes the need to log out from Alma and log in again, and if the authentication fails, provides a clear indication of what went wrong.
Before testing the SAML integration profile, save the profile! This enables you to revert back to the existing profile (if needed). If you do not save the profile, Alma exchanges the existing profile with the new profile version.
- Once you filled in all the relevant information on the SAML integration profile, click the Test button. A popup window opens.
- In the popup window, select the product from the list of your institution's available products. This generates a test link to the IdP set in the integration profile.
If you work with bc.alma and want to configure the same domain – log in to na03.alma instead.

- Copy this link and paste it to a different browser (or, if you are working with Chrome, to an Incognito tab). Your SAML login page opens.
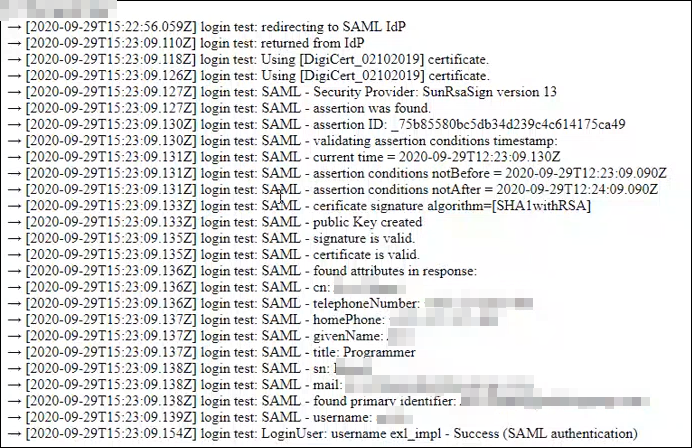
- Submit your credentials. You are redirected to a new page showing the authentication result and additional messages explaining what went on and possibly what went wrong.
The credentials are used only for the test and do not actually log in the user whose credentials were entered here.
- Close the test window and return to Alma. If needed, update the integration profile/IdP and test again. If no changes are necessary, save the profile.
Replacing an Expiring Certificate
If you need to replace the expiring 2025 self-signed certificate, please refer to the following guide.
SAML SSO usually works even with expired certificates. Some IdPs enforce non-expired certificates (or can be configured to do so), and Ex Libris ensures that up-to-date certificates are added, enabling customers with those IdPs to update the certificate.
Alma Metadata File Version:
- Access the Integration Profile List screen (Alma Configuration > General > External Systems > Integration Profiles).
- In the Integration Type drop-down menu, select SAML.

- Select an existing Integration Profile and in the row actions button, select Edit.
- In the Integration Profile screen, select the Actions tab.
- In the Alma metadata file version drop-menu, select a new certificate.
- Select the Generate Metadata File button to download the file (or get a link pointing to it). The Metadata is to be uploaded to the IdP.
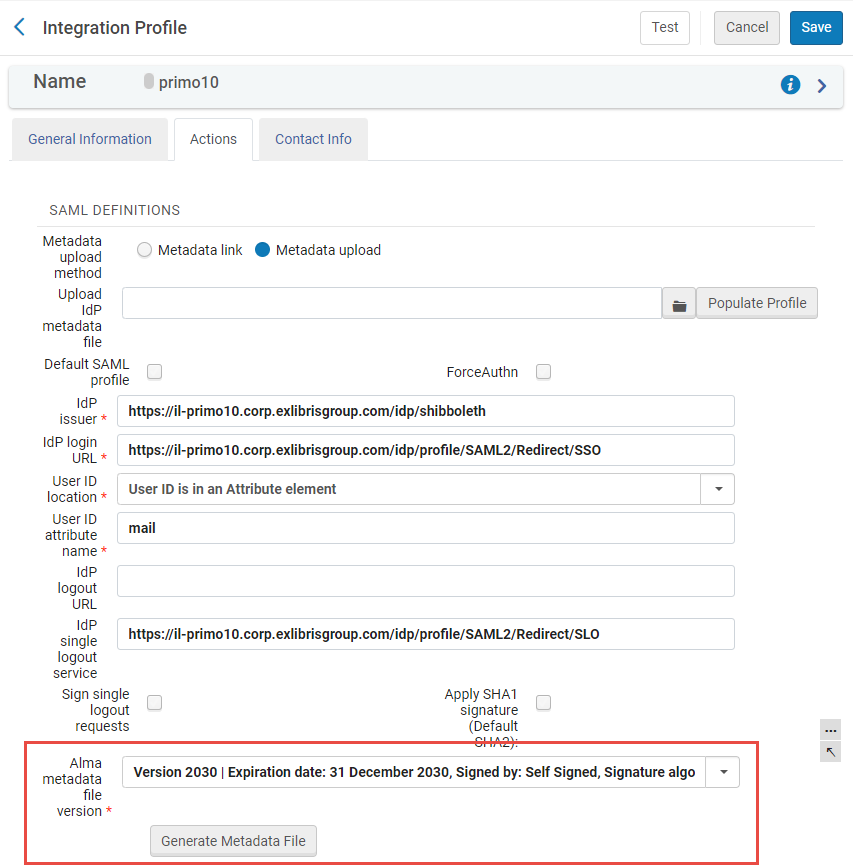 Alma metadata file version drop menu in the Integration Profile screen
To avoid downtime, the changes in Alma and in the IdP should be done at the same time! Coordinate with your IT the exact time the change is done in Alma and the IdP.
Add Additional Certificate:
If you would like to change the certificate without coordinating the process indicated above (Alma metadata file version), complete the following procedures:
Each step can be done at a time convenient to you (BUT, before the old certificate expires).
Users can revert to the previously signed certificate by removing the new certificate. For instance, the newly added certificate (e.g. IdP Certificate 1) and the previously signed certificate (e.g. IdP Certificate 2) are loaded to Alma. Simply remove IdP Certificate 1 by using the Remove Certificate ( ) button.
- In the Integration Profile screen > Actions tab, select the Add additional certificate button. Another dropdown is displayed enabling you to select the new certificate. Select Save.

- Generate a metadata file (that includes both certificates) and upload it to the IdP.
- Remove the old certificate from Alma and select Save.
- Again, generate the metadata file from Alma (that now includes only the new certificate) and upload it to the IdP.
Replacing an IdP Signing Certificate
This section is relevant only if your institution holds only one certificate in the "IdP Certificate 1 / 2" section of the integration profile. If both certificates were uploaded, then holding two certificates simultaneously allows the institution to add the new certificate ahead of time, without removing the old certificate until after the IdP has made the switch, refer to Automatic Rollover of an IdP Signing Certificate below.
If the IdP signing certificate on your Alma SAML profile is about to change, upload the new certificate using one of the three supported methods:
- Free-text certificate,
- Certificate file,
- JKS file. JKS is required for chain of trust certificates.
Make sure to perform this change and click Save at the same time that the IdP switches over to the new certificate. Otherwise, SAML authentication will fail during the interval.
Switching to a newer signing certificate automatically, without updating the SAML profile in Alma, might cause a system-down.
Automatic Rollover of an IdP Signing Certificate
- Verify the Integration profile is configured to update automatically and that the link is valid.
- Configure an additional certificate in the IdP.
- Wait for Alma (and other SPs if they exist) to read the new metadata.
- Remove the old certificate from the IdP.