
Dashboard Setup
For links to online help pages related to collaborative networks, see Collaborative Networks.
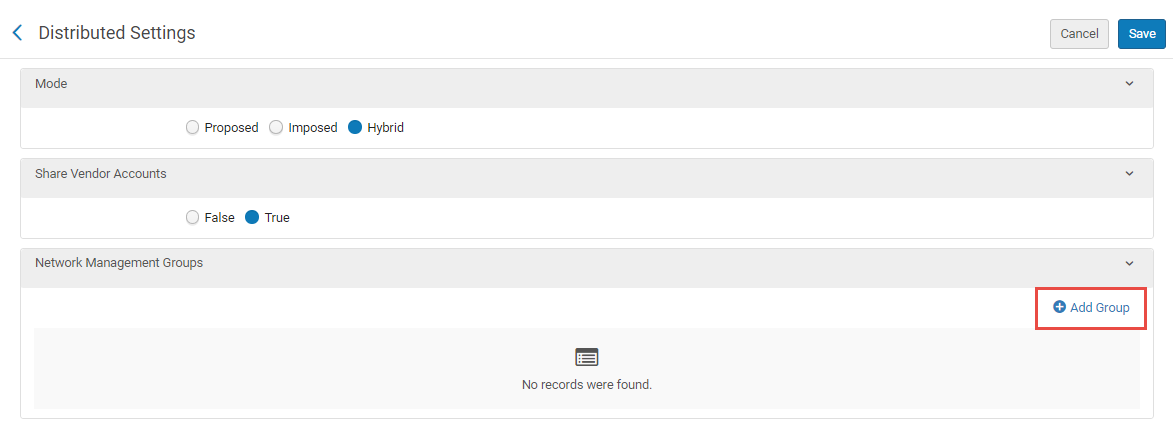
The dashboard is only visible at the Network Zone level and includes a link to "Distributed Settings," where operators can define:
- Distribution Modes: Proposed (default), Imposed, and Hybrid.
- Shared Vendor Accounts: This enables distribution of acquisition rules (True/False).
- Group Settings: Group multiple Institution Zones for distribution purposes, with group names available in dropdown for Distribute All or Distribute Selected actions.
Distribution Modes
Network Zone administrators can distribute the configuration alterations in three different modes:
- Proposed (default) - any configuration alterations (by the network administrator) are not demanded, but proposed. If any member has made customizations or changes to the out of box configurations in their environment, the Network Zone administrator's proposed alterations will NOT take effect.
- Imposed - any configuration alterations (by the network administrator) ARE demanded. Regardless of any customizations or changes to the out of the box configurations in their environment, the Network Zone administrator's imposed alterations will override any member configurations.
Imposing configuration changes on members by Network zone administrators overrides and removes any existing customizations the members defined. All member customization settings will be deleted, and this process cannot be reversed. Member configurations will now match the Network settings, but only for the distributed configurations.
- Hybrid - enables the Network Zone administrator to select either the proposed or imposed mode during the distribution process.
To access and select the desired mode:
- Go to: Configuration Menu > Network Zone > Distributed Settings. The Distributed Settings screen is displayed in the right sliding panel.
- In the Mode drawer, select the desired distribution mode: Proposed, Imposed, or Hybrid.
- Select Save.

Distributed Settings
Shared Vendor Accounts
Acquisition rule configurations include vendor data that is available in the Network Zone for some consortia but is unnecessary for its members. When distributing such a configuration, vendor data might be included as part of the configuration.
- Share Vendor Accounts is False, the distribution buttons will not be available for the Acquisition rule configurations.
- Share Vendor Account is True, the distribution buttons are available for the Acquisition rule configurations. In this case, the distribution process can be run and it does also create the missing information (for instance Vendor data) at the member institution.

Share Vendor Accounts Setup
Creating Network Management Groups
Instead of Network Zone administrators selecting members individually (one-by-one) to distribute the configuration alterations, they can create groups to simplify the distribution process. A group comprises of any number or subset of members that Network zone administrators define for the group. For instance, a Network zone has 60 members. Twenty members are large establishments, ten are medium establishments and the remaining thirty are small establishments. The groups: Large, Medium, and Small can be created to contain only those establishments for the relative group. Network Zone administrators can select the group when they want to distribute the configuration settings. Only members in that selected group will receive the altered configurations.
To create a Group:
- Go to: Configuration Menu > Network Zone > Distributed Settings. The Distributed Settings screen is displayed in the right sliding panel.
- In the Network Management Groups drawer, select
 Add Group.
 Adding a Network Group
 - In the Add Group window, define a Group Name (mandatory) and a Group Description (optional).
 Add Group window
 - Select Add and Close.
The group name is created and is displayed in the Network Management Groups drawer. Group Name Created in Network Management Groups Drawer
 - In the desired group's row, click the row actions button (
 ) and select Edit.
The Networks Management Group Details window displays. - In the Add another member drawer, click in the field and either select the member(s) listed in the drop menu or type the individual member's name to add them to the group.
Multi-selection is enabled. Add Another Member Drawer
 - When all of the desired members appear in the Add another member drawer, select Save.
The group is created with the members defined.