Rosetta-Primo Integration Guide
Introduction
This guide describes the integration process between Rosetta and Primo and specifies the steps for configuring each system.
The integration between Rosetta and Primo uses the Publishing module of Rosetta, which allows the institution to publish its content in order to achieve the following:
- Allow end users to search discovery systems (through the Internet) and view digital content that is stored in Rosetta.
- Share the metadata about objects that are stored in Rosetta with cataloging systems.
- Publish full-text from Rosetta to Primo. For more information, see the Developer's Network.
Rosetta-Alma customers should publish only from Alma and not from Rosetta. For information on publishing from Primo VE, see Integration Between Rosetta and Primo VE.
Overview of Rosetta
This section describes the various components of Rosetta, which are used to export sets of digital content to Primo.
Publishing Module
The Publishing module consists of three main entities:
-
Publishing Set – Rosetta sets that are used as the population for publishing.
-
Publishing Profile – The technical definitions for the Publishing module. Each profile includes:
-
Converter – The type of conversion that is used. (Conversion from the IE structure to a different structure. For example, from DC within METS to OAI-DC)
-
Target – The physical location where the published IEs are written.
-
-
Publishing Configuration – A combination of a publishing set and a publishing profile creates an entity called the publishing configuration. Each publishing configuration has a name and description. For example, publishing from Rosetta to Primo is defined in one publishing configuration, while publishing from Rosetta to Google is defined in another publishing configuration.
Publishing Processes
The main purpose of the publishing processes is to allow other systems to harvest the descriptive metadata of the intellectual entities stored in Rosetta so that their end users will be able to search and discover them. The initial publishing, according to the publishing configurations, is done once by converting all of the IEs that are part of the publishing sets and storing them in the designated location that is defined as the target.
The following processes are designed for maintaining the synchronization between the data in the permanent repository and the data in the publishing target (file system or database table):
-
Publishing Configuration Synchronization – This process performs the publishing according to the modified publishing configuration if the data has been modified — for example, a new set was added to the publishing configuration or the publishing profile was removed and a new profile was associated with the configuration.
-
Publishing Set Comparison – This process performs the publishing in case there is a change in the population of a set or a modification of an IE that belongs to a set that is associated with a publishing configuration.
These maintenance processes are batch processes that run every night to prevent system overload during business hours.
Manual Publishing Activities
Rosetta allows users (system administrators) to do the following:
-
Create a set that can be associated with a publishing configuration.
-
Create publishing configurations by associating a set with a publishing profile.
-
Create a publishing profile by adding a new converter and/or a target plug-in (such as an OAI converter and an OAI target).For publishing to Primo there is already an existing profile that is based on the OAI protocol.
-
Update publishing configuration by adding or removing a set or a profile from the configuration.It is not recommended to have more than one publishing profile per publishing configuration.
-
Perform manual synchronization. After updating a publishing configuration, you can perform the publishing process, based on the new configuration. This option is available only after the configuration is modified.This action is not recommended during business hours because it might affect the system’s performance.
Publishing and Access Rights
According to Rosetta’s data model, access rights are defined separately from the IEs and each access rights policy can be shared by multiple IEs. Therefore, changes made to the access rights definition itself will not cause re-publishing of the IE because nothing has changed within the IE. (It has the same access rights policy.)
This implies that Primo will not be able to determine whether the user is authorized to deliver the IE until it is called by the Delivery module in Rosetta.
Configuring Rosetta
This section describes the configuration that is required in Rosetta in order to publish to Primo.
Detailed information on the Rosetta publishing configuration process can be found in the Rosetta Staff User’s Guide.
To configure Rosetta to publish to Primo:
- Create a publishing configuration:
- From Data Management > Manage Sets and Processes > Publishing Configuration, select Add Configuration.
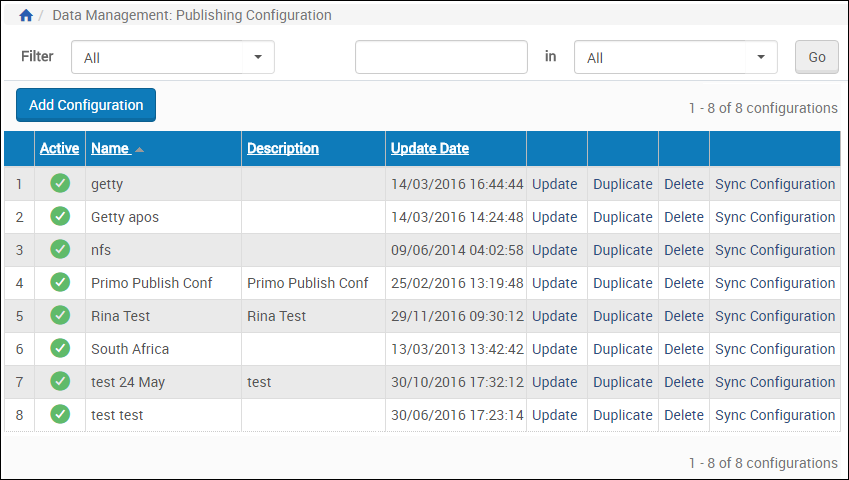 Publishing Configuration ListThe following appears:
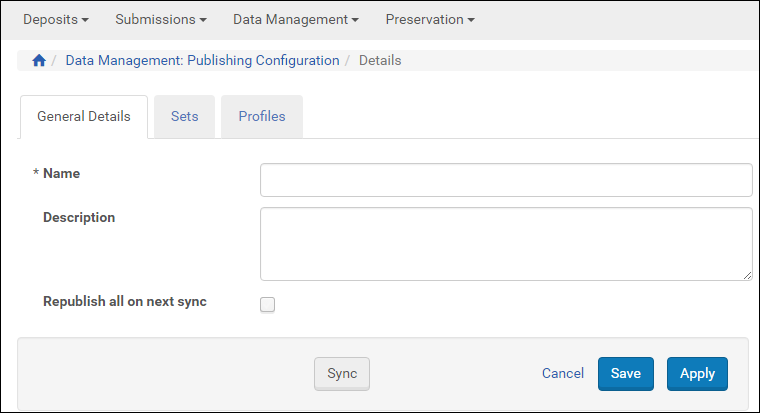 Publishing Configuration - General Details
 - Fill in a name and description of the publishing configuration.
- Select Republish all on next sync to republish all records in the set whether or not they have been updated since the last publishing job.
- From Data Management > Manage Sets and Processes > Publishing Configuration, select Add Configuration.
- Create a publishing set:
- Select the Sets tab. The following appears:
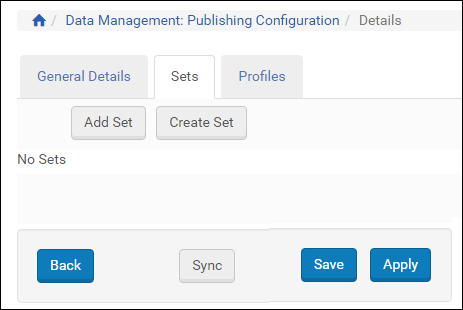 Sets Tab
 - Click Add Set to select an existing set, or click Create Set to create a new set that should be published as part of the Primo publishing configuration.
To create a set of all IEs, create a logical set with the SIP ID equal to or greater than 0.
- Select the Sets tab. The following appears:
- In the Profiles tab, there should be a profile that includes the standard OAI converter (IEToOAI-Converter or XSLConverterPlugin if you want to use your own xsl) and OAI target (OAIPublisherPlugin). If there is no such profile, create one:
- Select the Profiles tab. The following appears:
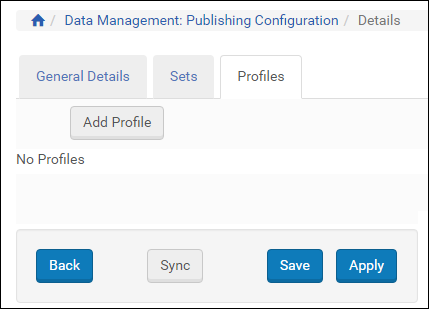 Profiles Tab
 - Click Add Profile. The following appears:
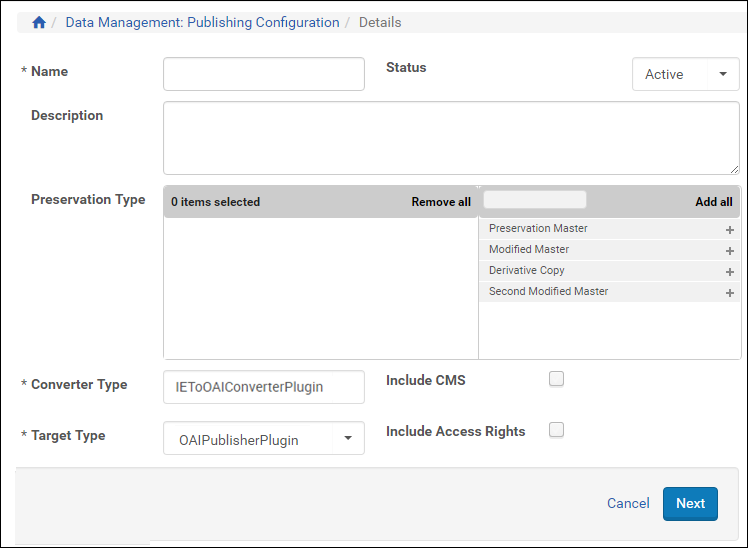 Publishing Profile Details – Step 1
 - Fill in the fields according to the following table:
Publishing Profile - Step 1 Field Description Name Enter a name for the profile. Status Select Active. Description Enter a description for the profile. Preservation Type Select the preservation types of the representations that you want to publish. Converter Type Select IEToOAIConverterPlugin or XSLConverterPlugin if you want to add your own XSL file. Include CMS Select the checkbox to include CMS. Target Type Select OAIPublisherPlugin. Include Access Rights Select the checkbox to include the access rights. - Click Next. The following appears:
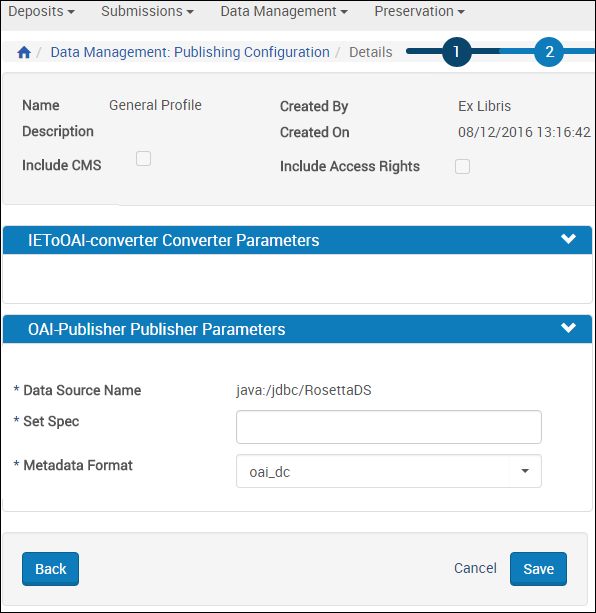 Publishing Profile Details – Step 2
 - Fill in the fields according to the following table:
Publishing Profile - Step 2 Field Description XSL File (if you select XSLConverterPlugin) Select the XSL file with the converter parameters. Set Spec Enter the logical name of the harvest (an OAI term). Metadata Format Select the format of the published metadata (should be OAI-DC). - Click Save.
- Select the Profiles tab. The following appears:
- Return to the Publishing Configuration List (Data Management > Manage Sets and Processes > Publishing Configuration).
- For your configuration, click Sync configuration.
When the Publishing Sync job runs, the IEs are published to Primo.
For performance reasons, the process of publishing the modified configuration runs automatically at night when the system is not used as much. Therefore, manual synchronization should be used only when the publishing of the set cannot wait.
Publishing Collections
You can configure Rosetta to publish collections to Primo so that they appear in the collection hierarchy.
To publish collections to Primo:
- For the collections that you want to publish, select the Publish checkbox.
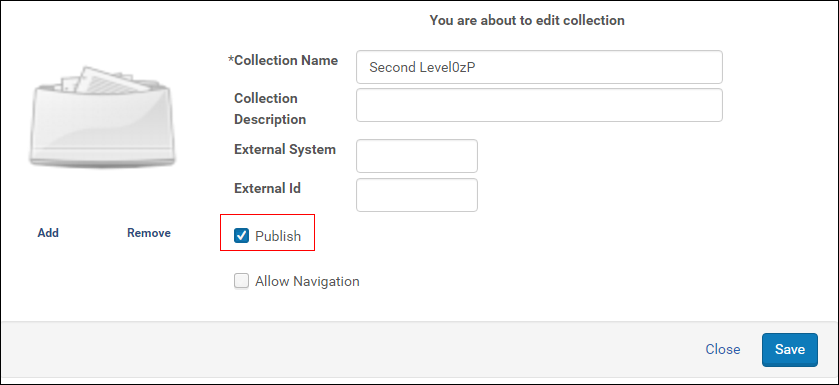 Publishing Collections
 - Add the following to the conversion XSL file that you include in the publishing profile:
<xsl:for-each select="//dnx:section[@id='Collection']/dnx:record"><dcterms:isPartOf xsi:type="collection"><xsl:value-of select="dnx:key[@id='collectionId']"/></dcterms:isPartOf></xsl:for-each>
Publishing Error Handling
Because the publishing process runs automatically in a batch process, the errors and exceptions must be written so they can be tracked.
Events
Events are captured by the system and written to the events table. The events created by the publishing process (starting and end time, process end-status) are generated by process automation and can be viewed in a dedicated report. (Because this report is not one of the pre-defined reports, you will need to create it to view this data.)
Publishing History
The publishing history of each IE is captured in an Oracle table that stores information (such as the publishing configuration ID, set ID, profile ID, converter, and target) for each IE PID.
This table is the basis for reports that you can create yourself to show publishing statistics.
Overview of Primo
Primo provides users with a Web interface for discovering and viewing objects that are stored in Rosetta.
Primo can be configured to harvest records from Rosetta to create a local repository that holds the replicated metadata of the objects, including links to Rosetta for viewing the objects.
The Primo Publishing Pipe
The publishing pipe is the process that the source records go through before being turned into the PNX record.
In order integrate with Rosetta, a new pipe must be created in Primo. This publishing pipe consists of the following stages:
Once the records are loaded into the Primo database, they go through the following additional stages, which are not described in this document:
-
Harvesting
-
Splitting Records
-
Normalization
-
Enrichment
-
Load to Primo Database
-
Duplicate Record Detection (Dedup)
-
FRBR
Harvesting
The first stage in a Primo pipe is the harvesting stage, which basically copies the source data to the Primo system. Primo supports several harvesting methods, including FTP, Copy, and OAI.
These harvesting methods can copy files from a remote server, any mounted drive, or an OAI server.
Splitting Records
During the second stage, the records are split into two groups. The first group is a bulk of normal records, which are sent through the publishing pipe to be normalized and enriched. These normalized records include new and updated records that are received during the harvesting stage. The second group contains records that were deleted from the data sources. Although these records do not need to be normalized or enriched, their search indexes need to be removed from Primo.
Normalization
Every pipe works with a set of normalization rules that can be shared by different pipes. The normalization process converts the group of source records to the PNX format, using the normalization rules set that is assigned to the pipe.
Enrichment
Once the records are normalized, they can be enriched with additional data by assigning an enrichment set (which includes one or more enrichment routines) to the pipe.
Load to Primo Database
The normalized and enriched data is loaded into the Primo database. The Primo database stores the PNX records in the P_PNX table to be retrieved and loaded into the search engine. In addition, the pipe stores the original source records in the P_SOURCE_RECORD table.
After the records are stored in the Primo database, the Dedup and FRBRization processes are performed.
Configuring Primo
This section describes the Primo Back Office pages that configure the discovery and delivery of digital content from Rosetta. The following steps outline the configuration process in Primo:
-
Create a normalization rules set to map records from Rosetta to Primo (see Defining the Normalization Rules Set).
-
Configure the base URL to access Rosetta and to deliver digital content (see Configuring the Delivery URL).
-
Create a data source for Rosetta (see Configuring the Data Source).
-
Create a search scope value for Rosetta (see Creating a Search Scope Value for Rosetta).
-
Create the Rosetta pipes (see Configuring the Rosetta Pipe).
-
Execute the pipe (see Executing a Pipe).
-
Run the Indexing_And_Hotswapping process (see Scheduling Tasks).
-
Configure the view to search the Rosetta search scope value (see Configuring the View).
Configuring the Data Source
To allow Primo to harvest Rosetta data, you must first identify Rosetta as a data source.
To define the Rosetta data source:
-
On the Data Source page (Primo Home > Ongoing Configuration Wizards > Pipe Configuration Wizard > Data Sources Configuration), enter the following fields to create the new data source:For installation-level users, you must select an institution before the associated values appear in the drop-down lists that display the Select Institution value.
-
Owner – Select the name of the institution from the drop-down list. For institution-level staff users, your institution will already be selected.
-
Source name – Enter a name for the data source.
-
Source code – Enter a unique data source code, which is used as a prefix in the Primo Record ID and when defining the search scope.
-
Source format – Specify the DC format.
-
Input Record Path – Use the following default for DC: oai_dc:dc.
-
File Splitter – Specify OAI splitter.
-
Character Set – Specify UTF-8.
-
-
Click Add.
 Defining the Rosetta Data Source
Configuring the Delivery URL
In order to allow a direct link to the IE in Rosetta, you must define the base URL of the Rosetta server. When calling Rosetta’s server, Primo adds the IE PID to the base URL to retrieve the specific IE.
To define the base URL for Rosetta: delivery:
-
On the Institution Wizard page (Primo Home > Ongoing Configuration Wizards > Institution Wizard), edit your institution.
-
In the Rosetta field, enter the base URL for the Rosetta server. For example: http://<rosetta-server-name>:1801.
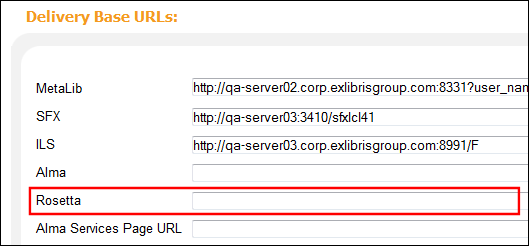 Institution Wizard - Defining the Rosetta Base URL
 -
Click Save & Continue.
-
Deploy your changes.
Defining the Normalization Rules Set
To map the records that were harvested from the Rosetta source, you must define a normalization rules set that utilizes the Rosetta - Template template.
To create the normalization rules set:
-
On the Normalization Rules Sets page (Primo Home > Ongoing Configuration Wizards > Pipe Configuration Wizard > Normalization Rules Configuration), enter the following fields in the Create a Normalization Rules Set section:
-
Duplicate from existing Normalization Rules Set – Select Rosetta - Template from the drop-down list.
-
Name – Type a unique name for the normalization rules set.
 Create Normalization Rules Set
 -
-
Click Create to add the new normalization rules set to the list.
-
Click Edit next to the new normalization rules set.
-
Select Links from the PNX Section drop-down list.
-
Verify that the following PNX fields are defined as follows:
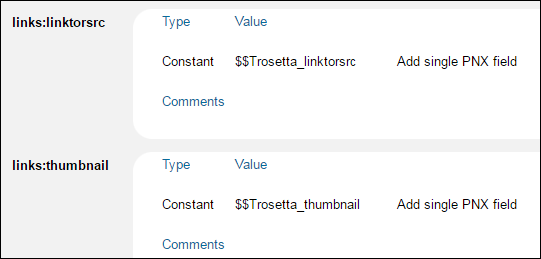 Verify Rosetta Links
 -
Deploy the new normalization rules set so that it can be selected on the Define Pipe page.For more details regarding normalization rules, see the Primo Back Office Guide and the Primo Technical Guide.
Creating a Search Scope Value for Rosetta
Search scopes enable users to direct their searches to a particular data source, which is identified by the source code.
To add a search scope for Rosetta:
-
On the Scope Values Configuration page (Primo Home > Ongoing Configuration Wizards > Pipe Configuration Wizard > Scope Values Configuration), specify the following fields:
-
Scope Value Code – Enter the value of the Source Code field, which is defined on the Data Sources page.
-
Scope Value Name – Specify a name for the search scope.
-
Use Scope for – Select Search to allow users to search for records specifically from this data source.
-
-
Click Create.
-
Deploy your changes to the Front End.
Configuring the Rosetta Pipe
Primo pipes allow you to map source records into Primo for discovery. These pipes should be run periodically to keep record changes and availability up to date.
If you are harvesting collections, it is also necessary to create an additional pipe for each collection. For additional information on configuring collection discovery in Primo, see Collection Discovery.
To create an item-level pipe for Rosetta:
-
On the Define Pipe page (Primo Home > Ongoing Configuration Wizards > Pipe Configuration Wizard > Pipes Configuration > Define Pipe), enter the following fields:
-
Pipe name – Specify a name for the pipe.
-
Data source – Select the name of your data source from the drop-down list.
-
Normalization mapping set – Select the name of the Rosetta normalization rules set from the drop-down list.
-
Harvesting method – Select OAI from the drop-down list.
-
Enrichment rule set – No enrichment is necessary.
-
Server – Enter the URL of Rosetta’s OAI server.
-
Metadata format – Specify oai_dc.
-
Set – If you want to harvest a particular set of records from Rosetta, specify the name of the set defined in Rosetta.
-
Start harvesting records from – This parameter indicates the date from which to harvest the source records. Changes to records dated prior to this date will not be included in the harvest.
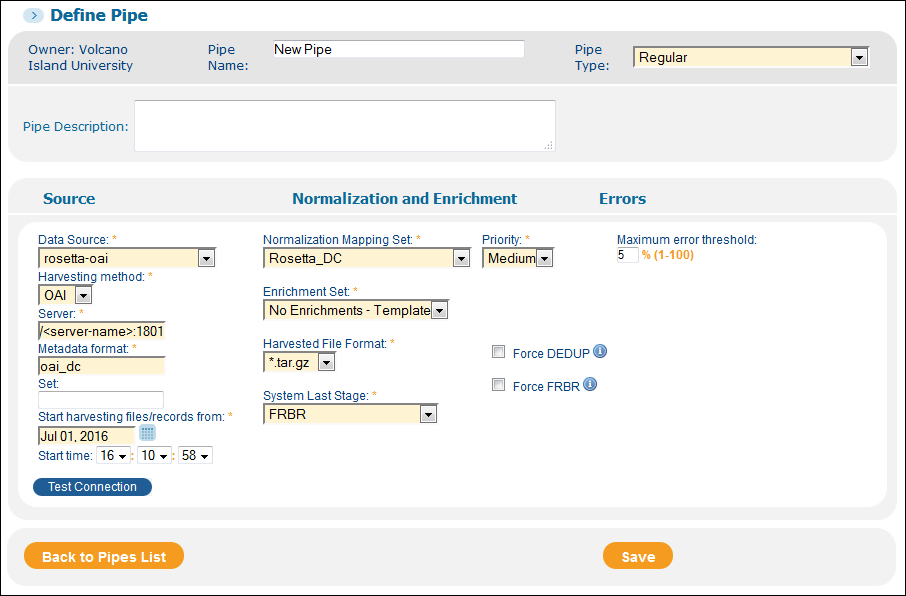 Define Pipe Page
 -
-
Click Save.
Configuring the View
After you have configured the search scope value for Rosetta and indexed the records, you must add the search scope value to the view to enable users to search for Rosetta records.
To add the Rosetta search scope value:
-
On the Views Wizard page (Primo Home > Ongoing Configuration Wizards > Views Wizard), edit your view.
-
Click Save & Continue to access the Scopes List page.
-
Edit the search scopes (such as default_scope) to which you want to include the Rosetta search scope value.
-
Select the Rosetta search scope value in the list.
-
Click Save & Continue.
-
Deploy your changes to the Front End.
Integration Between Rosetta and Primo VE
You can export your records from Rosetta to have them discoverable by Primo VE. There are two methods to do this:
- Publish the records to Alma. They are then discoverable by Primo VE as any record in Alma. For information on how to do this, see the Alma-Rosetta Integration Guide.
- Export the the records from Rosetta as described in the Overview of Rosetta and Configuring Rosetta sections above. Then from Primo VE, load the records as described in Loading Records from External Sources into Primo VE.

