
How to Add Open Access Indication and Facet for Local Records
- Product: Primo
- Product Version: May 2018
- Relevant for Installation Type: Multi-Tenant Direct, Dedicated-Direct, Local
Question
How do we add Open Access indication and facet for local records?
Answer
1. Identify the field(s) and subfield(s) in the source records that will be used to identify whether the item (eBook, journal, etc.) is Open Access.
2. Create a new normalization rule for each of following PNX fields, and configure each to map the values indicated below.
-
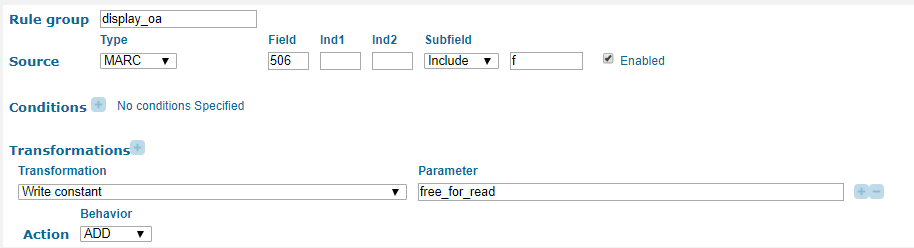
Display:oa - This field is used is to display the Open Access icon in the Brief Display. Your rule should be set up to add the value 'free_for_read' to this PNX field. An example of what this rule may look like is shown below.
-
Addata:oa - This field is used to tag open access records. Similar to the rule above, the rule that you create should also add the value 'free_for_read' to the PNX field
If you are not able to see the display:oa or addata:oa fields, you may need to select the "Display Empty PNX fields" check mark at the top of the Manage Normalization Rules page.
-
Facet:toplevel - This field is used to create the facets that display in the 'Show Only' section in the Primo Front End. Your rule should be set up to add the value 'open_access' to the PNX field. An example of the rule is provided below.

3. Add a new row to the facet_tlevel_values mapping table (Primo Home > Advanced Configuration > All Mapping Tables) with the following information:
Value name – Open Access Value – open_access
Your local records will be returned along with Primo Central records as both use the same facet value.
4. Deploy changes (Deploy & Utilities > Deploy All) for Normalization Rules and All Code Tables and Mapping Tables.
5. Run a renorm (No Harvesting - Update DS) pipe.
6. Wait for the indexing process to complete.
Additional Information
Additional information about the new Open Access feature is available in this article: Open Access Indication in Primo.
- Article last edited: 05-06-2018