
The UI Customization Package Manager

-
Central – This package allows a consortium to define a single customization package that can be used directly or as a template by each member institution. Configurations in this package override settings defined in the out-of-the-box configurations. When used as a template, member institutions can create a view-level customization package to override settings in the Central package.To create and modify the Central package itself, users must have Super Admin permissions.
-
View-level – This type of package allows you override the out-of-the-box settings and the Central package (if defined for your consortium).
In addition, you can use the UI Customization Package Manager to perform the following:
-
Upload a customized logo and make it clickable. For more information, see Uploading a Clickable Logo.
-
Upload a customized email template. For more information, see Customizing the Email Template.
Creating a View-Level Package
-
From the Owner drop-down list, select your institution.
-
From the View drop-down list, select your view.
-
Under the Download a Package section, click Download to select one of the following templates:
-
Template package – This template defines a package's folder structure and includes the files (such as custom1.css and home_en_US.html) needed to create a package.
-
Central package – For member institutions in a consortium, download the Central package if you want to override settings from it and the out-of-the-box configuration.
-
-
Create the new package from the template:
-
Uncompress the template.
-
Change the name of the VIEW_CODE folder to your view's code.
 Change Folder's Name
 -
Use the browser's inspect functionality to determine which CSS elements to modify in the new Front End UI.
-
Update the relevant files that are stored under the directories shown in the following figure. Remember to add any new or updated images to the img folder.
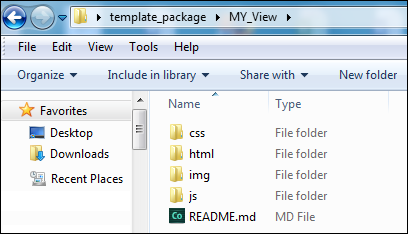 Package Folder StructureIn order for the system to recognize your customizations, you must retain the package structure (including folder and file names). In addition, it is necessary to retain the file names for images and other files that you modify and include in your customization package.
 -
Compress the view's package. In this example, you would compress the My_View folder.
For Windows users, it is recommended that you use a compression tool such as 7zip or Winrar instead of Windows Send to > Compress folder to avoid upload errors.
For Mac users, use the following procedure to zip and remove any hidden .DS_Store files:
-
Open the Terminal application under Applications > Utilities.
-
Move to the parent directory of the folder that you want to compress. For example: cd /Users/<user name>/<parent folder>
-
Enter the following command to compress the file: zip –r <target file>.zip <My_View> -x "*.DS_Store"
-
-
-
Upload the new package (for example, My_View.zip):
-
Under the Upload Package section, click Choose File.
-
Specify the name of the compressed package.
-
Click Upload.
-
-
Deploy your view.
Modifying a View-Level Package
-
From the Owner drop-down list, select your institution.
-
From the View drop-down list, select your view.
-
Under the Download a Package section, click Download to download view-level package (which is identified by the view's code).
 Download View-Level Package
 -
Decompress, modify, and then compress the modified package.To avoid upload errors, it is recommended that you use a compression tool such as 7zip or Winrar instead of Windows Send to > Compress folder.
-
Upload the updated package:
-
Under the Upload Package section, click Choose File.
-
Specify the name of the compressed package.
-
Click Upload.
-
-
Deploy your view.
Creating the Central Package
-
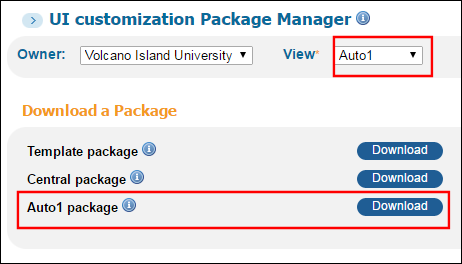
From the Owner drop-down list, select All Institutions.
-
From the View drop-down list, select CENTRAL_PACKAGE.
-
Under the Download a Package section, click Download to download the Template package.
-
Create the new package from the template:
-
Uncompress the template.
-
Change the name of the VIEW_CODE folder to CENTRAL_PACKAGE.Template's Root Folder
-
Use the browser's inspect functionality to determine which CSS elements to modify in the new Front End UI.
-
Update the relevant files that are stored under the directories shown in the following figure. Remember to add any new or updated images to the img folder.
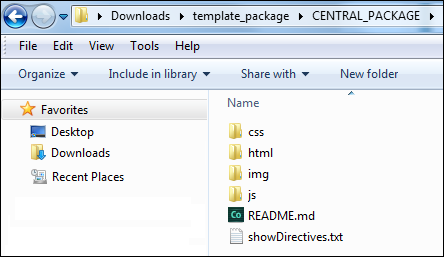 Central Package Folder Structure
 -
Compress the view's package. In this example, you would compress the CENTRAL_PACKAGE folder.
To avoid upload errors, it is recommended that you use a compression tool such as 7zip or Winrar instead of Windows Send to > Compress folder.
-
-
Upload the new package:
-
Under the Upload Package section, click Choose File.
-
Specify the name of the compressed package.
-
Click Upload.
-
-
Deploy your view.
Modifying the Central Package
-
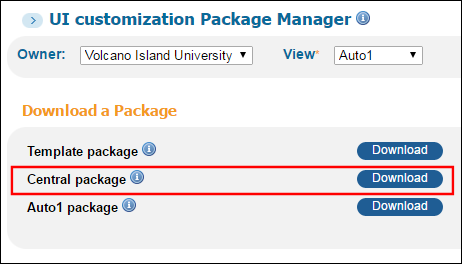
From the Owner drop-down list, select All Institutions.
-
From the View drop-down list, select CENTRAL_PACKAGE.
-
Under the Download a Package section, click Download to download the Central package.
 Download Central Package
 -
Decompress, modify, and then compress the modified package.To avoid upload errors, it is recommended that you use a compression tool such as 7zip or Winrar instead of Windows Send to > Compress folder.
-
Upload the updated package:
-
Under the Upload Package section, click Choose File.
-
Specify the name of the compressed package.
-
Click Upload.
-
-
Deploy your view.
Inheriting from the Central Package
-
From the Owner drop-down list, select your institution.
-
From the View drop-down list, select your view.
-
Under the Download a Package section, verify that a package has been loaded for the Central package field.
-
Under the Upload Package section, select the Inherit from Central Package check box and click Save.
-
Deploy your view.
Disabling Packages While Testing
-
Open the new Front End UI in a browser.
-
Add the &package=OTB parameter to the end of the URL and press ENTER to refresh the page. For example:http://my-primoqa02:1701/primo-explore/search?vid=MY_VIEW&lang=en_US&package=OTB
-
You can toggle between the out-of-the-box formatting and your customized formatting by adding and removing this parameter.
Adding a Clickable Logo
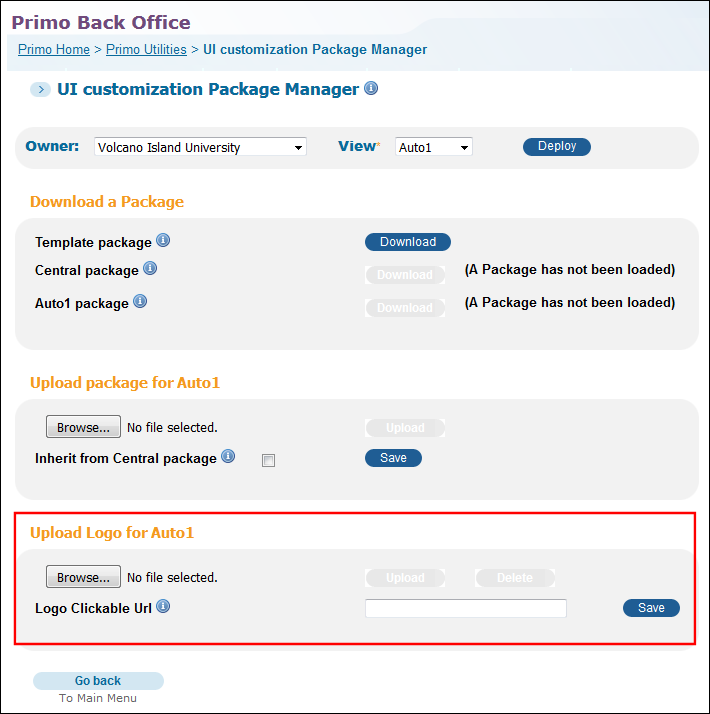
-
Open the UI Customization Package Manager (Primo Home > Utilities > UI Customization Package Manager).
-
In the Upload Logo section, select Browse to locate and select the image that you want to use for your institution's logo.The system places the following restrictions on the logo file:
-
The file format of the image must be .png.
-
The height of the image cannot exceed 120 pixels.
-
The width of the image cannot exceed 300 pixels.
-
The size of the image cannot exceed 30 KB.
-
-
Click Upload to upload your selection the to Front End server. If you want to remove the logo, click Delete.
-
If you want to redirect users to a page other than the Primo Home page, specify a URL in the Logo Clickable URL field.
-
Click Save to save your changes.
-
Deploy the changes to the Front End.
Customizing the Email Template
Primo allows you to customize the format of emails sent to users after selecting the Send To Email action in the new UI. You can customize the format with or without Primo Studio. With either method, you must upload the customized email templates with the Customization Package Manager in the Primo Back Office. In addition, you can create separate email templates for each supported language in the UI.
-
The email template for the new UI supports a maximum of 50 records. If a user sends more than 50 records, the system will revert to the classic email template, which was used in previous releases.
-
For security reasons, all links will be removed from your email template.
The following figure shows the sample output of the out-of-the-box Email template for the new UI.
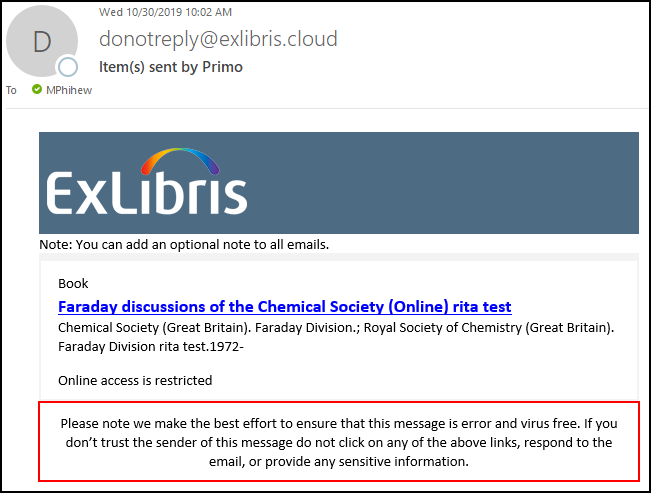
The Email template is in HTML format and includes the following sections:
-
Logo – Displays the logo, which is taken from your view's customization package.
-
Institution note – Displays the text configured with the following code in the Send Email and SMS code table: default.nui.email.institutionNote. By default, this field has no value and will not display if left empty.
-
List of records – For each record, the email displays the record's brief display and availability statement.
-
Disclaimer – Displays the text configured with the following code in the Send Email and SMS code table: default.nui.email.disclaimer.
Configuration Options
The email_<4-digit_language_code>.html template files (such as email_en_US.html) allow you to configure the layout and format of the emails (per supported UI languages) that are sent when users perform the Send To Email action in the new UI. For more details and examples of how to customize the email templates, see the following page on GitHub:
-
If you decide to customize the out-of-the-box email template and your view supports additional languages, you must create and upload a separate template file for each language (including the default email_en_US.html file).
-
The alignment of the email's text is based on the settings of the email client.
After you have created or modified any email template files, open the UI Customization Package Manager (Primo Home > Primo Utilities > UI Customization Package Manager), and then use one of the following methods to upload the email template files to the UI:
-
Store the custom email template files under the html directory in your view's customization package and upload the entire customization package.
-
Use the new Upload Email/Print Template section to upload only the email template files. If you have not uploaded a customization package for your view, this option will create one for you and store the custom email template files under the html directory.
 Customization Package Manager - New Upload Email Section
If you want to delete an email template file, remove the email template file under the html directory in the view's customization package and upload the modified package to the UI. If you want to revert to the out-the-box email template, remove all email templates under the html directory in the view's customization package and upload the modified package to the UI.
Accessing Primo Studio
Primo Studio is an integrated environment that allows you to customize and test various aspects of your Primo views. For more information, see Using Primo Studio.

-
In the Go to Primo Studio section, select Primo Studio.
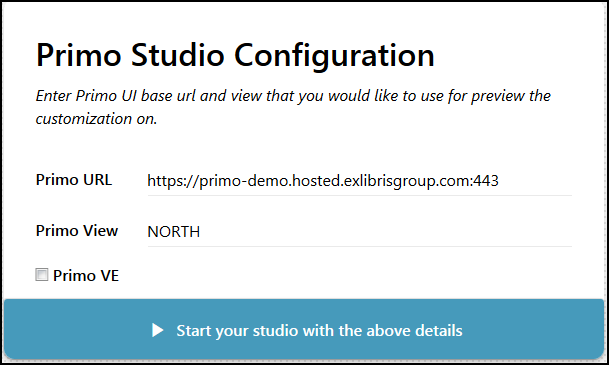
Primo Studio Login Page
-
Enter the following information:
-
Primo URL – Specify the base URL of your Primo UI.
-
Primo View – Specify your view's code.
-
Primo VE – For Primo VE environments, select this check box.
-
-
Select Start your studio with the above details.