Configuring the Send To Actions
If you are working with Primo VE and not Primo, see Configuring the Actions on the Display Pages for Primo VE.
-
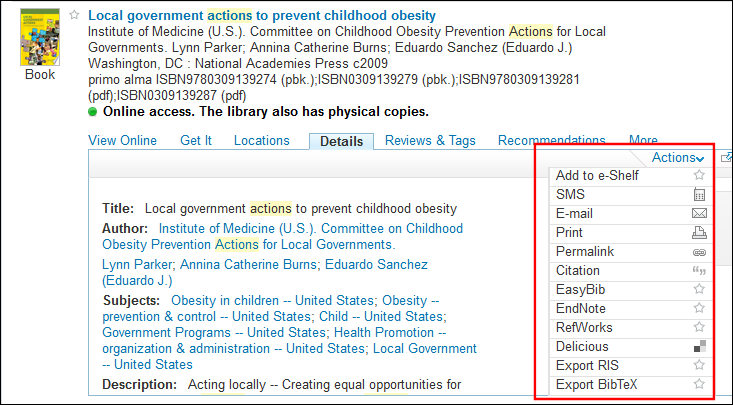
Enable/disable actions in the Actions list for the classic and new UIs. The following figure shows the Actions list on the Brief Results page in the classic UI.
 Send To Actions in Classic UI (Brief Results and Full Display)
 -
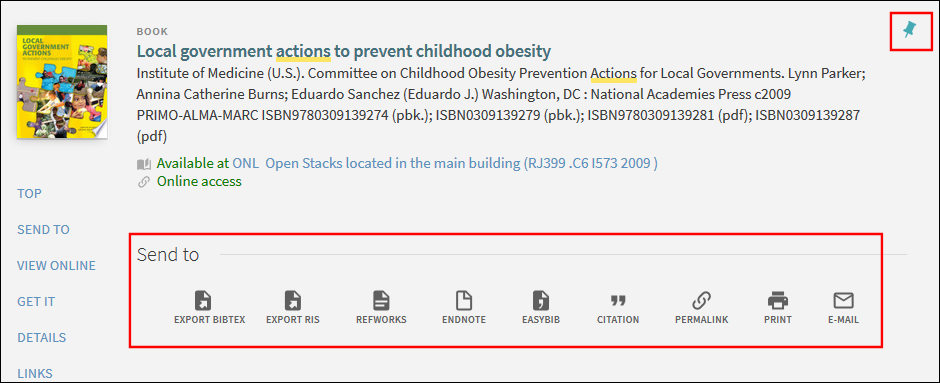
Set the order of the actions in Actions list for the classic and new UIs. The following figure shows the Actions list on the Full Display page in the new UI.
 Send To Actions in New UI (Full Display)
 -
Specify the up-front actions, which display on the Brief Results page in the new UI only. The following figure shows the up-front actions on the Brief Results page in the new UI.
 Up-Front Actions in New UI (Brief Results)
The PushTo Adaptors mapping table defines a URL for each of the Send To actions. Hosted and local Primo customers are permitted to add new adaptors for the classic UI only. For more information, see PushTo Adaptors.
Using the Actions List Mapping Table
The Actions List mapping table allows you to configure the Send To actions at both the institution and view levels.
-
On the Advanced Configuration page (Primo Home > Advanced Configuration), select All Mapping Tables to open the Mapping Tables page.
-
Select Front End from the Subsystem drop-down field and Actions List from the Table Name drop-down field.
-
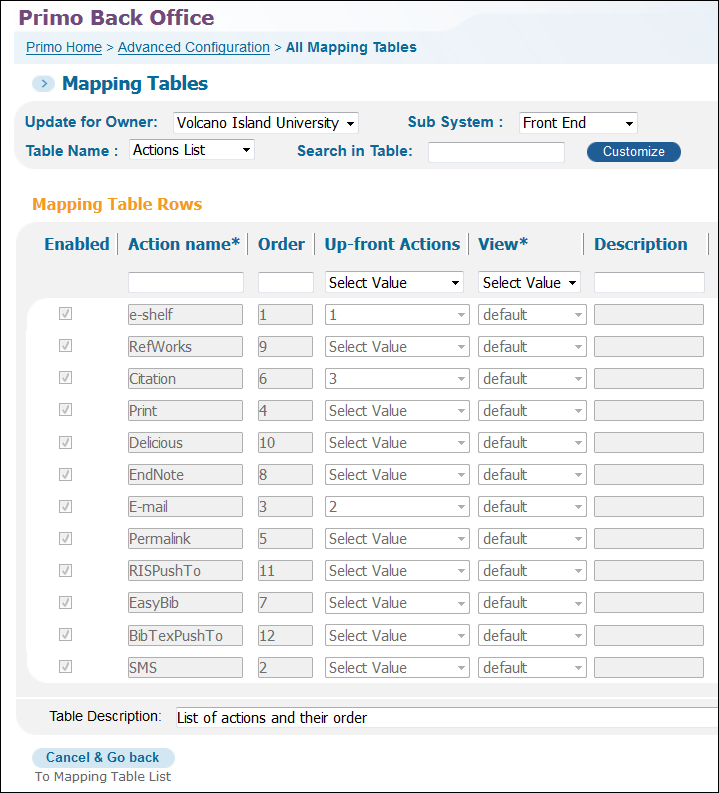
Edit the Actions List mapping table.
 Actions List Mapping Table
 -
If you haven't already customized the mapping table, click Customize.
-
Select the Enabled check box for each action that you want displayed in the UI. If you want to hide an action, clear its check box.
-
Use the Order field to specify the order of the actions in the UI. In the new UI, the items are ordered from right to left.
-
For the new UI only, use the Up-front Actions drop-down list to specify the three actions that you want to appear in the Brief Display of a record.
-
From the View field, select a specific view name or default if you want the setting to apply as the default setting for all views.
-
Click Save.
-
Deploy your changes to the UI.
Using CSS to Hide Actions in the Classic UI
-
Log on to the Back Office server as the primo user.Instead of accessing the server directly (as shown in steps 1 and 2), it is recommended to use the File Uploader utility (see The File Uploader Tool) to manage and publish CSS changes to the Primo Front End UI.
-
Enter the following commands to access and open the CSS file that is used to customize your view:fe_webcd cssvi <custom_css>.cssIt is not recommended to modify the default Primo CSS, which can be overwritten during updates. For more information regarding the customization of Primo views, see the Primo Technical Guide.
-
Add the following lines to your localized CSS file to hide the Send To actions:
-
Email:.EXLTabHeaderButtons ol.EXLTabHeaderButtonSendToList li.EXLButtonSendToMail {display: none;}
-
Print:.EXLTabHeaderButtons ol.EXLTabHeaderButtonSendToList li.EXLButtonSendToPrint {display: none;}
-
Permalink:.EXLTabHeaderButtons ol.EXLTabHeaderButtonSendToList li.EXLButtonSendToPermalink {display: none;}
-
Citation:.EXLTabHeaderButtons ol.EXLTabHeaderButtonSendToList li.EXLButtonSendToCitation {display: none;}
-
EasyBib:.EXLTabHeaderButtons ol.EXLTabHeaderButtonSendToList li.EXLButtonSendToEasyBib {display: none;}
-
EndNote:.EXLTabHeaderButtons ol.EXLTabHeaderButtonSendToList li.EXLButtonSendToEndNote {display: none;}
-
RefWorks:.EXLTabHeaderButtons ol.EXLTabHeaderButtonSendToList li.EXLButtonSendToRefWorks {display: none;}
-
Delicious:.EXLTabHeaderButtons ol.EXLTabHeaderButtonSendToList li.EXLButtonSendToDelicious {display:none;}
-
Export RIS:.EXLTabHeaderButtons ol.EXLTabHeaderButtonSendToList li.EXLButtonSendToRISPushTo {display: none;}
-
-
Save the changes to the CSS file.
-
On the Primo Home > Deploy All page, select all options and click Deploy.
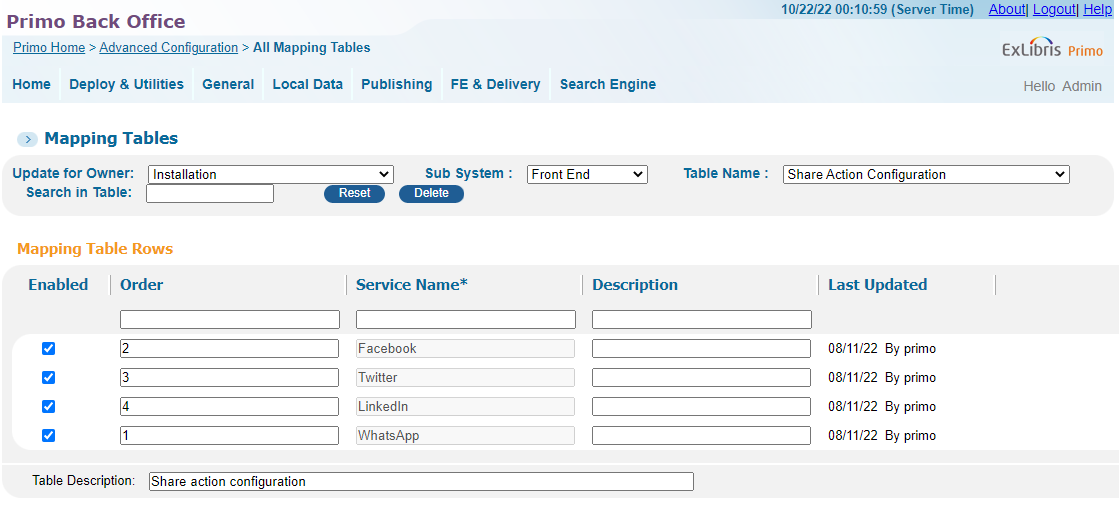
Enabling the Social Media Apps for the Share Export Action
The Share Action Configuration mapping table (Primo Home > General > Mapping Tables) allows you to enable/disable the social media apps that appear for the Share action. In addition, you can configure the order in which they appear. For more information on using mapping tables, see Mapping Table Reference.


