
Attribute Mapping
If you are working with Primo VE and not Primo, see Configuring User Authentication for Primo VE.
In addition to authenticating users, Primo also needs some basic information about the users. The user information can be obtained from the same system that is used for user authentication or a different system. The most common combination is to authenticate with an authentication system like Shibboleth (SAML) or LDAP and to fetch user information from the ILS (Alma).
To map attributes:
-
Open the Login Profiles page (Primo Home > Ongoing Configuration Wizards > User Authentication Wizard).
-
Under the Profiles section, click Edit next to the login profile that you want to configure.
-
The Login Profile configuration page opens.
-
If you have not selected a user information method, select either SAML, ALEPH, LDAP, or Alma from the Select User Information Method drop-down list. The user information systems that are not compatible with your user authentication system will be disabled.If you select Alma, the system will automatically enter the URL for your Alma server in the USER_INFO_URL field. For example:https://alma.exlibrisgroup.com
-
Click Save and re-edit your login profile to continue.
-
Click the Attributes Mapping button. If the Attributes Mapping button is not shown, repeat steps 4 and 5.The Attribute Mapping dialog box opens.
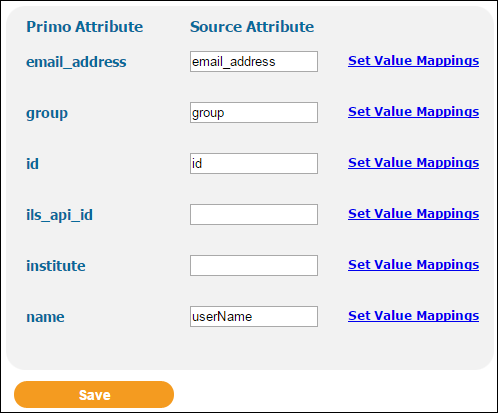 Attributes Mapping Dialog BoxDepending on the user information system, some fields may be filled in for you.
 -
For each of the following Primo attributes, specify the name of the associated attribute from the user information system:
Primo Attributes Attribute Description email_addressThe user’s email address. Primo will use this email address if the user does not have an email address defined in Primo.If the EMAIL_OVERRIDE authentication parameter has been enabled, the value of this attribute will override the email address defined for the user in Primo.For Alma, the default mapping is email_address.For Aleph, enter z304-email-address to use the default setting.There is no default mapping for LDAP and SAML.groupThe user group.For Alma, the default mapping is group.For Aleph, enter z305-bor-status to use the default setting.There is no default mapping for LDAP and SAML.idThe user ID.For Alma the default mapping is id.For Aleph, enter z303-id to use the default setting.There is no default mapping for LDAP and SAML.ils_api_idThe ID used for OPAC via Primo in case it is not the same as the regular ID.For Alma there is no default mapping because this attribute is not required for Alma.For Aleph, enter z303-id to use the default setting.There is no default mapping for LDAP and SAML.instituteThe Primo institution. This attribute can be used if there is a need to override the institution that the user signed in with (that is the institution of the view).For Alma there is no default mapping because the Primo institution defaults to the institution of the active view. If you want to override the institution of the view, you can specify an Alma attribute.There is no default mapping for Aleph, LDAP and SAML.nameThe name that displays for the user in the Primo Front End.For Alma the default mapping is userName.For Aleph, enter z303-name to use the default setting.There is no default mapping for LDAP and SAML. -
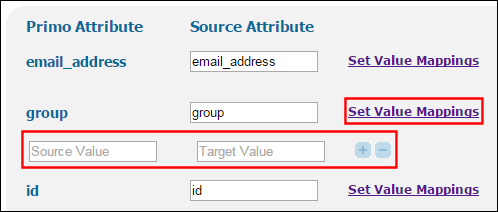
If you want to map specific values for an attribute, perform the following steps:
-
Click Set Value Mappings next to the attribute that you want to configure.An attribute value row displays below the attribute.
 Add Attribute Mapping Value
 -
In the first column specify the name of the value used in the Patron information source.
-
In the second column specify the name of the value used in Primo.Any values that are not defined will retain the value sent by the user information system.
-
If you want to add or remove a value, click the plus or minus icon next to the value, respectively.The following example shows how the group values from the source can be mapped to the undergraduate, graduate, staff values in Primo:
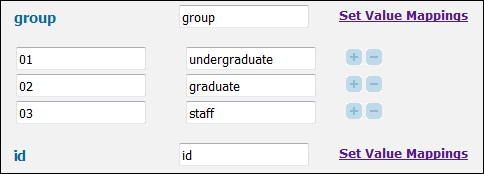 Attribute Value Mapping Example
-
-
Click Save.