
Using Social Networks for User Authentication
If you are working with Primo VE and not Primo, see Configuring User Authentication for Primo VE.
-
The user invokes the sign-in option in Primo.
-
Primo displays the Primo login page, which also contains a link to the social login page.
-
The user clicks the link to the social login page, according to the integration profile configured in Alma (see Social Login).If you have configured both Google and Facebook in Alma, the user selects a preferred social network from the Social Network Login page. Otherwise, the user is redirected automatically to the only configured social network.
-
Authentication is handled by Alma and the social network:
-
If the user has not signed in to the social network, the social network displays a sign-in page for the user to sign in. Otherwise, no additional sign-in is necessary.
-
After the user signs in, the social network sends a token to Alma.
-
If the user is not recognized by Alma and self-registration is configured in Alma (see Social Login), Alma prompts the user to perform self-registration. If self-registration is not configured in Alma, the user is sent an error message.
-
-
If the user has been authenticated, Primo logs the user in.
Configuring a Social Login Profile
Authentication using a social network via Alma does not require much configuration because the relevant information is defined for the Primo institution and displayed automatically for you in the login profile.
It is assumed that social authentication will be used in parallel with another authentication method to allow users to select a social network option from the parallel login page, which will display when the user attempts to sign in.
-
Open the User Authentication Wizard page (Primo Home > Ongoing Configuration Wizards > User Authentication Wizard).
Social authentication is available with the new Primo UI only.
-
Select your institution from the Owner drop-down list.
The source of your Primo institution must be Alma in order to configure Alma user authentication.
-
Create a new login profile. The Login Profile page opens. For more information on creating login profiles, see The Primo Authentication Manager.
-
Select SOCIAL_VIA_ALMA from the Select Authentication Method drop-down list.
The Social via Alma authentication parameters appear on the page.
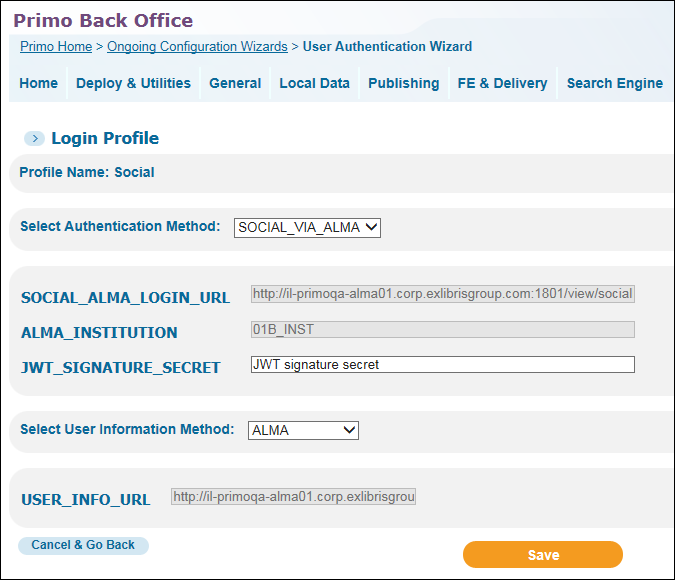 Social Login Profile Page
 -
Use the following table to configure the Alma authentication fields:
Alma Configuration Fields Parameter Description SOCIAL_ALMA_LOGIN_URL
(Required) The IDP login URL. This is the URL Primo uses when it sends the authentication request to Alma.
ALMA_INSTITUTION
(Required) The Alma institution code, which is defined in the Alma Institution Code mapping table.
JWT_SIGNATURE_SECRET
(Required) Used for the handshake between Primo and Alma. Any value can be used here as long as it matches the entry defined for Alma's customer parameter jwt_signature_secret (Administration > User Management Configuration > Configuration Menu > General > Other Settings in Alma; see Configuring Other Settings).
-
Select ALMA (see Alma Information Request Fields) from the Select User Information Method drop-down list.
-
Select Save to save your Social via Alma profile and to return to the Login Profiles page.