The Export Primo Configuration Tool
What is Exported?
- All code and mapping tables
- Search engine configuration
- Institutions
- Scopes and restrictions
- Data sources
- Normalization rules
- Enrichment sets
- Views
- Pipes
- Schedules
- Staff
- Tools (Except for export/import tools)
- Files on server:
- CSS and locale-specific CSS files in the following directory:
.../ng/primo/home/system/tomcat/search/webapps/primo_library#libweb/css
- Images files in the following directories:
- .../ng/primo/home/system/tomcat/search/webapps/primo_library#libweb/images
- .../ng/primo/home/system/tomcat/search/webapps/primo_library#libweb/locale/<locale>/images</locale>
- Help files in the following directories:
- .../ng/primo/home/system/tomcat/search/webapps/primo_library#libweb/help/
- .../ng/primo/home/system/tomcat/search/webapps/primo_library#libweb/locale/<locale>/help/</locale>
- Enrichments files in the following directories:
- /home/profile/publish/publish/production/conf/enrichPlugin
- /home/profile/publish/publish/production/conf/plugins/enrichment
- File splitters in the following directory:
/home/profile/publish/publish/production/conf/fileSplitter/lib
- Data source XSL files in the following directory:
/home/profile/publish/publish/production/conf/xsl
- Dedup algorithm XML files in the following directory:
/profile/publish/publish/production/conf
- RTA Plugin files in the following directory:
/home/profile/search/rta
- Search character normalization files in the following directory:
/jaguar/home/profile/analysis/specialCharacters
The following files on the server are not included:- Static HTML files
- Additional Search Engine configuration files from the /analysis directory (such as synonyms).
- CSS and locale-specific CSS files in the following directory:
What is Not Exported?
- Front End:
- bX Token
- PC Customers IDs
- Institution Base URLs
- OPAC via Primo:
ILS API Configuration
The Export Package
- ALL:
exp_all.<inst_code>.<inst_name>.<yyyymmdd_mmss>.zipFor example:exp_all.VCNO.Volcano University.20120327_070544.zipIf the export includes all institutions, the institution code is set to CUSTOMER and the institution name is set to ALL as follows:exp_all.CUSTOMER.ALL.20120327_070544.zip
- NR Sets:
exp_nrset.<inst_code>.<inst_name>.<yyyymmdd_mmss>.zipFor example:exp_nrset.VCNO.Volcano University.20120327_070544.zipIf the export includes all institutions, the institution code is set to CUSTOMER and the institution name is set to ALL as follows:exp_nrset.CUSTOMER.ALL.20120327_070544.zip
Exporting a Primo Configuration
- Local
- Direct or Multi-tenant (without server access)
Exporting a Primo Configuration: Local Customers
To export/import the Primo full configuration (not just the specific institution), follow the instructions in Exporting/Importing the Full Configuration.
-
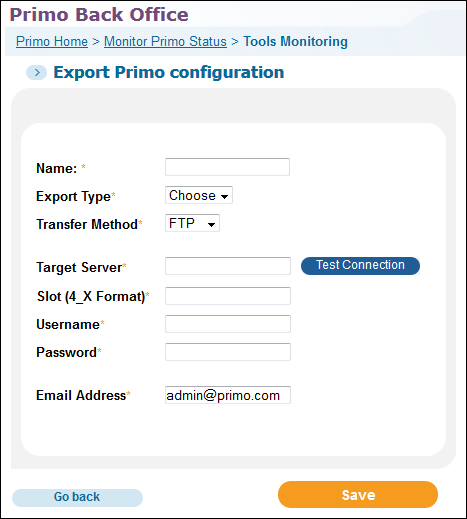
On the Tools Monitoring page (Primo Home > Monitor Primo Status > Tools Monitoring), select Export Primo Configuration from the Create a Tool drop-down list and then click Create. The Export Primo Configuration page opens.
 Export Primo Configuration Page
 -
Enter the following fields:
-
Name – Enter a name for the tool, which you can execute and monitor in the Tool Monitoring list.
-
Export type – Select the type of configuration you want to export. The valid values are All (all data) and NR Sets (normalization rules sets and related mapping tables, only).
-
Institution – If Export type is set to ALL, select All Institutions or a specific institution. For institution-level staff users, your institution will be selected for you.
If the export is done for a specific institution, any installation-level configurations in use are also included. For example, if a pipe uses normalization rules that belong to the installation level, then they will be included in the export. During the import, however, only new installation-level configurations are added and no existing configuration is replaced. -
Normalization Rules set – If Export type is set to NR Sets, select All NR Sets or a specific normalization rules set.
-
Transfer method – Select the method used to transfer the export package to the Production server. The methods are: FTP, SFTP, Profile, or Copy. The Profile option enables Primo Cloud customers to connect to the server. For more information, see the Profile field.
-
Target Server – For the FTP and SFTP transfer methods, enter the server name. Click Test Connection to test the connection to the server.
In addition, you can manually copy the package, but it must be placed in the directory /exlibris/primo/p4_1/ng/primo/home/profile/publish/exported_files. -
Slot – For the FTP and SFTP transfer methods, enter the slot (<ver>_<copy>) of the Primo installation on the target server. For example, if you have two Primo V4 instances, your slots might be 4_1 and 4_2.
-
Username – For the FTP and SFTP transfer methods, enter the user name of the server.
-
Password – For the FTP and SFTP transfer methods, enter the password of the server.
-
Profile – For the Profile transfer method, select the profile for your institution (which must be defined by Ex Libris support; if you do not see the required profile, open a support case). Click Test Connection to test the connection to the server.
-
Email Address – Enter an email address to which to send a confirmation when the tool completes execution.
-
-
Click Save.
-
Execute the tool when needed. For information on monitoring tools, see Tools Monitoring.
After exporting, the export file will be on the target server (the environment chosen in the Profile field). This file can be imported using the import tool. For more information, see Exporting/Importing the Full Configuration.
Exporting a Primo Configuration: Direct or Multi-Tenant Customers
-
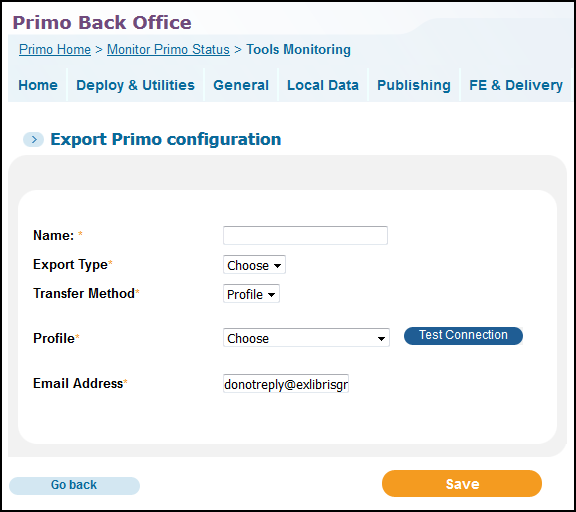
On the Tools Monitoring page (Primo Home > Monitor Primo Status > Tools Monitoring), select Export Primo Configuration from the Create a Tool drop-down list and then click Create. The Export Primo Configuration page opens.
 Export Primo Configuration Page
 -
Enter the following fields:
-
Name - Enter a name for the tool, which you can execute and monitor in the Tool Monitoring list.
-
Export Type - Select the type of configuration you want to export. The valid values are All (all data) and NR Sets (normalization rules sets and related mapping tables, only).
-
Transfer Method - Select Profile as the method used to transfer the export package to the Production server.
-
Profile - Select the profile for your institution (which must be defined by Ex Libris support; if you do not see the required profile, open a support case). Click Test Connection to test the connection to the server.
-
Email Address - Enter an email address to which to send a confirmation when the tool completes execution.
-
-
Click Save.
-
Execute the tool when needed. For information on monitoring tools, see Tools Monitoring.

