The Import Primo Configuration Tool
This functionality is not relevant to to Primo VE.
The Primo Home > Monitor Primo Status > Tools Monitoring > Import Primo Configuration page (see Importing a Primo Configuration, below) imports configuration data previously exported by the export tool to the following directory on the target servers:
/exlibris/primo/p4_1/ng/primo/home/profile/publish/exported_files
After the import completes successfully, the export package is copied to the following directory:
/exlibris/primo/p4_1/ng/primo/home/profile/publish/imported_files
If you are a Local deployment customer, verify that the export package in on the target environment under /exlibris/primo/p4_1/ng/primo/home/profile/publish/exported_files.
Importing a Primo Configuration
The instructions for importing are the same for all deployment levels: Local, Direct, or Multi-tenant (without server access).
If a configuration export was done for a specific institution, any installation-level configurations in use were also included in the export. For example, if a pipe uses normalization rules that belong to the installation level, they were included in the export. During the import, however, only new installation-level configuration are added; no existing configurations are replaced.
Use an institution-level export configuration if you are importing a configuration for a specific institution.
This tool is limited to the SuperAdmin and Admin roles.
To export/import the Primo full configuration (not just the specific institution), follow the instructions in Exporting/Importing the Full Configuration.
To import a Primo configuration:
- On the Tools Monitoring page, select Import Primo Configuration in the Create a Tool drop-down list.
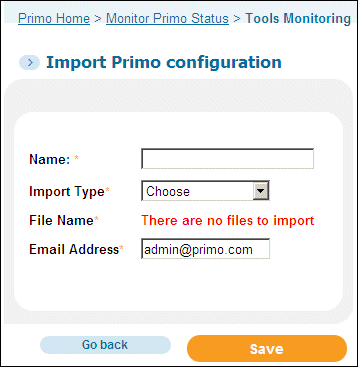
The Import Primo Configuration page opens.
 Import Primo Configuration Page
 - Enter the following fields:
- Name – Enter a name for the tool, which you can execute and monitor in the Tool Monitoring list.
- Import type – Select the type of configuration you want to import. The valid values are All (all data) and NR Sets (normalization rules sets and related mapping tables only).
- File Name – Select the name of the export file to import. If there are no files matching the configuration you want to import, run the export before creating this tool.
- Email Address – Enter an email address to which to send a confirmation when the tool completes execution.
- Click Save.
- Execute the tool when needed. For information on monitoring tools, see Tools Monitoring.
- After the import is complete, deploy the configuration settings; see Deploy All Configuration Settings.

