OpenSearch
This section explains how to enable Primo for OpenSearch, which allows users to search a Primo site via the Search bar (as defined by Mozilla) or the Instant Search box (as defined by Microsoft) using OpenSearch technology.
This feature is available in Web browsers that support OpenSearch technology (such as Firefox 2 and IE 7).
To enable auto-discovery mode for a Primo site, the following modifications are required:
-
Add a reference link to the Primo Front End for auto-discovery.
-
Add a customized OpenSearch XML file to the server.
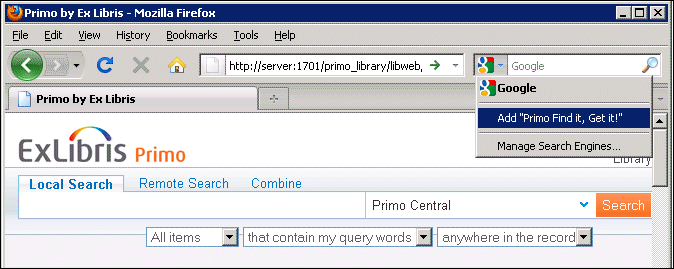
When a Primo site that has enabled OpenSearch is accessed for the first time, the Search box (or a part of it) appears highlighted to indicate that this Primo site can be added to the Search box as a search engine.
Users can add the Primo search engine to their browser by clicking the Add Search Provider link from the drop-down list shown in the following figure.

Add Primo Site as Search Engine
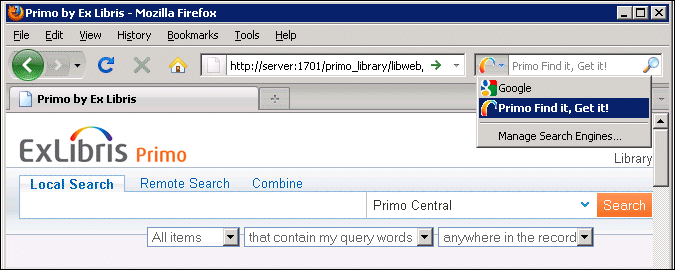
Users can then place searches to this Primo site from any Web page using the Search box.

Primo Search Added to Search Box
Adding a Reference Link to the Primo Front End
To enable auto-discovery for a Primo view, nest the following <link> element inside the <head> element of the dynamic_layout.jsp file:
<link rel="search" type="application/opensearchdescription+xml" title="Primo Find it, Get it!" href="http://<primo_server_address>:<port_number>/<xml_file>">
A <link> element can be inserted for each Primo view to allow end users to add one or more specific views of the Primo search engine from the Search box drop-down list.
To avoid multiple links in the Search box drop-down list, you can instead add a <link> element to the header.html file of each view (or locale). Note that this method does not comply with XHTML syntax.
The <link> element contains the following parameters:
-
The href parameter contains the path to the customized XML file, which is saved on the server. For more information, see Adding a Customized OpenSearch XML File to the Server.
-
In the title parameter, enter the name that should display in the Search Engine drop-down list that is opened from the Search bar/Instant Search box.
The title in the HTML/JSP file and the short name in the XML file must be identical.
The dynamic_layout.jsp file is stored in the following directory:
/exlibris/primo/p<v>_<n>/ng/primo/home/system/tomcat/search/webapps/primo_library#libweb/layouts
The header.html files are stored in the following directory:
/exlibris/primo/p<v>_<n>/ng/primo/home/system/tomcat/search/webapps/primo_library#libweb/static_htmls
Because the dynamic_layout.jsp file may be replaced by a service pack or hot fix, a backup of this file should always be kept so that the links can be copied and added to the new dynamic_layout.jsp file.
Adding a Customized OpenSearch XML File to the Server
To identify and describe the search engine, you must create an XML file.
<?xml version="1.0" encoding="UTF-8"?>
<OpenSearchDescription xmlns="http://a9.com/-/spec/opensearch/1.1/">
<ShortName>Primo Find it, Get it!</ShortName>
<Description>Primo Open Search</Description>
<Contact>support@proquest.com</Contact>
<Url type="text/html" method="get" template="<span class=" screenelement="">http://<primo_server/>:<port/>/primo_library/libweb/action/dlSearch.do?institution=PRIMO&onCampus=false&query=any,contains,{{searchTerms}}&indx=1&bulkSize=10&dym=true&highlight=true&lang=eng&group=GUEST&displayField=title&displayField=creator&displayField=title&displayField=contributor"></url>
<Image height="16" width="16">http://www.exlibrisgroup.com/favicon.ico</Image>
<Developer> Me </Developer>
<Attribution>Copyright 2008 - Ex Libris</Attribution>
<Syndicationright>open</Syndicationright>
<AdultContent>false</AdultContent>
<Language>en-us</Language>
<OutputEncoding>UTF-8</OutputEncoding>
<InputEncoding>UTF-8</InputEncoding>
</OpenSearchDescription>
Example OpenSearch XML file
The following elements are either required or most commonly used in the XML file:
-
ShortName – This element contains the name that displays in the Search box. The name must be identical to the title of the <link> element of the HTML or JSP file that enables auto-discovery. For more information, see Adding a Reference Link to the Primo Front End.
-
Description – This element contains the description of the service.
-
Contact – This optional element contains the e-mail address of the person to contact for any queries about the service.
-
URL – This element contains the search link, which is indicated by the highlighted text in the example. The search link uses the Brief Search Deep Linking request (dlSearch.do) to perform a brief search on the specified Primo server and institution. When creating the search link, make sure that you apply the following rules:
-
Use & instead of & to separate parameters in the dlSearch.do request.
-
Replace {{searchTerms}} with your search terms in the dlSearch.do request.
-
-
For more information on the Brief Search Deep Linking request, refer to the following page in the Primo Developer Network:
-
Image – This element contains the 16x16 icon that displays next to the name of the search engine in the Search box. This icon must be smaller than 10 KB and must be stored at a public location, such as the same location as the XML file.
All other elements can be changed as required.
After you have created the file, it must be stored in the location specified in the <link> element of the HTML or JSP file that enables auto-discovery. The location of the XML file must be accessible to the public. For example, if you want to place the file on the Primo server, store the file under the following directory:
/exlibris/primo/p<v>_<n>/ng/primo/home/system/thirdparty/openserver/server/search/deploy/jbossweb-tomcat.sar/ROOT.war

