
Editing Normalization Rules Sets
This page is not applicable to Primo VE customers. For information regarding the configuration of normalization rules for Primo VE, see Configuring Normalization Rules for Display and Local Fields.
The PNX has several sections, and every section has many fields. The NRS screens never display all PNX sections at once, and the rules for the PNX fields are always edited one at a time.
Normalization rules can be edited in two modes: basic and advanced. The advanced mode includes some additional features or rule elements that can be used in the rules. Both modes are explained below.
Normalization rules have three main parts:
-
Source – The source data that is being normalized in the rule. The source can be of several types. The most common is a field from the source record. But the source can also be a constant. In addition, Primo needs to know the format of the source record since different formats require different layout of the input screen. The following source types are valid:
-
MARC – A source record field in MARC format. It is possible to define the tag, indicators, and subfields.
-
MAB – A source record field in MAB format. It is possible to define the tag, indicators, and subfields as well as a range of fields.
-
XML – A source record field from an XML record. It is possible to define the path, attribute, and value.
-
Complex XML – Supports the use of full X-path capabilities. It allows you to create rules for any attribute in the path, not just the last attribute as provided with the XML source type.
-
PNX – A field from the PNX record. It is necessary to define the section/field from the PNX record.
-
Constant – A constant of some kind.
-
Config – A field from a configuration file/table. It is necessary to define the path of the field.
-
-
PNX field (or "target") – The section/field in the PNX record that will be created by the rule. A single PNX field can be created from one or more rules.
-
Conversion – What needs to be done to the source data so it is converted to the target PNX field. The conversion can have several components including conditions and transformation routines.
The Basic Normalization Set Editor Page
As noted above, every PNX field is edited separately. On the top of the screen it is possible to change the normalization set, PNX section and PNX field.
For every PNX field, the page will display one or more rules. All of the rules on an editor page always relate to a single PNX field.
The basic editor page is divided into the following parts:
-
a top part that is relevant to all rules
 Top Part of Normalization Set Editor
 -
a middle part that lists the rules
 Middle Part of Normalization Set Editor
 -
a bottom part that creates new rules
 Bottom Part of Normalization Set Editor
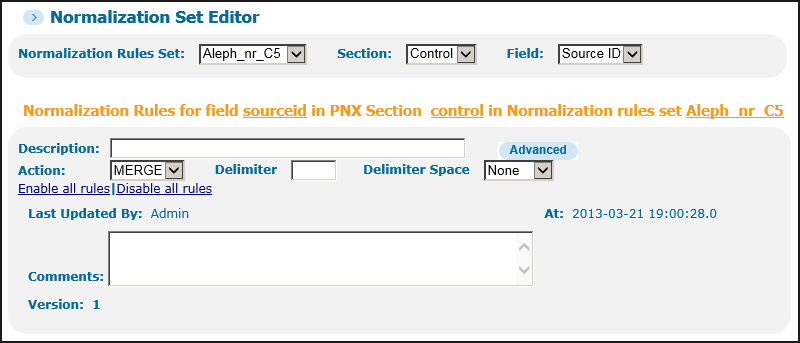
The Top of the Normalization Set Editor Page
The top part includes the following elements:
-
Description – A free text description of the rule.
-
Enable/Disable all rules – enables you to toggle between disabling and enabling all the rules of the PNX field.
-
Advanced – Opens the Advanced Normalization Set Editor page to perform more advanced normalizations. For more information, see The Advanced Normalization Set Editor Page.
-
Action – The basic action to be taken. On the basic edit page, all rules must share the same action. The following are possible:
-
ADD – new PNX fields should be added for every source field.
-
OR – only a single PNX field should be created. Once that field has been created, the system stops checking the remaining rules.
-
MERGE – merge all occurrences of the source fields to a single PNX field.The MERGE action allows you to define a delimiter between multiple source fields. The defined delimiter will always appear before the value. The Delimiter Space field allows you to add a space before and after the delimiter, as follows:
-
None – no blanks are added after or before the delimiter (or the source fields if no delimiter is defined). For example, if the delimiter is a semicolon, the field will look like this:aaa;bbb;ccc
-
Before – adds a blank before the delimiter. For example, if the delimiter is a semicolon, the field will look like this:aaa ;bbb ;ccc
-
After – adds a blank after the delimiter. For example, if the delimiter is a semicolon, the field will look like this:aaa; bbb; ccc
-
Both – adds a blank before and after the delimiter. For example, if the delimiter is a semicolon, the field will look like this:aaa ; bbb ; ccc
-
For example, the following source record has multiple 700 fields (additional authors):700 $$aJohnson, Melvin700 $$aKennelman, Anne700 $$aAdams, MarkDepending on the action specified, the system will create the display/contributor PNX field, as follows:-
If the action is OR, the system will use only the first 700 field:Contributor Johnson, Melvin
-
If the action is ADD, the system will use all 700 fields:Contributor Johnson, MelvinContributor Kennelman, AnneContributor Adams, Mark
-
If the action is MERGE, the system will merge all of the 700 fields:Contributor Johnson, Melvin; Kennelman, Anne; Adams Mark
-
-
Last updated by – The user who created or last updated the rule.
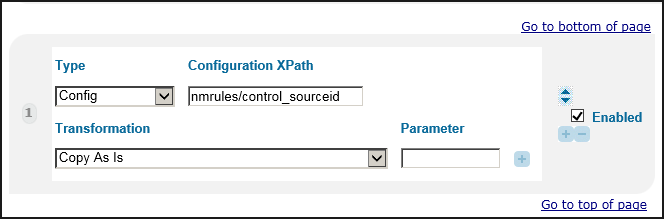
The Middle of the Normalization Set Editor Page
The middle part contains the rules section, which has the following elements:
-
Type – The type of source to normalize. There are several types of sources: MARC, MAB, XML, Complex XML, PNX, Config, and Constant.The remaining source-related fields depend on the value of the Type field.
-
Field – For MARC and MAB only, specify the three-character tag.
-
Ind1 – For MARC and MAB only, specify the first indicator if needed. Leave blank for all indicators. Multiple indicators can be added with a comma. You can also exclude indicators by adding a minus sign before every indicator. For example:1,2-0,-9
-
Ind2 – For MARC and MAB only, specify the second indicator if needed.
-
Subfield – For MARC and MAB only, specify the subfields that you want to exclude or include by selecting Include or Exclude from the drop-down list. Then type the subfields that you want to include/exclude in the box to the right of the drop-down list. You can use a comma to separate multiple subfields and an asterisk to specify all of the subfields. For example:Exclude d,t,u,v,w,x,y,zInclude *The numeric subfields are automatically excluded unless they are specifically included. If a numeric subfield is specifically excluded, the mapping will take other numeric subfieldsIt is also possible to add control fields. For more information on how to do this, see Using MARC/MAB Control fields.
-
Last – For MAB only, allows you to specify the last tag in a range of tags. The Field tag specifies the first tag in the range and the Step field specifies the number of fields to jump in the range.
-
Step – For MAB only, specifies the number of tags to jump in a range. For example, to specify every fourth tag in the range 208 through 296:Field 208 Last 296 Step 4This configuration will use tags: 208, 212, 216, and so forth.
-
Path – For XML only, indicates the path of the XML field. The following example describes how to extract the highlighted field from the XML below:<control>
<label>text: Digitool 3.0 Product Sheet</label>
<note>Guy Ben-Porat CREATOR </note>
<ingest_id>3_mets_digi_doc</ingest_id>
<ingest_name xsi:nil="true" xmlns:xsi="http://www.w3.org/2001/XMLSchema-instance"/>
<entity_type>METS</entity_type>
<usage_type>VIEW</usage_type>
<preservation_level>any</preservation_level>
<partition_a xsi:nil="true" xmlns:xsi="http://www.w3.org/2001/XMLSchema-instance"/>
<partition_b xsi:nil="true" xmlns:xsi="http://www.w3.org/2001/XMLSchema-instance"/>
<partition_c xsi:nil="true" xmlns:xsi="http://www.w3.org/2001/XMLSchema-instance"/>
<status xsi:nil="true" xmlns:xsi="http://www.w3.org/2001/XMLSchema-instance"/>
<creation_date>2005-09-22 10:08:34</creation_date>
<creator>a:a</creator>
<modification_date>2005-09-22 10:08:40</modification_date>
<modified_by>a:a</modified_by>
<admin_unit>DTL02</admin_unit>
</control>The path should be entered as control/entity_type. -
Attribute and Value – For XML only, if the XML field uses attributes, it may be necessary to select a specific field based on an attribute value. This is added to attribute and value. For example, in order to extract the highlighted field:<urls>
<url type="stream">http://il-dtldev02:1801/webclient/DeliveryManager?pid=4288</url>
<url type="descriptive_metadata">http://il-dtldev02:1801/webclient/MetadataManager?pid=42882&descriptive_only=true</url>
<url type="formated_metadata">http://il-dtldev02:1801/webclient/MetadataManager?pid=4288</url>
</urls>The information described in the following table needs to be defined:Attribute and Value Information Source Type Path Attribute Value XMLUrls/urlTypestream -
XPath – Valid only for the following types:
-
Complex XML – Contains the path of the XML attribute. From the following XML record, you can create a rule that uses the AuthorName attribute, which is a <subitem/> element:<item name="PagesEnd">110</item>
<item name="AbstractSupplied">
<subitem name="AbstractText"></subitem>
<subitem name="AbstractLang">English</subitem>
<subitem name="AbstractLangCode">EN</subitem>
<subitem name="AbstractSource">ABSTRACT FROM AUTHOR</subitem>
</item>
<item name="Author">
<subitem name="AuthorName">Vishnuvardhanarao,Elaprolu</subitem>
<subitem name="AuthorAffil">1</subitem>
</item>For this example, you would set Xpath to the following value:XPath='item[@name='Author']/subitem[@name=AuthorName']' -
PNX – A field from the PNX. It is necessary to define the Xpath, which contains the section and field from the PNX. The section and field are separated by a slash. For example, to use the Resource Type field from the Display section, enter display/type.You must use the PNX field code, not the name.
-
-
Configuration XPath – For Config only, a field from a configuration file. Currently, the only configuration file that can be used is the definition of the data source. It is necessary to define the name of the field in the value. The following fields are available:
-
nmrules/control_sourceid
-
nmrules/control_originalsourceid
-
nmrules/control_sourcesystem
-
nmrules/control_sourceformat
-
-
Value – If the source is a Constant, specify the display constant. It is necessary to define the constant in the Value field.
-
Transformation – Routines that enable you to manipulate the data. Every rule must have at least one transformation. The default transformation is Copy as is, which simply transfers the data from the source to the PNX field with no changes. Click the plus icon (+) to add an additional transformation. For a list of transformations, see Transformation Routines.
-
Parameter – In addition to the transformation drop-down list, there is a text box for adding the transformation parameter where relevant.
For every rule, the following functions are possible:
-
Delete (indicated by a minus sign) – click Delete to delete the rule.
-
Copy rule (indicated by a plus sign) – copy the rule to create a new rule based on an existing one.
-
Up and down arrows – use the arrows to change the order of the rules.
-
Enable/Disable – Disable or enable a specific rule by toggling the check mark.
The Bottom of the Normalization Set Editor Page
The bottom part of the editor contains several functions:
-
Create – it is possible to add additional rules (for the same PNX field) by clicking Create.
-
Test rules – it is also possible to test the rules (refer to Testing Normalization Rules for more details).
-
Synchronize with Template – this function lets you update the rules for the current PNX field from the template. This function may be useful in the following cases:
-
The template rules changed and you want to restore the old ones.
-
The template changed in a Service Pack or new version and you want to update your rules so that they are the same as the template.
-
The Advanced Normalization Set Editor Page
The advanced normalization editor has all of the elements of the basic editor with the following additions:
-
Rule groups
-
Conditions
-
Actions
-
Copy Target Function
Rule Groups
The Rule group field defines which rules the system will process together as a group. Before the addition of this field, the system automatically processed all rules for the same target and used the same source for the group. Now it is possible to create a group of rules that have different sources.
The Rule group field defaults to the name of the PNX section and tag for each rule. If you do not rename the rule group, the system will continue to process all rules that share the same source as a group. For example, in the MARC-based templates, the display/creator field has a single rule group for all of the rules called display_creator. Note that the rules use different source fields (MARC tags), which include 880, 100, 110 and 111. The system processes all of the rules with the same source tags, starting with the 880 fields, followed by the 100 fields, the 110 fields, and so forth. This can be a problem if you want to process the source tags together.
Merging Multiple Source Elements Example:
Using the following XML source, this example merges the surname and given-names elements into the display/creator field:
<contrib contrib-type="author">
<name>
</contrib><surname>Alarcon</surname>
<given-names>Graciela S.</given-names>
</name><contrib contrib-type="author">
<name>
</contrib><surname>Westfall</surname>
<given-names>Andrew O.</given-names>
</name><contrib contrib-type="author">
<name>
</contrib><surname>Lim</surname>
<given-names>Sam S.</given-names>
</name>To merge these elements together, you must configure the following rules, using a modified rule group:
Rule #1:
Rule group: display/creator_1
Source Type: XML
Source Path: contrib/name/given-names
Transformation: Copy as is
Action: ADD
Rule #2:
Rule group: display/creator_1
Source Type: XML
Source Path: contrib/name/surname
Transformation: Copy as is
Action: MERGE, no delimiter, space After
These rules generate the following output:
display/creator Graciela S Alcon
display/creator Andrew O.Westfall
display/creator Sam S. Lim
If you had not modified the rule group, these rules would have generated the following output, processing each source separately:
display/creator Graciela S
display/creator Andrew O.
display/creator Sam S. Alcon Westfall Lim
Merging a Source Field with a Single Instance Example:
Using a modified rule group allows you to merge a source field that contains a single instance more than once. For example, if the source record contains the following information, you can add the call number in the 090 subfield a to every 945 field in the enrichment/availability field:
<datafield tag="090" ind1=" " ind2=" ">
<subfield code="a">9ASAS90</subfield>
<subfield code="b">TTTT999999</subfield>
<subfield code="c">CaOTULAS</subfield>
</datafield>....
<datafield tag="945" ind1=" " ind2=" ">
<subfield code="c">c.1</subfield>
<subfield code="l">loc1</subfield>
<subfield code="g">2</subfield>
</datafield><datafield tag="945" ind1=" " ind2=" "/>
<subfield code="c">c.2</subfield>
<subfield code="l">loc2</subfield>
<subfield code="g">2</subfield>
<datafield tag="945" ind1=" " ind2=" ">
<subfield code="c">c.3</subfield>
<subfield code="l">loc3</subfield>
<subfield code="g">2</subfield>
</datafield><datafield tag="945" ind1=" " ind2=" ">
<subfield code="c">c.4</subfield>
<subfield code="l">loc4</subfield>
<subfield code="g">2</subfield>
</datafield>........
To add the call number in 090 subfield a, you must configure the following rules, using a modified rule group:
Rule #1:
Rule group: enrichment_availability_1
Source: MARC 945 subfield l
Transformation: Copy as is
Action: ADD
Rule #2:
Rule group - enrichment_availability_1
Source: MARC 090 subfield a
Transformation: Copy as is
Action: MERGE, no delimiters first, space=After
These rules generate the following output:
enrichment/availability loc1 9ASAS90
enrichment/availability loc2 9ASAS90
enrichment/availability loc3 9ASAS90
enrichment/availability loc4 9ASAS90
Merging a Source Field with Multiple Instances Example:
This example is similar to the previous example, but the following source record contains a second instance of the 090 field:
<datafield tag="090" ind1=" " ind2=" ">
<subfield code="a">9ASAS90</subfield>
<subfield code="b">TTTT999999</subfield>
<subfield code="c">CaOTULAS</subfield>
</datafield>....
<datafield tag="090" ind1=" " ind2=" ">
<subfield code="a">8ASAS80</subfield>
<subfield code="b">TTTT999999</subfield>
<subfield code="c">CaOTULAS</subfield>
</datafield>....
<datafield tag="945" ind1=" " ind2=" ">
<subfield code="c">c.1</subfield>
<subfield code="l">loc1</subfield>
<subfield code="g">2</subfield>
</datafield><datafield tag="945" ind1=" " ind2=" ">
<subfield code="c">c.2</subfield>
<subfield code="l">loc2</subfield>
<subfield code="g">2</subfield>
</datafield><datafield tag="945" ind1=" " ind2=" ">
<subfield code="c">c.3</subfield>
<subfield code="l">loc3</subfield>
<subfield code="g">2</subfield>
</datafield><datafield tag="945" ind1=" " ind2=" ">
<subfield code="c">c.4</subfield>
<subfield code="l">loc4</subfield>
<subfield code="g">2</subfield>
</datafield>........
In the previous example’s rules, the system uses all instances in the order in which they appear in the source record and reuses the last instance if there are not enough to generate the following output:
enrichment/availability loc1 9ASAS90
enrichment/availability loc2 8ASAS80
enrichment/availability loc3 8ASAS80
enrichment/availability loc4 8ASAS80
Conditions
It is possible to define one or more conditions for a rule. The condition must be met for the rule to be activated. A condition has the following elements:
-
Condition logic – a condition can be defined positively (true) or negatively (false). The condition logic is defined per set of conditions and per condition.
-
Condition relation – this flag appears if more than one condition is added. The following values are valid:
-
AND – all conditions must be met. If the logic is true, this means that all conditions must be true; if the logic is false, all conditions must be false.
-
OR – at least one of the conditions must be met. If the logic is true, then any one of the conditions should be true; if the logic is false, then any one of the conditions is false.
-
For every condition, the following is defined:
-
Condition source – the source field on which the condition is based. Any type of source can be defined.
-
General parameter – This parameter is no longer required and should not be used. It is present for historical reasons (some older rules use it).
-
Condition routine and routine parameter – it is possible to use transformation routines or validation routines. For more information, refer to Using Conditions.
-
Success if – indicates when the condition should be considered as met:
-
Match any – the condition must be true in any occurrence of the source field. This is the default condition.
-
Match current – the condition is true in the current source field. For example, if there are three source fields, the condition will be checked in the field being worked on. This is useful f you want the rule to based on another subfield in the same field.
-
Match all – the condition must be true in all occurrences of the source field.
-
Match last – tests only the last occurrence of the source field. If a match is found, the condition passes for all occurrences of the field even if the others do not match the condition.
-
Refer to Using Conditions for instructions on how to work with conditions.
Action
In the advanced editor, it is possible to assign a different action for every rule:
-
OR – if the rule is flagged with the action OR and the PNX field has already been created, then the rule will not create another PNX field.
-
ADD – if the rule is flagged with the action ADD, a new PNX field will be created even if the field already exists.
-
MERGE – if a rule is flagged with the action MERGE, the PNX field that it creates will be merged with the PNX field that was created before it.
If the action is MERGE, it is necessary to define a delimiter. In the advanced editor screen, it is possible to define a "first" delimiter and an "additional" delimiter as well as a "repeat number" for the first delimiter, which defines the number of times that the first delimiter can be used. This enables you to have two different delimiters for multiple occurrences of the field.
There is a special kind of "first delimiter" called "new." Not a proper delimiter, it tells the system to start a new field even though the action is a merge. This can be useful in case of a PNX field that is created from many different source fields and one of the fields should start a new PNX field but all of its occurrences should merge. For example, in MAB the publisher is created from several fields including 418. The 418 should create a new publisher field but all its occurrences should merge.
| Source | Action | First Delimiter | Space | Repeat Number |
|---|---|---|---|---|
|
418
|
MERGE
|
New
|
None
|
1
|
Copy Target Function
The Copy this Target to another Mapping Set function allows staff users to copy all rules for a single PNX field from the active normalization rules set to another normalization rules set.
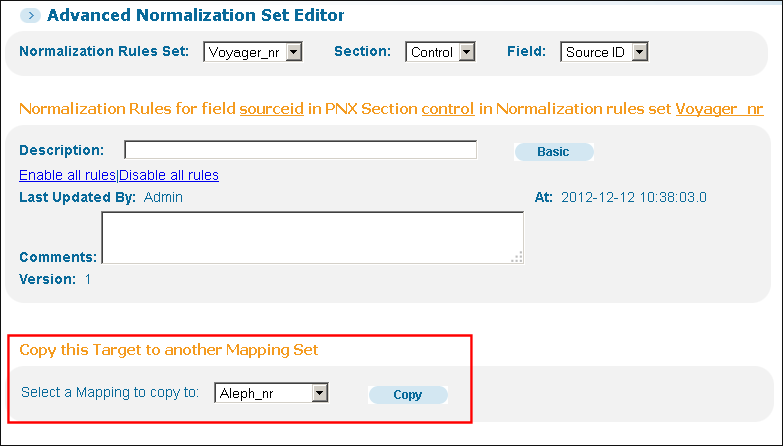
Copy Target Function
When the staff user confirms the copy, the entire set of rules for the active PNX field (“target”) will be overridden. There is no option to cancel the operation once it has started.
This option is available to all users who have the following roles: Admin, Data Administrator, Pipe Operator, Normalization Rules Editor, and Staff User.
This option is available only in the Advanced Normalization Rules Editor.