
How to Edit the Normalization Rules
In order to use MARC/MAB control fields, set the Source field to the MARC control field, select the Take substring transformation, and then set the Parameter field to the position, which contains the following parts separated by two ampersands: the starting position within the control field and the number of characters to use from the control field.
For example, in order to extract the language from the MARC21 008/35 position, create a rule as follows:
| Source | Transformation | Parameter |
|---|---|---|
|
008
|
Take substring
|
35@@3
|
Using Delimiters
If you select the MERGE action type, it is necessary to define delimiters between the merged parts. It is important to keep in mind that the defined delimiter displays before the field being defined unless it is the first data element in the PNX field. For example the delimiter for multiple source subject fields to a single subject fields in the display section is a semicolon - a semicolon will not display before the first subject in the PNX subject field. Also, keep in mind that spaces should be defined using the space parameter.
The following example is from MAB in which three fields should be combined to the PNX title field in the display: 331 / 333 : 335
Since the delimiter appears in front of the field, the delimiter "/" should be defined for the 333 field and the delimiter ":" should be defined for the 335 field. For both fields the space parameter should be "both"—a space should display before and after the parameter. For the first field (331), there is no need to define a parameter or a space.
| Source | Delimiter | Space |
|---|---|---|
|
331
|
none
|
|
|
333
|
/
|
both
|
|
335
|
:
|
both
|
Delimiters between Subfields from the Same Field
If you want to add a delimiter between several subfields from the same field, there are two options:
-
You can use the transformation "Define subfield delimiter" to define the delimiter. The delimiter between all the subfields will be the same.
-
Define a separate rule for every subfield.
Using the Action Parameter
In its simplest form, the action parameter determines if multiple occurrences of source fields should create one or more PNX fields.
For example, in the MARC mapping, the title field in the display can be created from two different source fields, 130 or 245. The action selected in this case is an OR: only one title field should be created.
On the other hand, in the search section, multiple title fields can be created (in the MARC mapping from 130, 210, 245, and so forth). In this case, the action is an ADD—that is, for every source field, a new PNX title field is created.
In some cases, you want to merge multiple source fields into a single PNX field. For example, all source fields for the PNX subject field in the display are mapped to a single field. The action in this case is a MERGE, and a delimiter between the multiple occurrences should be selected.
There can be more complex scenarios in which, for a single PNX field, it is necessary to use more than one action. In this case, it is necessary to use the advanced editor.
Example 1 - MARC mapping - FRBR K1
This rule creates the title key for the FRBR vector. The key is supposed to be created from the 100 OR 110 OR 111 field, but if none of these exists, then the 700, 710, and 711 fields should be used, and, in this case, a key created for all occurrences. Therefore, you need to combine the OR and the ADD actions. In order to ensure that the key is created only when 100, 110, or 111 does not exist, a condition also needs to be used.
The basic rule looks like this:
| Source | Condition | Transformation | Action |
|---|---|---|---|
|
100 abcdq
|
Several transformations are used to normalize the field.
|
OR
|
|
|
110 abcdq
|
Several transformations are used to normalize the field.
|
OR
|
|
|
111 abcdq
|
Several transformations are used to normalize the field.
|
OR
|
|
|
700 abcdq
|
If 100, 110, and 111 do not exist.
Three conditions were created using the "input does not exist" validation routine.
|
Several transformations are used to normalize the field.
|
ADD
|
|
710 abcdq
|
If 100, 110, and 111 do not exist.
Three conditions were created using the "input does not exist" validation routine.
|
Several transformations are used to normalize the field.
|
ADD
|
|
711 abcdq
|
If 100, 110, and 111 do not exist.
Three conditions were created using the "input does not exist" validation routine.
|
Several transformations are used to normalize the field.
|
ADD
|
Example 2 - MARC mapping - FRBR K3 (title key part)
For FRBR, create title key parts from 240 and 245 unless the format is a serial, in which case a title key part is created from either 240 or 245. If no key parts have been created, then try to create key parts from 242, 246, 247, and 740. Various transformations are possible with this mapping. The rules for this field include many actions:
| Source | Action |
|---|---|
|
240
|
ADD
|
|
245—if FMT not SE
|
ADD
|
|
245—if FMT SE
|
OR
|
|
242
|
OR
|
|
246
|
OR
|
|
247
|
OR
|
|
740
|
OR
|
Using Transformations
Transformations are used to modify the source field in some way. The default transformation is "copy as is," which does not make any change to the source data. Most rules only use a single transformation, but it also possible to combine transformations. When combining transformations, each transformation works consecutively, working with the input that was already modified by the transformations before it.
Example: Title key for FRBR Vector
Input: 24512 $aThe lost generation $b:English youth and W.W.I
Subfields are always dropped. Multiple spaces are always packed.
| Transformation | Parameter | Input | Explanation |
|---|---|---|---|
|
Drop non-filing text
|
@@ind2@@
|
The lost generation: English youth and W.W.I
|
Drops non-filing text.
|
|
Delete characters
|
| [ ]
|
'The lost generation: English youth and W.W.I
|
Deletes specified characters.
|
|
Replace characters
|
$~'^%*/\?@.:;<>{}}-()"!¿¡ @@^
|
The lost generation English youth and W W I
|
Changes specified characters to blank.
|
|
Character conversion
|
The lost generation English youth and W W I
|
Character conversion.
|
|
|
Lower case
|
the lost generation english youth and w w i
|
Changes to lower case.
|
|
|
Add to beginning of string
|
$$K
|
$$K the lost generation english youth and w w i
|
Adds the $$K subfield before the value of the key.
|
|
Add to end of string
|
$$AT
|
$$K the lost generation english youth and w w i$$AT
|
Adds the $$A subfield with the key type (T=title).
|
Using Conditions
Conditions can be used to ensure that a rule is carried out only under a certain condition. A condition is in fact a rule within a rule and has its own source and transformation(s). Unlike rules, conditions always have a validation routine.
Conditions can be true or false. As noted above, the condition logic is defined once for the entire set of conditions used in a rule and once per rule.
The following table explains how to use the multiple condition logic:
| Conditions logic | Conditions relation | Condition1 logic | Condition2 logic | Result |
|---|---|---|---|---|
|
true
|
Or
|
True
|
true
|
At least one condition is true.
|
|
true
|
And
|
True
|
true
|
Both conditions must be true.
|
|
true
|
Or
|
True
|
false
|
The first condition is true or the second condition is false.
|
|
true
|
And
|
True
|
false
|
The first condition is true and the second condition is false.
|
|
true
|
Or
|
False
|
false
|
At least one condition must be false.
|
|
true
|
And
|
False
|
false
|
Both conditions must be false.
|
|
false
|
Or
|
True
|
true
|
Both conditions must be false.
|
|
false
|
And
|
True
|
true
|
Both conditions must be false.
|
|
false
|
Or
|
True
|
false
|
The first condition must be false and the second condition must be true.
|
|
false
|
And
|
True
|
false
|
The first condition must be false or the second condition must be true.
|
|
false
|
Or
|
False
|
false
|
Both conditions must be true.
|
|
false
|
And
|
False
|
false
|
At least one condition must be true.
|
Checking if a field exists
A common use of conditions is to check if a certain field is present in the source record. This can be done using the "input exist" validation routine (remember to define subfields with this routine—use *).
For example, the FRBR vector author key part should be created from the 700, 710, and 711 fields only if there are no 100, 110, or 111 fields. The rule for the 700, 710, and 711 source fields is that each has three conditions. The condition logic for the entire set of conditions is true and the logic of the individual conditions is false. The relation is AND because all three must be true. If any of the 100, 110, or 111 fields exist, author keys should not be created from the 7XX fields.
The following table describes the parameters for the individual conditions:
| Condition's Logic | Condition's Relation |
|---|---|
|
False
|
AND
|
The following table describes the conditions:
| Source | Success if | Validation Transformation |
|---|---|---|
|
100 *
|
Match last
|
Input exists
|
|
110 *
|
Match last
|
Input exists
|
|
111 *
|
Match last
|
Input exists
|
The “Success If” Parameter
The Success If parameter is important if there can be multiple occurrences of the source field upon which the condition is based. If there is only a single occurrence, Ex Libris recommends that you use the match last parameter since it is the fastest.
It is important to use the match current parameter if the condition must be true in the current source field. For example, in the additional data section of the generic MARC21 rules there is a field - OCLC ID. The OCLC ID is stored in the 035 tag which can be used for other IDs - only the 035 with the prefix 'OcoLC' contains and OCLC ID. In this case, it is important to use the match current parameter so that the OcoLC prefix is checked for in the source field that is being normalized, not in any 035 field.
The source for the rule is 035 subfield a and the condition is defined as follows:
| Source | Success if | Validation Transformation | Parameter |
|---|---|---|---|
|
035 a
|
Match current
|
Check if string exists.
|
OCoLC
|
For example, if there is a record with two 035 fields, (NDL)ABL9111 and (OcoLC)83B52753, an OCLC ID is created depending on the match parameter that is being used. If match any or match last is used, an OCLC ID will be created from both of the 035 fields. If match current is used, an OCLC ID is created only from the last 035.
Using Mapping Tables
Mapping tables are useful when it is necessary to translate multiple values from the source record to multiple values in Primo. For example, the Primo institution and library can normally be mapped from a single or several data elements in the source.
The Use mapping table routine performs transformations using a mapping table. In this mapping table, you define the following:
-
Source code: the code or text from which to convert
-
Target code: the code to which the source code is being converted. In the mapping tables, you do not define the location of the source data since this is done in the normalization rules.
If you create a new mapping table or update an existing table, you must deploy the normalization set that uses the table in order for the table to be used when the pipe is run.
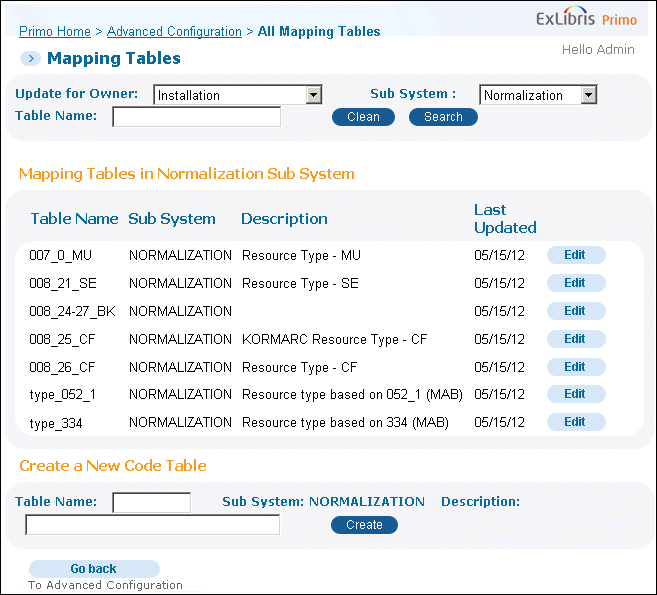
How to Create a Mapping Table
You can create and edit the mapping tables from the Ongoing Configuration Wizards - Pipe Configuration Wizard page. The mapping tables are divided into subsystems, one of which is is called Normalization.
To edit an existing mapping table, click Edit.
The Normalization Mapping Tables
To create a new mapping table:
-
In the Table Name field, enter the name parameter, which is used in the Use mapping table routine in the rules.
-
In the Description field, enter a description for the mapping table.
-
Click Create to add the new mapping table to the list.
-
In the Mapping Tables list, click Edit next to the new mapping table to display the new mapping table's parameters.
-
Enter values for the sourceCode1, targetCode, and Description fields.
-
If you want to add additional mapping rows, enter values for the Source Code, Target Code, and Description fields in the Create New Mapping Row section, and then click Create.
-
Click Save to save the changes to the new mapping table. Otherwise, click Cancel to discard your changes.For example, the following Genre mapping table maps the resource type from the display section of the PNX to the genre that is required by the OpenURL.
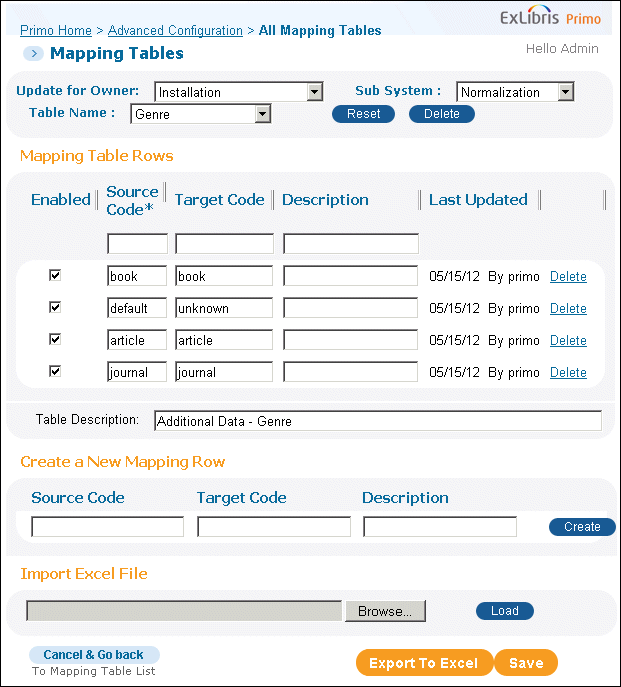 The Genre Mapping TableThis mapping table is used for the rule that creates the Genre field in the additional data section. The source for the mapping table is defined in the rule shown in the following figure.
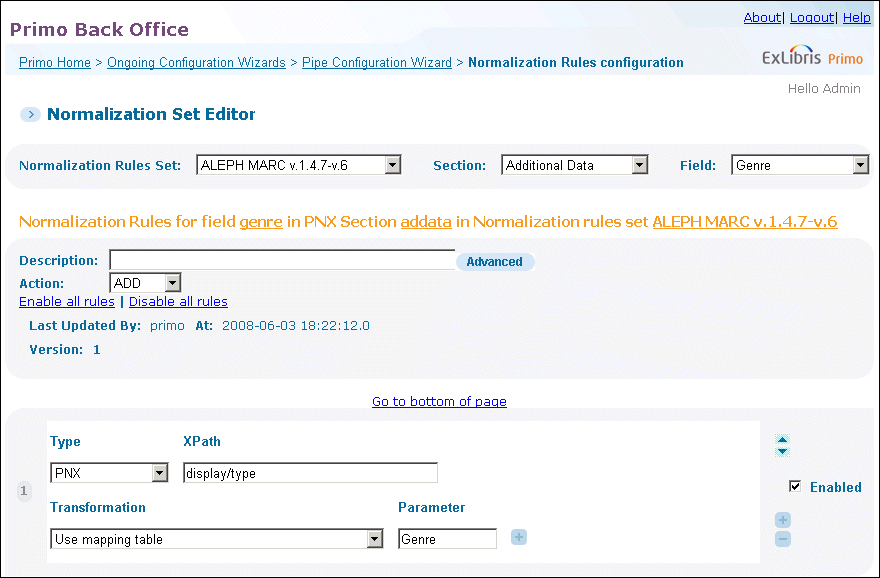 The Genre Field
Creating Multiple Values in Mapping Tables
It is possible to create multiple values for a single source value in the mapping tables by adding several values separated by a delimiter. An example of this is in the format_mean mapping table, which is used to map the resource type from the Display section of the PNX to the resource type in the Facets section.
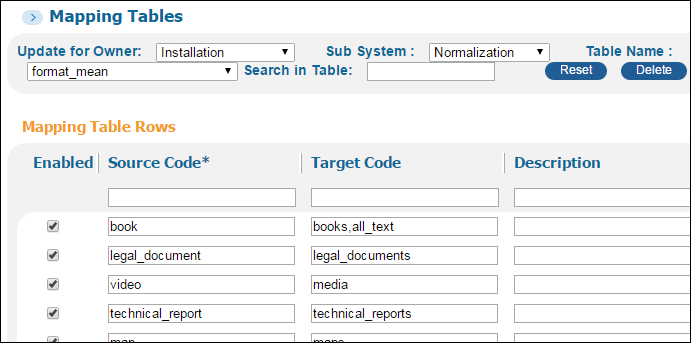
The Format_Mean Mapping Table
For example, if the code is book, it should be translated to books and to all text. The delimiter in this example is a comma. In order to ensure that every value appears in a field of its own, define the Split Field routine. The Split Field routine is specified after the Use mapping table routine, which splits the field by the delimiter.
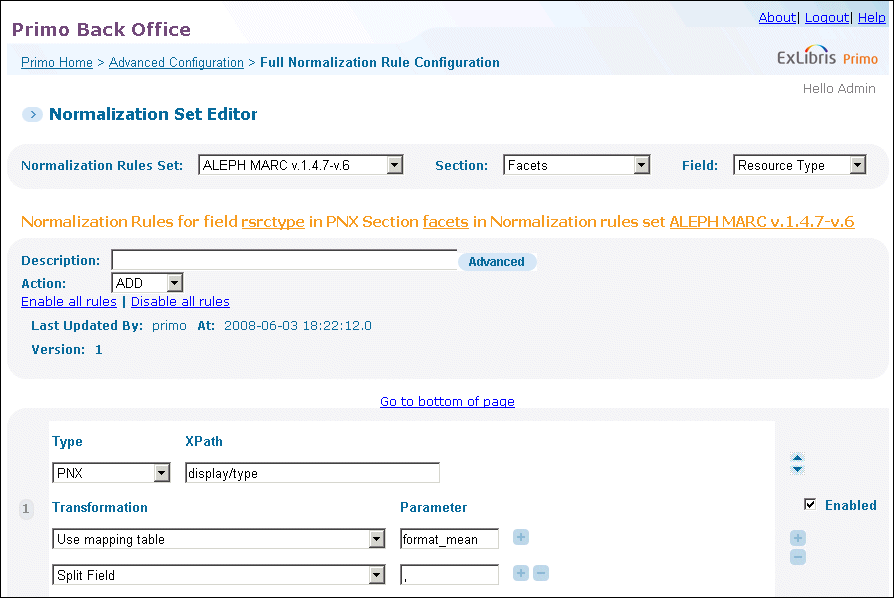
The Split Field Routine
Using Subfields in PNX Fields
In some cases, several values need to be linked together, for example, all of the data elements of the library_availability field (including institution, library, call number, and availability status). This is done by adding all of the data elements into the same PNX field and delimiting the elements with subfields. These are not true subfields as in a MARC record, but rather a special character to denote different data elements. Subfields are also used to add display constants or a display text that should replace the value itself (such as links that display in the Full record).
There are two types of subfield delimiters:
-
Uppercase Alphabetic. The character denotes the content and is persistent across PNX fields:
-
A: Algorithm that is used for FRBR key type.
-
C: Displays the translation of the constant that follows this subfield parameter. The constant is translated via the Display Constants code table of the Front End subsystem.
-
D: For links that display in the full record, display the text that follows this subfield parameter instead of the proceeding URL or template code. For example:<linktouc>$$Tworldcat_isbn$$DThis item in WorldCat®</linktouc>The system displays the text as entered and it cannot be translated via code tables. For language translations, use the E subfield delimiter.
-
E: for links that display in the full record, display the translation of the constant that follows this subfield parameter instead of the proceeding URL or Template code. The constant is translated via the Full Display Labels code table of the Front End subsystem. For example:<linktouc>$$Tworldcat_isbn$$Eworldcat</linktouc>
-
I: Institution code – For information on suppressing local display fields based on institution, refer to Display of Local Fields in the Primo Back Office Guide.
-
K: Key for FRBR
-
L: Library code
-
O: Origin of the field (this is the source_id that is used in deduped records)
-
S: Status
-
T: specifies the template to use from the Templates mapping table. For example:<linktouc>$$Tworldcat_isbn$$Eworldcat</linktouc>
-
U: URL
-
V: Value of field (used to distinguish between the field and the display text/constant)
-
-
Numeric. Indicates the order of the data elements.
The subfield's character or number should always be prefixed by two dollar signs ($$).
The subfields can be added using the "Add to the beginning of string" or "Add to end of string" transformation where the parameter is the subfield. Subfields can also be added as delimiters.
The following table describes the rule that is used to create the availlibrary field (up to subfield S) in the display section, where the source is the ALEPH AVA field:
| Source | Transformation | Parameter | Action |
|---|---|---|---|
|
AVA a
(ADM) |
Use mapping table
Add to beginning of string
|
ILS Institution Codes
$$I
|
MERGE—no delimiters or spaces
|
|
AVA b
(Sublibrary) |
Use mapping table
Add to beginning of string
|
ILS Library Codes
$$L
|
MERGE—no delimiters or spaces
|
|
AVA c
(Collection) |
Add to beginning of string
|
$$1
|
MERGE—no delimiters or spaces
|
|
AVA d
(Call number) |
Add to beginning of string
|
$$2
|
MERGE—no delimiters or spaces
|
|
AVA e
(Availability status) |
Add to beginning of string
|
$$S
|
MERGE—no delimiters or spaces
|
Adding Display Constants/Text
Use $$C to add a display constant and $$D to add text that should replace the actual value (used for example, for links).
Display constants can be added to the following fields in the Display section:
-
Relation
-
Identifier
-
Description
The constant can be a code (lower case with no spaces or special characters) or text. The code is translated to a name for display in the Front End using the Display Constants code table. If the text added has no translation in the code table, then it will display as entered in the rules.
Subfield D can be used in the Links section.
If there are multiple occurrences and you do not want the display constant to appear before every occurrence, add the display constant in a separate rule. If the field before which the display constant is supposed to display is not mandatory (for example, it may not appear), add a condition that causes the display constant to be created only if the field exists.
For example, to create the constant Series before all occurrences of the MARC source fields (440, 490, and 840), that should be added to a single "relation" field in the display section, create the following rules:
| Source | Condition | Transformation | Action |
|---|---|---|---|
|
Constant - Series:
|
see below
|
Copy as is
|
Add
|
This rule will be carried out only if the condition is met. The condition verifies that at least one of the source series fields exist:
| Condition's Logic | Condition's Relation |
|---|---|
|
True
|
OR
|
The following table describes the conditions:
| Source | Validation | Success if |
|---|---|---|
|
440 *
|
Input exists
|
Match any
|
|
490 *
|
Input exists
|
Match any
|
|
840 *
|
Input exists
|
Match any
|
Following the rule to create the display constant, enter the rules to create the series value:
| Source | Transformation | Action | Delimiter | Space |
|---|---|---|---|---|
|
440 -x
|
Copy as is
|
MERGE
|
;
|
After
|
|
490 -x
|
Copy as is
|
MERGE
|
;
|
After
|
|
840 -x
|
Copy as is
|
MERGE
|
;
|
After
|
Using the Write Constant Transformation Routine
Constants can also be added by using the write constant transformation routine. This routine is useful if you want the constant to be created for every occurrence of the field and/or only if the field exists.
Example 1:
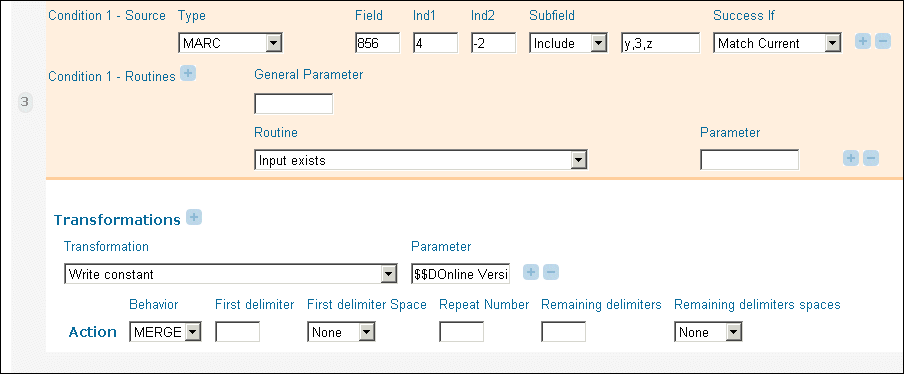
In the Links section of the MARC normalization rules, a "Link to Resource" field is created for 8564-, 85640, and 85641 fields. In order to have a display text instead of the URL, subfields y, z, and 3 are used. In case, these subfields are not present, a display constant "Online Version" is added. This text should display for every occurrence of the 8564 field. To ensure this, the "write constant" routine is used:
Ensuring Write Constant Routine
Example 2:
In the Links section, either the amazon_toc template or the syndetics_toc template should be added if the record has an ISBN (which is checked by using the additional data ISBN field).
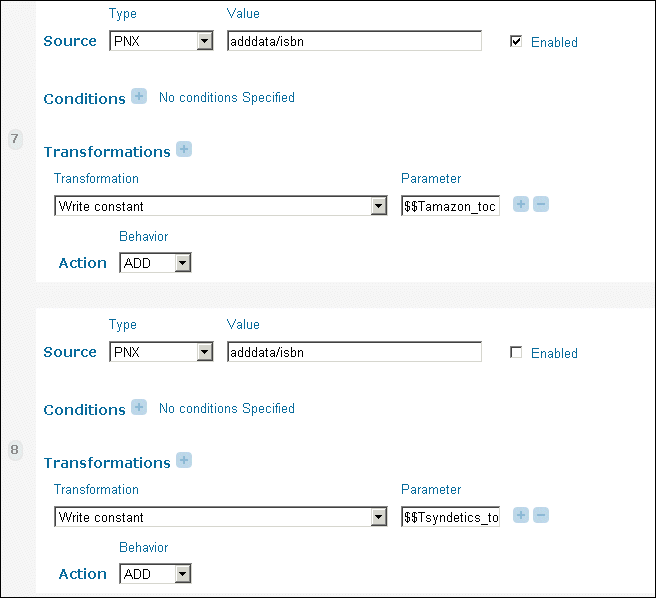
Links Section Parameter Additions
Inserting HTML Tags into PNX Records
Primo allows you to insert HTML tags into PNX records via the normalization rules so that you can apply HTML styles and formatting to search results. The system supports the following HTML tags:
|
span
|
table
|
tbody
|
th
|
|
tr
|
td
|
a
|
s
|
|
b
|
br
|
i
|
u
|
|
p
|
img
|
!--
|
style
|
In addition, you can include a space by entering a caret symbol (^) in the expression.
In the following example, the system adds a bold ISBN label followed by a space before the ID in the PNX records:
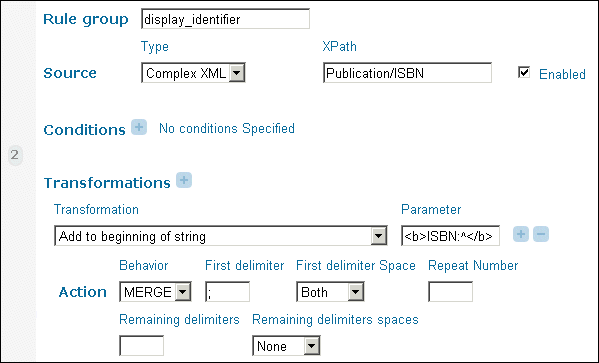
Inserting HTML into PNX Records
Primo does not allow you to combine the use of HTML tags and constants ($$C). For example, $$CISBN^$$V is not permitted.